Building Secure Smart Contracts
![]()
![]()
Brought to you by Trail of Bits, this repository offers guidelines and best practices for developing secure smart contracts. Contributions are welcome, you can contribute by following our contributing guidelines.
Table of Contents:
- Development Guidelines
- Code Maturity: Criteria for developers and security engineers to use when evaluating a codebase’s maturity
- High-Level Best Practices: Best practices for all smart contracts
- Incident Response Recommendations: Guidelines for creating an incident response plan
- Secure Development Workflow: A high-level process to follow during code development
- Token Integration Checklist: What to check when interacting with arbitrary tokens
- Learn EVM: Technical knowledge about the EVM
- EVM Opcodes: Information on all EVM opcodes
- Transaction Tracing: Helper scripts and guidance for generating and navigating transaction traces
- Arithmetic Checks: A guide to performing arithmetic checks in the EVM
- Yellow Paper Guidance: Symbol reference for easier reading of the Ethereum yellow paper
- Forks <> EIPs: Summaries of the EIPs included in each Ethereum fork
- Forks <> CIPs: Summaries of the CIPs and EIPs included in each Celo fork (EVM-compatible chain)
- Upgrades <> TIPs: Summaries of the TIPs included in each TRON upgrade (EVM-compatible chain)
- Forks <> BEPs: Summaries of the BEPs included in each BSC fork (EVM-compatible chain)
- Not So Smart Contracts: Examples of common smart contract issues, complete with descriptions, examples, and recommendations
- Program Analysis: Using automated tools to secure contracts
- Echidna: A fuzzer that checks your contract's properties
- Medusa: A next-gen fuzzer that checks your contract's properties
- Slither: A static analyzer with both CLI and scriptable interfaces
- Manticore: A symbolic execution engine that proves the correctness of properties
- For each tool, this training material provides:
- A theoretical introduction, an API walkthrough, and a set of exercises
- Exercises that take approximately two hours to gain practical understanding
- Resources: Assorted online resources
- Trail of Bits Blog Posts: A list of blockchain-related blog posts created by Trail of Bits
License
secure-contracts and building-secure-contracts are licensed and distributed under the AGPLv3 license. Contact us if you're looking for an exception to the terms.
List of Best Practices for Smart Contract Development
- Code Maturity: Criteria for developers and security engineers to use when evaluating a codebase's maturity
- High-Level Best Practices: Essential high-level best practices for all smart contracts
- Token Integration Checklist: Important aspects to consider when interacting with various tokens
- Incident Response Recommendations: Guidelines on establishing an effective incident response plan
- Secure Development Workflow: A recommended high-level process to adhere to while writing code
- Preparing for a Security Review: A checklist of things to consider when preparing for a security review
- The Rekt Test: A 12-question security assessment framework to evaluate your security posture
Blockchain Maturity Evaluation
- Document version: 0.1.0
This document provides criteria for developers and security engineers to use when evaluating a codebase’s maturity. Deficiencies identified during this evaluation often stem from root causes within the software development life cycle that should be addressed through standardization or training and awareness programs. This document aims to push the industry towards higher quality requirements and to reduce risks associated with immature practices, such as the introduction of bugs, a broken development cycle, and technical debt.
The document can be used as a self-evaluation protocol for developers, or as an evaluation guideline for security engineers.
As technologies and tooling improve, standards and best practices evolve, and this document will be updated to reflect such progress. We invite the community to open issues to provide insights and feedback and to regularly revisit this document for new versions.
Rating system
This Codebase Maturity Evaluation uses five ratings:
- Missing: Not present / not implemented
- Weak: Several and/or significant areas of improvement have been identified.
- Moderate: The codebase follows adequate procedure, but it can be improved.
- Satisfactory: The codebase is above average, but it can be improved.
- Strong: Only small potential areas of improvement have been identified.
How are ratings determined? While the process for assigning ratings can vary due to a number of variables unique to each codebase (e.g., use cases, size and complexity of the codebase, specific goals of the audit, timeline), a general approach for determining ratings is as follows:
- If “Weak” criteria apply, “Weak” is applied.
- If none of the “Weak” criteria apply, and some “Moderate” criteria apply, “Moderate” can be applied.
- If all “Moderate” criteria apply, and some “Satisfactory” criteria apply, “Satisfactory” can be applied.
- If all “Satisfactory” criteria apply, and there is evidence of exceptional practices or security controls in place, “Strong” can be applied.
Arithmetic
Weak
A weak arithmetic maturity reflects the lack of a systematic approach toward ensuring the correctness of the operations and reducing the risks of arithmetic-related flaws such as overflow, rounding, precision loss, and trapping. Specific criteria include, but are not limited to, the following:
- No explicit overflow protection (e.g., Solidity 0.8 or SafeMath) is used, and no justification for the lack of protection exists.
- Intentional usage of unchecked arithmetic is not sufficiently documented.
- There is no specification of the arithmetic formulas, or the specification does not match the code.
- No explicit testing strategy has been identified to increase confidence in the system’s arithmetic.
- The testing does not cover critical—or several—arithmetic edge cases.
Moderate
This rating indicates that the codebase follows best practices, but lacks a systematic approach toward ensuring the correctness of the arithmetic operations. The code is well structured to facilitate the testing of operations, and multiple testing techniques are used. Specific criteria include, but are not limited to, the following:
- None of the weak criteria apply to the codebase.
- Unchecked arithmetics are minimal and justified, and extra documentation has been provided.
- All overflow and underflow risks are documented and tested.
- Explicit rounding up or down is used for all operations that lead to precision loss.
- All rounding risks are documented and described in the specification.
- An automated testing technique is used for arithmetic-related code (e.g., fuzzing, formal methods).
- Arithmetic operations are structured through stateless functions to facilitate their testing.
- System parameters are bounded, the ranges are explained, and their impacts are propagated through the documentation/specification.
Satisfactory
Arithmetic-related risks are clearly identified and understood. A theoretical analysis ensures that the code is consistent with the specification. Specific criteria include, but are not limited to, the following: The system meets all moderate criteria.
- Precision loss is analyzed against a ground-truth (e.g, using an infinite-precision arithmetic library), and the loss is bounded and documented.
- All trapping operations (overflow protection, divide by zero, etc.) and their impacts are identified and documented.
- The arithmetic specification is a one-to-one match with the codebase. Each formula relevant to the white paper/specification has a respective function that is easily identifiable.
- The automated testing technique(s) cover all significant arithmetic operations and are run periodically, or ideally in the CI.
Auditing
“Auditing” refers to the proper use of events and monitoring procedures within the system.
Weak
The system has no strategy towards emitting or using events. Specific criteria include, but are not limited to, the following:
- Events are missing for critical components updates.
- There are no clear or consistent guidelines for event-emitting functions.
- The same events are reused for different purposes.
Moderate
The system is built to be monitored. An off-chain infrastructure for detecting unexpected behavior is in place, and the team can be notified about events. Clear documentation highlights how the events should be used by third parties. Specific criteria include, but are not limited to, the following:
- None of the weak criteria apply to the codebase.
- Events are emitted for all critical functions.
- There is an off-chain monitoring system that logs events, and a monitoring plan has been implemented.
- The monitoring documentation describes the purpose of events, how events should be used, and their assumptions.
- The monitoring documentation describes how to review logs in order to audit a failure.
- An incident response plan describes how the protocol’s actors must react in case of failure.
Satisfactory
The system is well monitored, and processes are in place to react in case of defect or failure. Specific criteria include, but are not limited to, the following: The system meets all moderate criteria.
- The off-chain monitoring system triggers notifications and/or alarms if unexpected behavior or events occur.
- Well-defined roles and responsibilities are defined for cases where unexpected behavior or vulnerabilities are detected.
- The incident response plan is regularly tested through a cybersecurity incident response exercise.
Authentication / access controls
“Authentication / access controls” refers to the use of robust access controls to handle identification and authorization and to ensure safe interactions with the system.
Weak
The expected access controls are unclear or inconsistent; one address may be in control of the entire system, and there is no indication of additional safeguards for this account. Specific criteria include, but are not limited to, the following: No access controls are in place for privileged functions, or some privileged functions lack access controls.
- There are no differentiated privileged actors or roles.
- All privileged functions are callable by one address, and there is no indication that this address will have further access controls (e.g., multisig).
Moderate
The system adheres to best practices, the major actors are documented and tested, and risks are limited through a clear separation of privileges. Specific criteria include, but are not limited to, the following: None of the weak criteria apply to the codebase.
- All privileged functions have some form of access control.
- The principle of least privilege is followed for all components.
- There are different roles in the system, and privileges for different roles do not overlap.
- There is clear documentation about the actors and their respective privileges in the system.
- Tests cover every actor-specific privilege.
- Roles can be revoked (if applicable).
- Two-step processes are used for privileged operations performed by Externally Owned Accounts (EOA).
Satisfactory
All actors and roles are clearly documented, including their expected privileges, and the implementation is consistent with all expected behavior and thoroughly tested. All known risks are highlighted and visible to users. Specific criteria include, but are not limited to, the following:
- The system meets all moderate criteria.
- All actors and roles are well documented.
- Actors with privileges are not EOAs.
- Leakage or loss of keys from one signer or actor does not compromise the system or affect other roles.
- Privileged functions are tested against known attack vectors.
Complexity management
“Complexity management” refers to the separation of logic into functions with a clear purpose. The presence of clear structures designed to manage system complexity, including the separation of system logic into clearly defined functions, is the central focus when evaluating the system with respect to this category.
Weak
The code has unnecessary complexity (e.g., failure to adhere to well-established software development practices) that hinders automated and/or manual review. Specific criteria include, but are not limited to, the following:
- Functions overuse nested operations (if/then/else, ternary operators, etc.).
- Functions have unclear scope, or their scope include too many components.
- Functions have unnecessary redundant code/code duplication.
- Contracts have a complex inheritance tree.
Moderate
The most complex parts of the codebase are well identified, and their complexity is reduced as much as possible. Specific criteria include, but are not limited to, the following: None of the weak criteria apply to the codebase.
- Functions have a high cyclomatic complexity (≥11).
- Critical functions are well scoped, making them easy to understand and test.
- Redundant code in the system is limited and justified.
- Inputs and their expected values are clear, and validation is performed where necessary.
- A clear and documented naming convention is in place for functions, variables, and other identifiers, and the codebase clearly adheres to the convention.
- Types are not used to enforce correctness.
Satisfactory
The code has little or no unnecessary complexity, any necessary complexity is well documented, and all code is easy to test. Specific criteria include, but are not limited to, the following:
- The system meets all moderate criteria.
- Each function has a specific and clear purpose and is clearly documented.
- Core functions are straightforward to test via unit tests or automated testing.
- There is no redundant behavior.
Decentralization
“Decentralization” refers to the presence of a decentralized governance structure for mitigating insider threats and managing risks posed by privileged actors. Decentralization is not required to have a mature smart contract codebase, and a project that does not claim to be decentralized might not fit within this category. However, if a single point of failure exists, it must be clearly identified and proper protections must be put in place.
A note on upgradeability: Upgradeability is often an important feature to consider when reviewing the decentralization of a system. While upgradeability is not, at a fundamental or theoretical level, incompatible with decentralization, it is, in practice, an obstacle in realizing robust system decentralization. Upgradeable systems that aim to be decentralized have additional requirements to demonstrate that their upgradeable components do not impact their decentralization.
Weak
The system has several points of centrality that may not be clearly visible to the users. Specific criteria include, but are not limited to, the following:
- Critical functionalities are upgradable by a single entity (e.g., EOA, multisig, DAO), and an arbitrary user cannot opt out from the upgrade or exit the system before the upgrade is triggered.
- A single entity is in direct control of user funds.
- All decision making is controlled by a single entity.
- System parameters can be changed at any time by a single entity.
- Permission/authorization by a centralized actor is required to use the contracts.
Moderate
Centralization risks are identified, justified and documented, and users might choose to not follow an upgrade. Specific criteria include, but are not limited to, the following:
- None of the weak criteria apply to the codebase.
- Risks related to trusted parties (if any) are clearly documented.
- Users have a documented path to opt out of upgrades or exit the system, or upgradeability is present only for non-critical features.
- Privileged actors are not able to unilaterally move funds out of, or trap funds in, the protocol.
- All privileges are documented.
Satisfactory
The system provides clear justification to demonstrate its path toward decentralization. Specific criteria include, but are not limited to the following:
- The system meets all moderate criteria.
- The system does not rely on on-chain voting for critical updates, or it is demonstrated that the on-chain voting does not have centralization risks. On-chain voting systems tend to have hidden centralized points and require careful consideration.
- Deployment risks are documented.
- Risks related to external contract interactions are documented.
- The critical configuration parameters are immutable once deployed, or the users have a documented path to opt out of the changes or exit the system if they are updated.
Documentation
“Documentation” refers to the presence of comprehensive and readable codebase documentation, including inline code comments, the roles and responsibilities of system entities, system invariants, use cases, expected system behavior, and data flow diagrams.
Weak
Minimal documentation is present, or documentation is clearly incomplete or outdated. Specific criteria include, but are not limited to, the following:
- There is only a high-level description of the system.
- Code comments do not match the documentation.
- Documentation is not publicly available. (Note that this applies only to codebases meant for general public usage.)
- Documentation depends directly on a set of artificial terms or words that are not clearly explained.
Moderate
The documentation adheres to best practices. Important components are documented; the documentation exists at different levels (such as inline code comments, NatSpec, and system documentation); and there is consistency across all documentation. Specific criteria include, but are not limited to, the following:
- None of the weak criteria apply to the codebase.
- Documentation is written in a clear manner, and the language is not ambiguous.
- A glossary of terms exists for business-specific words and phrases.
- The architecture is documented through diagrams or similar constructs.
- Documentation includes user stories.
- Documentation clearly identifies core/critical components, such as those that significantly affect the system and/or its users.
- Reading documentation is sufficient to understand the expected behavior of the system without delving into specific implementation details.
- All critical functions are documented.
- All critical code blocks are documented.
- Known risks and system limitations are documented.
Satisfactory
Thorough documentation exists spanning all of the areas required for a moderate rating, as well as system corner cases, detailed aspects of users stories, and all features. The documentation matches the code. Specific criteria include, but are not limited to, the following:
- The system meets all moderate criteria.
- The user stories cover all user operations.
- There are detailed descriptions of the expected system behaviors.
- The implementation is consistent with the specification; if there are deviations from the specification, they are strongly justified, thoroughly explained, and reasonable.
- Function and system invariants are clearly defined in the documentation.
- Consistent naming conventions are followed throughout the codebase and documentation.
- There is specific documentation for end-users and for developers.
Transaction ordering risks
“Transaction ordering risks” refers to the resilience against malicious ordering of the transactions. This includes toxic forms of Miner Extractable Value (MEV), such as front-running, sandwiching, forced liquidations, and oracle attacks.
Weak
There are unexpected/undocumented risks that arise due to the ordering of transactions. Specific criteria include, but are not limited to, the following:
- Transaction ordering risks are not clearly identified or documented.
- Protocols or user assets are at risk of unexpected transaction ordering.
- The system relies on unjustified constraints to prevent MEV extraction.
- The system makes unproven assumptions about which attributes may or may not be manipulatable by an MEV extractor.
Moderate
Risks related to transaction ordering are identified and, when applicable, limited through on-chain mitigations. Specific criteria include, but are not limited to, the following:
- None of the weak criteria apply to the codebase.
- Transaction ordering risks related to user operations are limited, justified, and documented.
- If MEV is inherent to the protocol, reasonable mitigations, such as time delays and slippage checks, are in place.
- The testing strategy emphasizes transaction ordering risks.
- The system uses tamper-resistant oracles.
Satisfactory
All transaction ordering risks are documented and clearly justified. The known risks are highlighted through documentation and tests and are visible to the users. Specific criteria include, but are not limited to, the following:
- The system meets all moderate criteria.
- The documentation centralizes all known MEV opportunities.
- Transactions ordering risks on privileged operations (e.g., system updates) are limited, justified, and documented.
- Known transaction ordering opportunities have tests highlighting the underlying risks.
Low-level manipulation
“Low-level manipulation” refers to the usage of low-level operations (e.g., assembly code, bitwise operations, low-level calls) and relevant justification within the codebase.
Weak
The code uses unjustified low-level manipulations. Specific criteria include, but are not limited to, the following:
- Usage of assembly code or low-level manipulation is not justified; most can likely be replaced by high-level code.
Moderate
Low level operations are justified and limited. Extra documentation and testing is provided for them. Specific criteria include, but are not limited to, the following:
- None of the weak criteria apply to the codebase.
- Use of assembly code is limited and justified.
- Inline code comments are present for each assembly operation.
- The code does not re-implement well-established, low-level library functionality without justification (e.g., OZ’s SafeERC20).
- A high-level implementation reference exists for each function with complex assembly code.
Satisfactory
Thorough documentation, justification, and testing exists to increase confidence in all usage of assembly code and low-level manipulation. Implementations are validated with automated testing against a reference implementation. Specific criteria include, but are not limited to, the following:
- The system meets all moderate criteria.
- Differential fuzzing, or a similar technique, is used to compare the high-level reference implementation against its low level counterpart.
- Risks related to compiler optimization or experimental features are identified and justified.
Testing and verification
“Testing and verification” refers to the robustness of testing procedures of techniques (including unit tests, integration tests, fuzzing, and symbolic execution) as well as the amount of test coverage.
Weak
Testing is limited and covers only some of the “happy paths.” Specific criteria include, but are not limited to, the following:
- Common or expected use cases are not fully tested.
- Provided tests fail for the codebase.
- There is insufficient or non-existent documentation to run the test suite “out of the box.”
Moderate
Testing adheres to best practices and covers a large majority of the code. An automated testing technique is used to increase the confidence of the most critical components. Specific criteria include, but are not limited to, the following:
- None of the weak criteria apply to the codebase.
- Most functions, including normal use cases, are tested.
- All provided tests for the codebase pass.
- Code coverage is used for the unit tests, and the report is easy to retrieve.
- An automated testing technique is used for critical components.
- Testing is implemented as part of the CI/CD pipeline.
- Integration tests are implemented, if applicable.
- Test code follows best practices and does not trigger warnings by the compiler or static analysis tools.
Satisfactory
Testing is clearly an important part of codebase development. Tests include unit tests and end-to-end testing. Code properties are clearly identified and validated with an automated testing technique. Specific criteria include, but are not limited to, the following:
- The system meets all moderate criteria.
- The codebase reaches 100% of reachable branch and statement coverage in unit tests.
- An end-to-end automated testing technique is used and all users' entry points are covered.
- Test cases are isolated and do not depend on each other or on the execution order, unless justified.
- Mutant testing is used to detect missing or incorrect tests/properties.
Development Guidelines
Follow these high-level recommendations to build more secure smart contracts.
Design Guidelines
Discuss the design of the contract ahead of time, before writing any code.
Documentation and Specifications
Write documentation at different levels and update it as you implement the contracts:
- A plain English description of the system, describing the contracts' purpose and any assumptions about the codebase.
- Schema and architectural diagrams, including contract interactions and the system's state machine. Use Slither printers to help generate these schemas.
- Thorough code documentation. Use the Natspec format for Solidity.
On-chain vs Off-chain Computation
- Keep as much code off-chain as possible. Keep the on-chain layer small. Pre-process data off-chain in a way that simplifies on-chain verification. Need an ordered list? Sort it off-chain, then check its order on-chain.
Upgradeability
Refer to our blog post for different upgradeability solutions. If you are using delegatecall to achieve upgradability, carefully review all items of the delegatecall proxy guidance. Decide whether or not to support upgradeability before writing any code, as this decision will affect your code's structure. Generally, we recommend:
- Favoring contract migration over upgradeability. Migration systems offer many of the same advantages as upgradeable systems but without their drawbacks.
- Using the data separation pattern instead of the delegatecall proxy pattern. If your project has a clear abstraction separation, upgradeability using data separation will require only a few adjustments. The delegatecall proxy is highly error-prone and demands EVM expertise.
- Document the migration/upgrade procedure before deployment. Write the procedure to follow ahead of time to avoid errors when reacting under stress. It should include:
- The calls that initiate new contracts
- The keys' storage location and access method
- Deployment verification: develop and test a post-deployment script.
Delegatecall Proxy Pattern
The delegatecall opcode is a sharp tool that must be used carefully. Many high-profile exploits involve little-known edge cases and counter-intuitive aspects of the delegatecall proxy pattern. To aid the development of secure delegatecall proxies, utilize the slither-check-upgradability tool, which performs safety checks for both upgradable and immutable delegatecall proxies.
- Storage layout: Proxy and implementation storage layouts must be the same. Instead of defining the same state variables for each contract, both should inherit all state variables from a shared base contract.
- Inheritance: Be aware that the order of inheritance affects the final storage layout. For example,
contract A is B, Candcontract A is C, Bwill not have the same storage layout if both B and C define state variables. - Initialization: Immediately initialize the implementation. Well-known disasters (and near disasters) have featured an uninitialized implementation contract. A factory pattern can help ensure correct deployment and initialization and reduce front-running risks.
- Function shadowing: If the same method is defined on the proxy and the implementation, then the proxy’s function will not be called. Be mindful of
setOwnerand other administration functions commonly found on proxies. - Direct implementation usage: Configure implementation state variables with values that prevent direct use, such as setting a flag during construction that disables the implementation and causes all methods to revert. This is particularly important if the implementation also performs delegatecall operations, as this may lead to unintended self-destruction of the implementation.
- Immutable and constant variables: These variables are embedded in the bytecode and can get out of sync between the proxy and implementation. If the implementation has an incorrect immutable variable, this value may still be used even if the same variable is correctly set in the proxy’s bytecode.
- Contract Existence Checks: All low-level calls, including delegatecall, return true for an address with empty bytecode. This can mislead callers into thinking a call performed a meaningful operation when it did not or cause crucial safety checks to be skipped. While a contract’s constructor runs, its bytecode remains empty until the end of execution. We recommend rigorously verifying that all low-level calls are protected against nonexistent contracts. Keep in mind that most proxy libraries (such as Openzeppelin's) do not automatically perform contract existence checks.
For more information on delegatecall proxies, consult our blog posts and presentations:
- Contract Upgradability Anti-Patterns: Describes the differences between downstream data contracts and delegatecall proxies with upstream data contracts and how these patterns affect upgradability.
- How the Diamond Standard Falls Short: Explores delegatecall risks that apply to all contracts, not just those following the diamond standard.
- Breaking Aave Upgradeability: Discusses a subtle problem we discovered in Aave
ATokencontracts, resulting from the interplay between delegatecall proxies, contract existence checks, and unsafe initialization. - Contract Upgrade Risks and Recommendations: A Trail of Bits talk on best practices for developing upgradable delegatecall proxies. The section starting at 5:49 describes general risks for non-upgradable proxies.
Implementation Guidelines
Aim for simplicity. Use the simplest solution that meets your needs. Any member of your team should understand your solution.
Function Composition
Design your codebase architecture to facilitate easy review and allow testing individual components:
- Divide the system's logic, either through multiple contracts or by grouping similar functions together (e.g. authentication, arithmetic).
- Write small functions with clear purposes.
Inheritance
- Keep inheritance manageable. Though inheritance can help divide logic you should aim to minimize the depth and width of the inheritance tree.
- Use Slither’s inheritance printer to check contract hierarchies. The inheritance printer can help review the hierarchy size.
Events
- Log all critical operations. Events facilitate contract debugging during development and monitoring after deployment.
Avoid Known Pitfalls
- Be aware of common security issues. Many online resources can help, such as Ethernaut CTF, Capture the Ether, and Not So Smart Contracts.
- Review the warnings sections in the Solidity documentation. These sections reveal non-obvious language behaviors.
Dependencies
- Use well-tested libraries. Importing code from well-tested libraries reduces the likelihood of writing buggy code. If writing an ERC20 contract, use OpenZeppelin.
- Use a dependency manager instead of copying and pasting code. Always keep external sources up-to-date.
Testing and Verification
- Create thorough unit tests. An extensive test suite is essential for developing high-quality software.
- Develop custom Slither and Echidna checks and properties. Automated tools help ensure contract security. Review the rest of this guide to learn how to write efficient checks and properties.
Solidity
- Favor Solidity versions outlined in our Slither Recommendations. We believe older Solidity versions are more secure and have better built-in practices. Newer versions may be too immature for production and need time to develop.
- Compile using a stable release, but check for warnings with the latest release. Verify that the latest compiler version reports no issues with your code. However, since Solidity has a fast release cycle and a history of compiler bugs, we do not recommend the newest version for deployment. See Slither’s solc version recommendation.
- Avoid inline assembly. Assembly requires EVM expertise. Do not write EVM code unless you have mastered the yellow paper.
Deployment Guidelines
After developing and deploying the contract:
- Monitor contracts. Observe logs and be prepared to respond in the event of contract or wallet compromise.
- Add contact information to blockchain-security-contacts. This list helps third parties notify you of discovered security flaws.
- Secure privileged users' wallets. Follow our best practices for hardware wallet key storage.
- Develop an incident response plan. Assume your smart contracts can be compromised. Possible threats include contract bugs or attackers gaining control of the contract owner's keys.
Token Integration Checklist
This checklist offers recommendations for interacting with arbitrary tokens. Ensure that every unchecked item is justified and that its risks are understood.
For convenience, all Slither utilities can be run directly on a token address, as shown below:
slither-check-erc 0xdac17f958d2ee523a2206206994597c13d831ec7 TetherToken --erc erc20
slither-check-erc 0x06012c8cf97BEaD5deAe237070F9587f8E7A266d KittyCore --erc erc721
Use the following Slither output for the token to follow this checklist:
- slither-check-erc [target] [contractName] [optional: --erc ERC_NUMBER]
- slither [target] --print human-summary
- slither [target] --print contract-summary
- slither-prop . --contract ContractName # requires configuration, and use of Echidna and Manticore
General Considerations
- The contract has a security review. Avoid interacting with contracts that lack a security review. Assess the review's duration (i.e., the level of effort), the reputation of the security firm, and the number and severity of findings.
- You have contacted the developers. If necessary, alert their team to incidents. Locate appropriate contacts on blockchain-security-contacts.
- They have a security mailing list for critical announcements. Their team should advise users (like you!) on critical issues or when upgrades occur.
Contract Composition
-
The contract avoids unnecessary complexity. The token should be a simple contract; tokens with complex code require a higher standard of review. Use Slither’s
human-summaryprinter to identify complex code. -
The contract uses
SafeMath. Contracts that do not useSafeMathrequire a higher standard of review. Inspect the contract manually forSafeMathusage. -
The contract has only a few non-token-related functions. Non-token-related functions increase the likelihood of issues in the contract. Use Slither’s
contract-summaryprinter to broadly review the code used in the contract. -
The token has only one address. Tokens with multiple entry points for balance updates can break internal bookkeeping based on the address (e.g.,
balances[token_address][msg.sender]might not reflect the actual balance).
Owner Privileges
-
The token is not upgradeable. Upgradeable contracts may change their rules over time. Use Slither’s
human-summaryprinter to determine if the contract is upgradeable. -
The owner has limited minting capabilities. Malicious or compromised owners can abuse minting capabilities. Use Slither’s
human-summaryprinter to review minting capabilities and consider manually reviewing the code. - The token is not pausable. Malicious or compromised owners can trap contracts relying on pausable tokens. Identify pausable code manually.
- The owner cannot blacklist the contract. Malicious or compromised owners can trap contracts relying on tokens with a blacklist. Identify blacklisting features manually.
- The team behind the token is known and can be held responsible for abuse. Contracts with anonymous development teams or teams situated in legal shelters require a higher standard of review.
ERC20 Tokens
ERC20 Conformity Checks
Slither includes the slither-check-erc utility that checks a token's conformance to various ERC standards. Use slither-check-erc to review the following:
-
TransferandtransferFromreturn a boolean. Some tokens do not return a boolean for these functions, which may cause their calls in the contract to fail. -
The
name,decimals, andsymbolfunctions are present if used. These functions are optional in the ERC20 standard and may not be present. -
Decimalsreturns auint8. Some tokens incorrectly return auint256. In these cases, ensure the returned value is below 255. - The token mitigates the known ERC20 race condition. The ERC20 standard has a known race condition that must be mitigated to prevent attackers from stealing tokens.
Slither includes the slither-prop utility, which generates unit tests and security properties to find many common ERC flaws. Use slither-prop to review the following:
-
The contract passes all unit tests and security properties from
slither-prop. Run the generated unit tests, then check the properties with Echidna and Manticore.
Risks of ERC20 Extensions
The behavior of certain contracts may differ from the original ERC specification. Review the following conditions manually:
-
The token is not an ERC777 token and has no external function call in
transferortransferFrom. External calls in the transfer functions can lead to reentrancies. -
TransferandtransferFromshould not take a fee. Deflationary tokens can lead to unexpected behavior. - Consider any interest earned from the token. Some tokens distribute interest to token holders. If not taken into account, this interest may become trapped in the contract.
Token Scarcity
Token scarcity issues must be reviewed manually. Check for the following conditions:
- The supply is owned by more than a few users. If a few users own most of the tokens, they can influence operations based on the tokens' distribution.
- The total supply is sufficient. Tokens with a low total supply can be easily manipulated.
- The tokens are located in more than a few exchanges. If all tokens are in one exchange, compromising the exchange could compromise the contract relying on the token.
- Users understand the risks associated with large funds or flash loans. Contracts relying on the token balance must account for attackers with large funds or attacks executed through flash loans.
- The token does not allow flash minting. Flash minting can lead to drastic changes in balance and total supply, requiring strict and comprehensive overflow checks in the token operation.
Known non-standard ERC20 tokens
Protocols that allow integration with arbitrary tokens must take care to properly handle certain well-known non-standard ERC20 tokens. Refer to the non-standard-tokens list for a list of well-known tokens that contain additional risks.
ERC721 Tokens
ERC721 Conformity Checks
The behavior of certain contracts may differ from the original ERC specification. Review the following conditions manually:
- Transfers of tokens to the 0x0 address revert. Some tokens allow transfers to 0x0 and consider tokens sent to that address to have been burned; however, the ERC721 standard requires that such transfers revert.
-
safeTransferFromfunctions are implemented with the correct signature. Some token contracts do not implement these functions. Transferring NFTs to one of those contracts can result in a loss of assets. -
The
name,decimals, andsymbolfunctions are present if used. These functions are optional in the ERC721 standard and may not be present. -
If used,
decimalsreturns auint8(0). Other values are invalid. -
The
nameandsymbolfunctions can return an empty string. This behavior is allowed by the standard. -
The
ownerOffunction reverts if thetokenIdis invalid or refers to a token that has already been burned. The function cannot return 0x0. This behavior is required by the standard but may not always be implemented correctly. - A transfer of an NFT clears its approvals. This is required by the standard.
- The token ID of an NFT cannot be changed during its lifetime. This is required by the standard.
Common Risks of the ERC721 Standard
Mitigate the risks associated with ERC721 contracts by conducting a manual review of the following conditions:
-
The
onERC721Receivedcallback is taken into account. External calls in the transfer functions can lead to reentrancies, especially when the callback is not explicit (e.g., insafeMintcalls). -
When an NFT is minted, it is safely transferred to a smart contract. If a minting function exists, it should behave similarly to
safeTransferFromand handle the minting of new tokens to a smart contract properly, preventing asset loss. - Burning a token clears its approvals. If a burning function exists, it should clear the token’s previous approvals.
Known non-standard ERC20 tokens
The following tokens are known to be non-standard ERC20 tokens. They may have additional risks that must be covered.
Missing Revert
These tokens do not revert when a transfer fails, e.g. due to missing funds. Protocols that integrate these tokens must include a check for the transfer function's returned boolean success status and handle the failure case appropriately.
| Token | Notes |
|---|---|
| Basic Attention Token (BAT) | |
| Huobi Token (HT) | |
| Compound USD Coin (cUSDC) | |
| 0x Protocol Token (ZRX) |
Transfer Hooks
These tokens include ERC777-like transfer hooks. Protocols that interact with tokens that include transfer hooks must be extra careful to protect against reentrant calls when dealing with these tokens, because control is handed back to the caller upon transfer. This can also affect cross-protocol reentrant calls to view functions.
| Token | Notes |
|---|---|
| Amp (AMP) | |
| The Tokenized Bitcoin (imBTC) |
Missing Return Data / Transfer Success Status
These tokens do not return any data from the external call when transferring tokens. Protocols using an interface that specifies a return value when transferring tokens will revert. Solidity includes automatic checks on the return data size when decoding return values of an expected size.
| Token | Notes |
|---|---|
| Binance Coin (BNB) | Only missing return data on transfer. transferFrom returns true. |
| OMGToken (OMG) | |
| Tether USD (USDT) |
Permit No-op
Does not revert when calling permit. Protocols that use EIP-2612 permits should check that the token allowance has increased or is sufficient. See Multichain's incident.
| Token | Notes |
|---|---|
| Wrapped Ether (WETH) | Includes a non-reverting fallback function. |
Additional Non-standard Behavior
Additional non-standard token behavior that could be problematic includes:
- fee on transfers
- upgradeable contracts (USDC)
- tokens with multiple address entry-points to the same accounting state
- non-standard decimals (USDC: 6)
- non-standard permits (DAI)
- do not reduce allowance when it is the maximum value
- do not require allowance for transfers from self
- revert for approval of large amounts
>= 2^96 < 2^256 - 1(UNI, COMP)
Refer to d-xo/weird-erc20 for additional non-standard ERC20 tokens.
Incident Response Recommendations
How you respond during an incident is a direct reflection of your efforts to prepare for such an event. Each team or project's needs will vary so we provide the guidelines below as a starting point. Adherence to our guidelines can help you shift from a reactive approach to a proactive approach by planning with the assumption that incidents are inevitable. To fully leverage the following guidelines, consider them throughout the application development process.
Application Design
- Identify which components should or should not be:
- Pausable. While pausing a component can be beneficial during an incident, you must assess its potential impact on other contracts.
- Migratable or upgradeable. Discovering a bug might necessitate a migration strategy or contract upgrade to fix the issue; note, however, that upgradeability has its own sets of risks. Making all contracts upgradeable might not be the best approach.
- Decentralized. Using decentralized components can sometimes limit what rescue measures are possible and may require a higher amount of coordination.
- Begin to identify important system invariants. This helps to determine what you will need to monitor and what events may be necessary to do so effectively.
- Evaluate what additional events are needed. A missed event in a critical location might result in unnoticed incidents.
- Evaluate what components must be on-chain and off-chain. On-chain components are generally more at risk, but off-chain components push the risks to the off-chain owner.
- Use fine-grained access controls. Avoid setting all access controls to be available to an EOA. Opt for multisig wallets/MPC, and avoid delegating several roles to one address (e.g., the key responsible for setting fees shouldn't have access to the upgradeability feature).
Documentation
- Assemble a runbook of common actions you may need to perform. It's not possible or practical to exhaustively detail how you'll respond to every type of incident. But you can start to document procedures for some of the more important ones as well as actions that might be common across multiple scenarios (e.g., pausing, rotating owner keys, upgrading an implementation). This can also include scripts or snippets of code to facilitate performing these actions in a reproducible manner.
- Document how to interpret events emission. Only emitting events isn't sufficient; proper documentation is crucial, and users should be empowered to identify and decode them.
- Document how to access wallets. Clearly outline how to access wallets with special roles in the system. This should include both the location as well as access procedures for each wallet.
- Document the deployment and upgrade process. Deployment and upgrade processes are risky and must be thoroughly documented. This should include how to test the deployment/upgrade (e.g., using fork testing) and how to validate it (e.g., using a post-deployment script).
- Document how to contact users and external dependencies. Define guidelines regarding which stakeholders to contact, including the timing and mode of communication in case of incidents. The right communication at the right time is key to maintaining trust.
Process
- Conduct periodic training and incident response exercises. Regularly organize training sessions and incident response exercises. Such measures ensure that employees remain updated and can help highlight any flaws in the current incident response protocol.
- Remember to consider off-chain components when planning. While much of this document is concerned with on-chain code, compromised frontends or social media accounts are also common sources of incidents.
- Identify incident owners, with at least:
- A technical lead. Responsible for gathering and centralizing technical data.
- A communication lead. Tasked with internal and external communication.
- A legal lead. Either provides legal advice or ensures the right legal entities are contacted. It might also be worth considering liaison with appropriate law enforcement agencies.
- Use monitoring tools. You may opt for a third-party product, an in-house solution, or a combination of both. Third-party montoring will identify more generally suspicious transactions but may not be as in tune with system-specific metrics like health factors, collateralization ratios, or if an AMM invariant starts to drift. In-house monitoring, on the other hand, requires more engineering effort to setup and maintain, but can be tailored specifically to your needs.
- Carefully consider automating certain actions based on monitoring alerts. You may wish to automatically pause or move the system into a safer state if certain actvities are detected given how quickly some exploits are carried out. However, also keep in mind the impact and likelihood of a false positive triggering such a mechanism and how disruptive that could be.
Threat Intelligence
- Identify similar protocols, and stay informed of any issues affecting them. This could include forks, implementations on other chains, or protocols in the same general class (e.g., other lending protocols). Being aware of vulnerabilities in similar systems can help preemptively address potential threats in your own.
- Identify your dependencies, and follow their communication channels to be alerted in case of an issue. Follow their Twitter, Discord, Telegram, newsletter, etc. This includes both on-chain as well as off-chain (e.g., libraries, toolchain) dependencies.
- Maintain open communication lines with your dependencies' owners. This will help you to stay informed if one of your dependencies is compromised.
- Subscribe to the BlockThreat newsletter. BlockThreat will keep you informed about recent incidents and developments in blockchain security. The nature of blockchains means we have a culture of learning in the open so take advantage of this and learn from your peers.
Additionally, consider conducting a threat modeling exercise. This exercise will identify risks that an application faces at both the structural and operational level. If you're interested in undertaking such an exercise and would like to work with us, contact us.
Resources
- An Incident Response Plan for Startups
- A minimum viable incident response plan, a great starting point for a smaller team. Especially in combination with the Yearn example below, which is tailored a bit more for web3 teams.
- The practical guide to incident management
- An approachable guide for incident response. Chapter 4 includes examples for how to approach practicing your process.
- PagerDuty Incident Response
- A very detailed handbook of how PagerDuty handles incident response themselves. Some useful ideas and resources, but more practical for larger organizations.
- Emergency Procedures for Yearn Finance
- Rekt pilled: What to do when your dApp gets pwned and how to stay kalm - Heidi Wilder (DSS 2023)
- Crisis Handbook - Smart Contract Hack (SEAL)
Community Incident Retrospectives
Secure Development Workflow
Follow this high-level process while developing your smart contracts for enhanced security:
- Check for known security issues:
- Review your contracts using Slither, which has over 70 built-in detectors for common vulnerabilities. Run it on every check-in with new code and ensure it gets a clean report (or use triage mode to silence certain issues).
- Consider special features of your contract:
-
If your contracts are upgradeable, review your upgradeability code for flaws using
slither-check-upgradeabilityor Crytic. We have documented 17 ways upgrades can go sideways. -
If your contracts claim to conform to ERCs, check them with
slither-check-erc. This tool instantly identifies deviations from six common specs. -
If you have unit tests in Truffle, enrich them with
slither-prop. It automatically generates a robust suite of security properties for features of ERC20 based on your specific code. - If you integrate with third-party tokens, review our token integration checklist before relying on external contracts.
- Visually inspect critical security features of your code:
- Review Slither's inheritance-graph printer to avoid inadvertent shadowing and C3 linearization issues.
- Review Slither's function-summary printer, which reports function visibility and access controls.
- Review Slither's vars-and-auth printer, which reports access controls on state variables.
- Document critical security properties and use automated test generators to evaluate them:
- Learn to document security properties for your code. Although challenging at first, it is the single most important activity for achieving a good outcome. It is also a prerequisite for using any advanced techniques in this tutorial.
- Define security properties in Solidity for use with Echidna and Manticore. Focus on your state machine, access controls, arithmetic operations, external interactions, and standards conformance.
- Define security properties with Slither's Python API. Concentrate on inheritance, variable dependencies, access controls, and other structural issues.
- Be mindful of issues that automated tools cannot easily find:
- Lack of privacy: Transactions are visible to everyone else while queued in the pool.
- Front running transactions.
- Cryptographic operations.
- Risky interactions with external DeFi components.
Ask for help
Office Hours are held every Tuesday afternoon. These one-hour, one-on-one sessions provide an opportunity to ask questions about security, troubleshoot tool usage, and receive expert feedback on your current approach. We will help you work through this guide.
Join our Slack: Empire Hacking. We are always available in the #crytic and #ethereum channels if you have questions.
Security is about more than just smart contracts
Review our quick tips for general application and corporate security. While it is crucial to ensure on-chain code security, off-chain security lapses can be equally severe, especially regarding owner keys.
How to prepare for a security review
Get ready for your security review! Ensuring a few key elements are in place before the review starts can make the process significantly smoother for both sides.
Set a goal for the review
This is the most important step of a security review, and paradoxically the one most often overlooked. You should have an idea of what kind of questions you want answered, such as:
- What’s the overall level of security for this product?
- What are the areas that you are the most concerns about?
- Take into considerations previous audits and issues, complex parts, and fragile components.
- What is the worst case scenario for your project?
Knowing your biggest area of concern will help the assessment team tailor their approach to meet your needs.
Resolve the easy issues
Handing the code off to the assessment team is a lot like releasing the product: the cleaner the code, the better everything will go. To that end:
- Triage all results from static analysis tools. Go after the low-hanging fruits and use:
- Slither for Solidity codebases
- dylint for Rust codebases
- golangci for Go codebases
- CodeQL and Semgrep for Go/Rust/C++/... codebases
- Increase unit and feature test coverage. Ideally this has been part of the development process, but everyone slips up, tests don’t get updated, or new features don’t quite match the old integrations tests. Now is the time to update the tests and run them all.
- Remove dead code, unused libraries, and other extraneous weight. You may know which is unused but the consultants won’t and will waste time investigating it for potential issues. The same goes for that new feature that hasn’t seen progress in months, or that third-party library that doesn’t get used anymore.
Ensure the code is accessible
Making the code accessible and clearly identified will avoid wasting ressources from the security engineers.
- Provide a detailed list of files for review.. This will avoid confusion if your codebase is large and some elements are not meant to be in scope.
- Create a clear set of build instructions, and confirm the setup by cloning and testing your repository on a fresh environment. A code that cannot be built is a code more difficult to review.
- Freeze a stable commit hash, branch, or release prior to review. Working on a moving target makes the review more difficult
- Identify boilerplates, dependencies and difference from forked code. By highliting what code you wrote, you will help keeping the review focused
Document, Document, Document
Streamline the revuew process of building a mental model of your codebase by providing comprehensive documentation.
- Create flowcharts and sequence diagrams to depict primary workflows. They will help identify the components and their relationships
- Write users stories. Having users stories is a powerful tool to explain a project
- Outline the on-chain / off-chain assumptions. This includes:
- Data validation procedure
- Oracles information
- Bridges assumptions
- List actors and with their respective roles and privileges. The complexity of a system grows with its number of actors.
- Incorporate external developer documentation that links directly to your code. This will help to ensure the documentation is up to date with the code
- Add function documentation and inline comments for complex areas of your system. Code documentation should include:
- System and function level invariants
- Parameter ranges (minimum and maximum values) used in your system.
- Arithmetic formula: how they map to their specification, and their precision loss exceptations
- Compile a glossary for consistent terminology use. You use your codebase every day and you are familar with the terminology - a new person looking at your code is not
- Consider creating short video walkthroughs for complex workflows or areas of concern. Video walkthroughs is a great format to share your knowledge
The Rekt Test
The Rekt Test is a 12-question security assessment framework created by Trail of Bits and blockchain security experts to help organizations evaluate their security posture. Inspired by Joel Spolsky's Joel Test, it provides a quick way to assess security maturity.
The more questions your organization can answer "yes" to, the more you can trust the quality of your security operations.
The 12 Questions
Documentation and Planning
-
1. Do you have all actors, roles, and privileges documented?
Document who can do what in your system. This includes admin roles, privileged operations, and the scope of each role's permissions.
-
2. Do you keep documentation of all external services, contracts, and oracles you rely on?
Maintain an up-to-date list of all external dependencies, including third-party contracts, oracles, bridges, and off-chain services your system interacts with.
-
3. Do you have a written and tested incident response plan?
Have a documented plan for responding to security incidents. Test it regularly through tabletop exercises. See our Incident Response Recommendations.
-
4. Do you document the best ways to attack your system?
Maintain a threat model that identifies potential attack vectors. Update it as your system evolves.
Personnel and Access Control
-
5. Do you perform identity verification and background checks on all employees?
Verify the identity of team members, especially those with access to privileged systems or keys.
-
6. Do you have a team member with security defined in their role?
Assign explicit security responsibilities to at least one team member. Security should not be an afterthought.
-
7. Do you require hardware security keys for production systems?
Use hardware security keys (like YubiKeys) for accessing production systems and critical infrastructure.
-
8. Does your key management system require multiple humans and physical steps?
Implement multi-signature schemes and physical security measures for critical operations. No single person should be able to compromise the system.
Technical Security
-
9. Do you define key invariants for your system and test them on every commit?
Identify the properties that must always hold true in your system and verify them automatically. Use tools like Echidna or Medusa to test invariants continuously.
-
10. Do you use the best automated tools to discover security issues in your code?
Integrate security tools into your development workflow:
- Slither for static analysis
- Echidna or Medusa for fuzzing
- See our Secure Development Workflow for a complete checklist
-
11. Do you undergo external audits and maintain a vulnerability disclosure or bug bounty program?
Get independent security reviews before major releases. Maintain a way for security researchers to responsibly report vulnerabilities.
-
12. Have you considered and mitigated avenues for abusing users of your system?
Think beyond technical exploits. Consider how your system could be used to harm users through phishing, social engineering, or economic attacks.
How to Use This Test
-
Initial Assessment: Go through each question honestly. A "yes" requires evidence, not just intention.
-
Identify Gaps: Questions you cannot answer "yes" to represent areas for improvement.
-
Prioritize: Not all questions are equally critical for every project. Prioritize based on your risk profile.
-
Revisit Regularly: Security posture changes over time. Reassess periodically, especially after major changes.
Resources
- Can you pass the Rekt Test? - Original Trail of Bits blog post
- Incident Response Recommendations - Guidelines for question 3
- Secure Development Workflow - Detailed workflow for questions 9-10
- Program Analysis Tools - Tools for questions 9-10
Learn EVM
List of EVM Technical Knowledge
- EVM Opcode Reference: Reference and notes for each of the EVM opcodes
- Transaction Tracing: Helper scripts and guidance for generating and navigating transaction traces
- Arithmetic Checks: Guide to performing arithmetic checks in the EVM
- Yellow Paper Guidance: Symbol reference for more easily reading the Ethereum yellow paper
- Forks <> EIPs: Summarizes the EIPs included in each fork
- Forks <> CIPs: Summarizes the CIPs and EIPs included in each Celo fork (EVM-compatible chain)
- Upgrades <> TIPs: Summarizes the TIPs included in each TRON upgrade (EVM-compatible chain)
- Forks <> BEPs: Summarizes the BEPs included in each BSC fork (EVM-compatible chain)
Ethereum VM (EVM) Opcodes and Instruction Reference
This reference consolidates EVM opcode information from the yellow paper, stack exchange, solidity source, parity source, evm-opcode-gas-costs and Manticore.
Notes
The size of a "word" in EVM is 256 bits.
The gas information is a work in progress. If an asterisk is in the Gas column, the base cost is shown but may vary based on the opcode arguments.
Table
| Opcode | Name | Description | Extra Info | Gas |
|---|---|---|---|---|
0x00 | STOP | Halts execution | - | 0 |
0x01 | ADD | Addition operation | - | 3 |
0x02 | MUL | Multiplication operation | - | 5 |
0x03 | SUB | Subtraction operation | - | 3 |
0x04 | DIV | Integer division operation | - | 5 |
0x05 | SDIV | Signed integer division operation (truncated) | - | 5 |
0x06 | MOD | Modulo remainder operation | - | 5 |
0x07 | SMOD | Signed modulo remainder operation | - | 5 |
0x08 | ADDMOD | Modulo addition operation | - | 8 |
0x09 | MULMOD | Modulo multiplication operation | - | 8 |
0x0a | EXP | Exponential operation | - | 10* |
0x0b | SIGNEXTEND | Extend length of two's complement signed integer | - | 5 |
0x0c - 0x0f | Unused | Unused | - | |
0x10 | LT | Less-than comparison | - | 3 |
0x11 | GT | Greater-than comparison | - | 3 |
0x12 | SLT | Signed less-than comparison | - | 3 |
0x13 | SGT | Signed greater-than comparison | - | 3 |
0x14 | EQ | Equality comparison | - | 3 |
0x15 | ISZERO | Simple not operator | - | 3 |
0x16 | AND | Bitwise AND operation | - | 3 |
0x17 | OR | Bitwise OR operation | - | 3 |
0x18 | XOR | Bitwise XOR operation | - | 3 |
0x19 | NOT | Bitwise NOT operation | - | 3 |
0x1a | BYTE | Retrieve single byte from word | - | 3 |
0x1b | SHL | Shift Left | EIP145 | 3 |
0x1c | SHR | Logical Shift Right | EIP145 | 3 |
0x1d | SAR | Arithmetic Shift Right | EIP145 | 3 |
0x20 | KECCAK256 | Compute Keccak-256 hash | - | 30* |
0x21 - 0x2f | Unused | Unused | ||
0x30 | ADDRESS | Get address of currently executing account | - | 2 |
0x31 | BALANCE | Get balance of the given account | - | 700 |
0x32 | ORIGIN | Get execution origination address | - | 2 |
0x33 | CALLER | Get caller address | - | 2 |
0x34 | CALLVALUE | Get deposited value by the instruction/transaction responsible for this execution | - | 2 |
0x35 | CALLDATALOAD | Get input data of current environment | - | 3 |
0x36 | CALLDATASIZE | Get size of input data in current environment | - | 2* |
0x37 | CALLDATACOPY | Copy input data in current environment to memory | - | 3 |
0x38 | CODESIZE | Get size of code running in current environment | - | 2 |
0x39 | CODECOPY | Copy code running in current environment to memory | - | 3* |
0x3a | GASPRICE | Get price of gas in current environment | - | 2 |
0x3b | EXTCODESIZE | Get size of an account's code | - | 700 |
0x3c | EXTCODECOPY | Copy an account's code to memory | - | 700* |
0x3d | RETURNDATASIZE | Pushes the size of the return data buffer onto the stack | EIP 211 | 2 |
0x3e | RETURNDATACOPY | Copies data from the return data buffer to memory | EIP 211 | 3 |
0x3f | EXTCODEHASH | Returns the keccak256 hash of a contract's code | EIP 1052 | 700 |
0x40 | BLOCKHASH | Get the hash of one of the 256 most recent complete blocks | - | 20 |
0x41 | COINBASE | Get the block's beneficiary address | - | 2 |
0x42 | TIMESTAMP | Get the block's timestamp | - | 2 |
0x43 | NUMBER | Get the block's number | - | 2 |
0x44 | DIFFICULTY | Get the block's difficulty | - | 2 |
0x45 | GASLIMIT | Get the block's gas limit | - | 2 |
0x46 | CHAINID | Returns the current chain’s EIP-155 unique identifier | EIP 1344 | 2 |
0x47 | SELFBALANCE | Returns the balance of the currently executing account | - | 5 |
0x48 | BASEFEE | Returns the value of the base fee of the current block it is executing in. | EIP 3198 | 2 |
0x49 | BLOBHASH | Returns the transaction blob versioned hash at the given index, or 0 if the index is greater than the number of versioned hashes | EIP-4844 | 3 |
0x4a | BLOBBASEFEE | Returns the value of the blob base fee of the current block it is executing in | EIP-7516 | 2 |
0x4b - 0x4f | Unused | - | ||
0x50 | POP | Remove word from stack | - | 2 |
0x51 | MLOAD | Load word from memory | - | 3* |
0x52 | MSTORE | Save word to memory | - | 3* |
0x53 | MSTORE8 | Save byte to memory | - | 3 |
0x54 | SLOAD | Load word from storage | - | 800 |
0x55 | SSTORE | Save word to storage | - | 20000** |
0x56 | JUMP | Alter the program counter | - | 8 |
0x57 | JUMPI | Conditionally alter the program counter | - | 10 |
0x58 | PC | Get the value of the program counter prior to the increment | - | 2 |
0x59 | MSIZE | Get the size of active memory in bytes | - | 2 |
0x5a | GAS | Get the amount of available gas, including the corresponding reduction for the cost of this instruction | - | 2 |
0x5b | JUMPDEST | Mark a valid destination for jumps | - | 1 |
0x5c | TLOAD | Load word from transient storage | EIP-1153 | 100 |
0x5d | TSTORE | Save word to transient storage | EIP-1153 | 100 |
0x5e | MCOPY | Copy memory from one area to another | EIP-5656 | 3+3*words* |
0x5f | PUSH0 | Place the constant value 0 on stack | EIP-3855 | 2 |
0x60 | PUSH1 | Place 1 byte item on stack | - | 3 |
0x61 | PUSH2 | Place 2-byte item on stack | - | 3 |
0x62 | PUSH3 | Place 3-byte item on stack | - | 3 |
0x63 | PUSH4 | Place 4-byte item on stack | - | 3 |
0x64 | PUSH5 | Place 5-byte item on stack | - | 3 |
0x65 | PUSH6 | Place 6-byte item on stack | - | 3 |
0x66 | PUSH7 | Place 7-byte item on stack | - | 3 |
0x67 | PUSH8 | Place 8-byte item on stack | - | 3 |
0x68 | PUSH9 | Place 9-byte item on stack | - | 3 |
0x69 | PUSH10 | Place 10-byte item on stack | - | 3 |
0x6a | PUSH11 | Place 11-byte item on stack | - | 3 |
0x6b | PUSH12 | Place 12-byte item on stack | - | 3 |
0x6c | PUSH13 | Place 13-byte item on stack | - | 3 |
0x6d | PUSH14 | Place 14-byte item on stack | - | 3 |
0x6e | PUSH15 | Place 15-byte item on stack | - | 3 |
0x6f | PUSH16 | Place 16-byte item on stack | - | 3 |
0x70 | PUSH17 | Place 17-byte item on stack | - | 3 |
0x71 | PUSH18 | Place 18-byte item on stack | - | 3 |
0x72 | PUSH19 | Place 19-byte item on stack | - | 3 |
0x73 | PUSH20 | Place 20-byte item on stack | - | 3 |
0x74 | PUSH21 | Place 21-byte item on stack | - | 3 |
0x75 | PUSH22 | Place 22-byte item on stack | - | 3 |
0x76 | PUSH23 | Place 23-byte item on stack | - | 3 |
0x77 | PUSH24 | Place 24-byte item on stack | - | 3 |
0x78 | PUSH25 | Place 25-byte item on stack | - | 3 |
0x79 | PUSH26 | Place 26-byte item on stack | - | 3 |
0x7a | PUSH27 | Place 27-byte item on stack | - | 3 |
0x7b | PUSH28 | Place 28-byte item on stack | - | 3 |
0x7c | PUSH29 | Place 29-byte item on stack | - | 3 |
0x7d | PUSH30 | Place 30-byte item on stack | - | 3 |
0x7e | PUSH31 | Place 31-byte item on stack | - | 3 |
0x7f | PUSH32 | Place 32-byte (full word) item on stack | - | 3 |
0x80 | DUP1 | Duplicate 1st stack item | - | 3 |
0x81 | DUP2 | Duplicate 2nd stack item | - | 3 |
0x82 | DUP3 | Duplicate 3rd stack item | - | 3 |
0x83 | DUP4 | Duplicate 4th stack item | - | 3 |
0x84 | DUP5 | Duplicate 5th stack item | - | 3 |
0x85 | DUP6 | Duplicate 6th stack item | - | 3 |
0x86 | DUP7 | Duplicate 7th stack item | - | 3 |
0x87 | DUP8 | Duplicate 8th stack item | - | 3 |
0x88 | DUP9 | Duplicate 9th stack item | - | 3 |
0x89 | DUP10 | Duplicate 10th stack item | - | 3 |
0x8a | DUP11 | Duplicate 11th stack item | - | 3 |
0x8b | DUP12 | Duplicate 12th stack item | - | 3 |
0x8c | DUP13 | Duplicate 13th stack item | - | 3 |
0x8d | DUP14 | Duplicate 14th stack item | - | 3 |
0x8e | DUP15 | Duplicate 15th stack item | - | 3 |
0x8f | DUP16 | Duplicate 16th stack item | - | 3 |
0x90 | SWAP1 | Exchange 1st and 2nd stack items | - | 3 |
0x91 | SWAP2 | Exchange 1st and 3rd stack items | - | 3 |
0x92 | SWAP3 | Exchange 1st and 4th stack items | - | 3 |
0x93 | SWAP4 | Exchange 1st and 5th stack items | - | 3 |
0x94 | SWAP5 | Exchange 1st and 6th stack items | - | 3 |
0x95 | SWAP6 | Exchange 1st and 7th stack items | - | 3 |
0x96 | SWAP7 | Exchange 1st and 8th stack items | - | 3 |
0x97 | SWAP8 | Exchange 1st and 9th stack items | - | 3 |
0x98 | SWAP9 | Exchange 1st and 10th stack items | - | 3 |
0x99 | SWAP10 | Exchange 1st and 11th stack items | - | 3 |
0x9a | SWAP11 | Exchange 1st and 12th stack items | - | 3 |
0x9b | SWAP12 | Exchange 1st and 13th stack items | - | 3 |
0x9c | SWAP13 | Exchange 1st and 14th stack items | - | 3 |
0x9d | SWAP14 | Exchange 1st and 15th stack items | - | 3 |
0x9e | SWAP15 | Exchange 1st and 16th stack items | - | 3 |
0x9f | SWAP16 | Exchange 1st and 17th stack items | - | 3 |
0xa0 | LOG0 | Append log record with no topics | - | 375 |
0xa1 | LOG1 | Append log record with one topic | - | 750 |
0xa2 | LOG2 | Append log record with two topics | - | 1125 |
0xa3 | LOG3 | Append log record with three topics | - | 1500 |
0xa4 | LOG4 | Append log record with four topics | - | 1875 |
0xa5 - 0xaf | Unused | - | ||
0xb0 | JUMPTO | Tentative libevmasm has different numbers | EIP 615 | |
0xb1 | JUMPIF | Tentative | EIP 615 | |
0xb2 | JUMPSUB | Tentative | EIP 615 | |
0xb4 | JUMPSUBV | Tentative | EIP 615 | |
0xb5 | BEGINSUB | Tentative | EIP 615 | |
0xb6 | BEGINDATA | Tentative | EIP 615 | |
0xb8 | RETURNSUB | Tentative | EIP 615 | |
0xb9 | PUTLOCAL | Tentative | EIP 615 | |
0xba | GETLOCAL | Tentative | EIP 615 | |
0xbb - 0xe0 | Unused | - | ||
0xe1 | SLOADBYTES | Only referenced in pyethereum | - | - |
0xe2 | SSTOREBYTES | Only referenced in pyethereum | - | - |
0xe3 | SSIZE | Only referenced in pyethereum | - | - |
0xe4 - 0xef | Unused | - | ||
0xf0 | CREATE | Create a new account with associated code | - | 32000 |
0xf1 | CALL | Message-call into an account | - | Complicated |
0xf2 | CALLCODE | Message-call into this account with alternative account's code | - | Complicated |
0xf3 | RETURN | Halt execution returning output data | - | 0 |
0xf4 | DELEGATECALL | Message-call into this account with an alternative account's code, but persisting into this account with an alternative account's code | - | Complicated |
0xf5 | CREATE2 | Create a new account and set creation address to sha3(sender + sha3(init code)) % 2**160 | - | |
0xf6 - 0xf9 | Unused | - | - | |
0xfa | STATICCALL | Similar to CALL, but does not modify state | - | 40 |
0xfb | Unused | - | - | |
0xfd | REVERT | Stop execution and revert state changes, without consuming all provided gas and providing a reason | - | 0 |
0xfe | INVALID | Designated invalid instruction | - | 0 |
0xff | SELFDESTRUCT | Sends all ETH to the target. If executed in the same transaction a contract was created, register the account for later deletion | EIP-6780 | 5000* |
Instruction Details
STOP
0x00
() => ()
halts execution
ADD
0x01
Takes two words from stack, adds them, then pushes the result onto the stack.
(a, b) => (c)
c = a + b
MUL
0x02
(a, b) => (c)
c = a * b
SUB
0x03
(a, b) => (c)
c = a - b
DIV
0x04
(a, b) => (c)
c = a / b
SDIV
0x05
(a: int256, b: int256) => (c: int256)
c = a / b
MOD
0x06
(a, b) => (c)
c = a % b
SMOD
0x07
(a: int256, b: int256) => (c: int256)
c = a % b
ADDMOD
0x08
(a, b, m) => (c)
c = (a + b) % m
MULMOD
0x09
(a, b, m) => (c)
c = (a * b) % m
EXP
0x0a
(a, b, m) => (c)
c = (a * b) % m
SIGNEXTEND
0x0b
(b, x) => (y)
y = SIGNEXTEND(x, b)
sign extends x from (b + 1) * 8 bits to 256 bits.
LT
0x10
(a, b) => (c)
c = a < b
all values interpreted as uint256
GT
0x11
(a, b) => (c)
c = a > b
all values interpreted as uint256
SLT
0x12
(a, b) => (c)
c = a < b
all values interpreted as int256
SGT
0x13
(a, b) => (c)
c = a > b
all values interpreted as int256
EQ
0x14
Pops 2 elements off the stack and pushes the value 1 to the stack in case they're equal, otherwise the value 0.
(a, b) => (c)
c = a == b
ISZERO
0x15
(a) => (c)
c = a == 0
AND
0x16
(a, b) => (c)
c = a & b
OR
0x17
(a, b) => (c)
c = a | b
XOR
0x18
(a, b) => (c)
c = a ^ b
NOT
0x19
(a) => (c)
c = ~a
BYTE
0x1a
(i, x) => (y)
y = (x >> (248 - i * 8) & 0xff
SHL
0x1b
Pops 2 elements from the stack and pushes the second element onto the stack shifted left by the shift amount (first element).
(shift, value) => (res)
res = value << shift
SHR
0x1c
Pops 2 elements from the stack and pushes the second element onto the stack shifted right by the shift amount (first element).
(shift, value) => (res)
res = value >> shift
SAR
0x1d
(shift, value) => (res)
res = value >> shift
value: int256
KECCAK256
0x20
(offset, len) => (hash)
hash = keccak256(memory[offset:offset+len])
ADDRESS
0x30
() => (address(this))
BALANCE
0x31
() => (address(this).balance)
ORIGIN
0x32
() => (tx.origin)
CALLER
0x33
() => (msg.sender)
CALLVALUE
0x34
() => (msg.value)
CALLDATALOAD
0x35
(index) => (msg.data[index:index+32])
CALLDATASIZE
0x36
() => (msg.data.size)
CALLDATACOPY
0x37
(memOffset, offset, length) => ()
memory[memOffset:memOffset+len] = msg.data[offset:offset+len]
CODESIZE
0x38
() => (address(this).code.size)
CODECOPY
0x39
(memOffset, codeOffset, len) => ()
memory[memOffset:memOffset+len] = address(this).code[codeOffset:codeOffset+len]
GASPRICE
0x3a
() => (tx.gasprice)
EXTCODESIZE
0x3b
(addr) => (address(addr).code.size)
EXTCODECOPY
0x3c
(addr, memOffset, offset, length) => ()
memory[memOffset:memOffset+len] = address(addr).code[codeOffset:codeOffset+len]
RETURNDATASIZE
0x3d
() => (size)
size = RETURNDATASIZE()
The number of bytes that were returned from the last ext call
RETURNDATACOPY
0x3e
(memOffset, offset, length) => ()
memory[memOffset:memOffset+len] = RETURNDATA[codeOffset:codeOffset+len]
RETURNDATA is the data returned from the last external call
EXTCODEHASH
0x3f
(addr) => (hash)
hash = address(addr).exists ? keccak256(address(addr).code) : 0
BLOCKHASH
0x40
(number) => (hash)
hash = block.blockHash(number)
COINBASE
0x41
() => (block.coinbase)
TIMESTAMP
0x42
() => (block.timestamp)
NUMBER
0x43
() => (block.number)
DIFFICULTY
0x44
() => (block.difficulty)
GASLIMIT
0x45
() => (block.gaslimit)
CHAINID
0x46
() => (chainid)
where chainid = 1 for mainnet & some other value for other networks
SELFBALANCE
0x47
() => (address(this).balance)
BASEFEE
0x48
() => (block.basefee)
current block's base fee (related to EIP1559)
BLOBHASH
0x49
(index) => (tx.blob_versioned_hashes[index])
the transaction blob versioned hash at the given index, or 0 if the index is greater than the number of versioned hashes (EIP-4844)
BLOBBASEFEE
0x4a
() => (block.blobbasefee)
current block's blob base fee (EIP-7516)
POP
0x50
(a) => ()
discards the top stack item
MLOAD
0x51
(offset) => (value)
value = memory[offset:offset+32]
MSTORE
0x52
Saves a word to the EVM memory. Pops 2 elements from stack - the first element being the word memory address where the saved value (second element popped from stack) will be stored.
(offset, value) => ()
memory[offset:offset+32] = value
MSTORE8
0x53
(offset, value) => ()
memory[offset:offset+32] = value & 0xff
SLOAD
0x54
Pops 1 element off the stack, that being the key which is the storage slot and returns the read value stored there.
(key) => (value)
value = storage[key]
SSTORE
0x55
Pops 2 elements off the stack, the first element being the key and the second being the value which is then stored at the storage slot represented from the first element (key).
(key, value) => ()
storage[key] = value
JUMP
0x56
(dest) => ()
pc = dest
JUMPI
0x57
Conditional - Pops 2 elements from the stack, the first element being the jump location and the second being the value 0 (false) or 1 (true). If the value’s 1 the PC will be altered and the jump executed. Otherwise, the value will be 0 and the PC will remain the same and execution unaltered.
(dest, cond) => ()
pc = cond ? dest : pc + 1
PC
0x58
() => (pc)
MSIZE
0x59
() => (memory.size)
GAS
0x5a
() => (gasRemaining)
not including the gas required for this opcode
JUMPDEST
0x5b
() => ()
noop, marks a valid jump destination
TLOAD
0x5c
Pops 1 element off the stack, that being the key which is the transient storage slot and returns the read value stored there (EIP-1153).
(key) => (value)
value = transient_storage[key]
TSTORE
0x5d
Pops 2 elements off the stack, the first element being the key and the second being the value which is then stored at the transient storage slot represented from the first element (key) (EIP-1153).
(key, value) => ()
transient_storage[key] = value
MCOPY
0x5e
(dstOffset, srcOffset, length) => ()
memory[dstOffset:dstOffset+length] = memory[srcOffset:srcOffset+length]
PUSH0
0x5f
The constant value 0 is pushed onto the stack.
() => (0)
PUSH1
0x60
The following byte is read from PC, placed into a word, then this word is pushed onto the stack.
() => (address(this).code[pc+1:pc+2])
PUSH2
0x61
() => (address(this).code[pc+2:pc+3])
PUSH3
0x62
() => (address(this).code[pc+3:pc+4])
PUSH4
0x63
() => (address(this).code[pc+4:pc+5])
PUSH5
0x64
() => (address(this).code[pc+5:pc+6])
PUSH6
0x65
() => (address(this).code[pc+6:pc+7])
PUSH7
0x66
() => (address(this).code[pc+7:pc+8])
PUSH8
0x67
() => (address(this).code[pc+8:pc+9])
PUSH9
0x68
() => (address(this).code[pc+9:pc+10])
PUSH10
0x69
() => (address(this).code[pc+10:pc+11])
PUSH11
0x6a
() => (address(this).code[pc+11:pc+12])
PUSH12
0x6b
() => (address(this).code[pc+12:pc+13])
PUSH13
0x6c
() => (address(this).code[pc+13:pc+14])
PUSH14
0x6d
() => (address(this).code[pc+14:pc+15])
PUSH15
0x6e
() => (address(this).code[pc+15:pc+16])
PUSH16
0x6f
() => (address(this).code[pc+16:pc+17])
PUSH17
0x70
() => (address(this).code[pc+17:pc+18])
PUSH18
0x71
() => (address(this).code[pc+18:pc+19])
PUSH19
0x72
() => (address(this).code[pc+19:pc+20])
PUSH20
0x73
() => (address(this).code[pc+20:pc+21])
PUSH21
0x74
() => (address(this).code[pc+21:pc+22])
PUSH22
0x75
() => (address(this).code[pc+22:pc+23])
PUSH23
0x76
() => (address(this).code[pc+23:pc+24])
PUSH24
0x77
() => (address(this).code[pc+24:pc+25])
PUSH25
0x78
() => (address(this).code[pc+25:pc+26])
PUSH26
0x79
() => (address(this).code[pc+26:pc+27])
PUSH27
0x7a
() => (address(this).code[pc+27:pc+28])
PUSH28
0x7b
() => (address(this).code[pc+28:pc+29])
PUSH29
0x7c
() => (address(this).code[pc+29:pc+30])
PUSH30
0x7d
() => (address(this).code[pc+30:pc+31])
PUSH31
0x7e
() => (address(this).code[pc+31:pc+32])
PUSH32
0x7f
() => (address(this).code[pc+32:pc+33])
DUP1
0x80
(1) => (1, 1)
DUP2
0x81
(1, 2) => (2, 1, 2)
DUP3
0x82
(1, 2, 3) => (3, 1, 2, 3)
DUP4
0x83
(1, ..., 4) => (4, 1, ..., 4)
DUP5
0x84
(1, ..., 5) => (5, 1, ..., 5)
DUP6
0x85
(1, ..., 6) => (6, 1, ..., 6)
DUP7
0x86
(1, ..., 7) => (7, 1, ..., 7)
DUP8
0x87
(1, ..., 8) => (8, 1, ..., 8)
DUP9
0x88
(1, ..., 9) => (9, 1, ..., 9)
DUP10
0x89
(1, ..., 10) => (10, 1, ..., 10)
DUP11
0x8a
(1, ..., 11) => (11, 1, ..., 11)
DUP12
0x8b
(1, ..., 12) => (12, 1, ..., 12)
DUP13
0x8c
(1, ..., 13) => (13, 1, ..., 13)
DUP14
0x8d
(1, ..., 14) => (14, 1, ..., 14)
DUP15
0x8e
(1, ..., 15) => (15, 1, ..., 15)
DUP16
0x8f
(1, ..., 16) => (16, 1, ..., 16)
SWAP1
0x90
(1, 2) => (2, 1)
SWAP2
0x91
(1, 2, 3) => (3, 2, 1)
SWAP3
0x92
(1, ..., 4) => (4, ..., 1)
SWAP4
0x93
(1, ..., 5) => (5, ..., 1)
SWAP5
0x94
(1, ..., 6) => (6, ..., 1)
SWAP6
0x95
(1, ..., 7) => (7, ..., 1)
SWAP7
0x96
(1, ..., 8) => (8, ..., 1)
SWAP8
0x97
(1, ..., 9) => (9, ..., 1)
SWAP9
0x98
(1, ..., 10) => (10, ..., 1)
SWAP10
0x99
(1, ..., 11) => (11, ..., 1)
SWAP11
0x9a
(1, ..., 12) => (12, ..., 1)
SWAP12
0x9b
(1, ..., 13) => (13, ..., 1)
SWAP13
0x9c
(1, ..., 14) => (14, ..., 1)
SWAP14
0x9d
(1, ..., 15) => (15, ..., 1)
SWAP15
0x9e
(1, ..., 16) => (16, ..., 1)
SWAP16
0x9f
(1, ..., 17) => (17, ..., 1)
LOG0
0xa0
(offset, length) => ()
emit(memory[offset:offset+length])
LOG1
0xa1
(offset, length, topic0) => ()
emit(memory[offset:offset+length], topic0)
LOG2
0xa2
(offset, length, topic0, topic1) => ()
emit(memory[offset:offset+length], topic0, topic1)
LOG3
0xa3
(offset, length, topic0, topic1, topic2) => ()
emit(memory[offset:offset+length], topic0, topic1, topic2)
LOG4
0xa4
(offset, length, topic0, topic1, topic2, topic3) => ()
emit(memory[offset:offset+length], topic0, topic1, topic2, topic3)
CREATE
0xf0
(value, offset, length) => (addr)
addr = keccak256(rlp([address(this), this.nonce]))[12:] addr.code = exec(memory[offset:offset+length]) addr.balance += value this.balance -= value this.nonce += 1
CALL
0xf1
(gas, addr, value, argsOffset, argsLength, retOffset, retLength) => (success)
memory[retOffset:retOffset+retLength] = address(addr).callcode.gas(gas).value(value)(memory[argsOffset:argsOffset+argsLength]) success = true (unless the prev call reverted)
CALLCODE
0xf2
(gas, addr, value, argsOffset, argsLength, retOffset, retLength) => (success)
memory[retOffset:retOffset+retLength] = address(addr).callcode.gas(gas).value(value)(memory[argsOffset:argsOffset+argsLength]) success = true (unless the prev call reverted)
TODO: what's the difference between this & CALL?
RETURN
0xf3
(offset, length) => ()
return memory[offset:offset+length]
DELEGATECALL
0xf4
(gas, addr, argsOffset, argsLength, retOffset, retLength) => (success)
memory[retOffset:retOffset+retLength] = address(addr).delegatecall.gas(gas)(memory[argsOffset:argsOffset+argsLength]) success = true (unless the prev call reverted)
CREATE2
0xf5
(value, offset, length, salt) => (addr)
initCode = memory[offset:offset+length] addr = keccak256(0xff ++ address(this) ++ salt ++ keccak256(initCode))[12:] address(addr).code = exec(initCode)
STATICCALL
0xfa
(gas, addr, argsOffset, argsLength, retOffset, retLength) => (success)
memory[retOffset:retOffset+retLength] = address(addr).delegatecall.gas(gas)(memory[argsOffset:argsOffset+argsLength]) success = true (unless the prev call reverted)
TODO: what's the difference between this & DELEGATECALL?
REVERT
0xfd
(offset, length) => ()
revert(memory[offset:offset+length])
SELFDESTRUCT
0xff
(addr) => ()
address(addr).send(address(this).balance) this.code = 0
Tracing Utils
Transaction Tracing
One excellent way to learn more about the internal workings of the EVM is to trace the execution of a transaction opcode by opcode. This approach can also help you assess the correctness of assembly code and catch problems related to the compiler or its optimization steps.
The following JavaScript snippet uses an ethers provider to connect to an Ethereum node with the debug JSON RPC endpoints activated. Although this requires an archive node on Mainnet, it can also be run quickly and easily against a local development Testnet using Hardhat node, Ganache, or some other Ethprovider targeting developers.
Transaction traces for even simple smart contract interactions are verbose, so we recommend providing a filename to save the trace for further analysis. Note that the following function depends on the fs module built into Node.js, so it should be copied into a Node console rather than a browser console. However, the filesystem interactions could be removed for use in the browser.
const ethers = require("ethers");
const fs = require("fs");

const provider = new ethers.providers.JsonRpcProvider(
  process.env.ETH_PROVIDER || "http://localhost:8545"
);

let traceTx = async (txHash, filename) => {
  await provider.send("debug_traceTransaction", [txHash]).then((res) => {
    console.log(`Got a response with keys: ${Object.keys(res)}`);
    const indexedRes = {
      ...res,
      structLogs: res.structLogs.map((structLog, index) => ({
        index,
        ...structLog,
      })),
    };
    if (filename) {
      fs.writeFileSync(filename, JSON.stringify(indexedRes, null, 2));
    } else {
      log(indexedRes);
    }
  });
};
By default, transaction traces do not feature a sequential index, making it difficult to answer questions such as, "Which was the 100th opcode executed?" The above script adds such an index for easier navigation and communication.
The output of the script contains a list of opcode executions. A snippet might look something like:
{
  "structLogs": [
    ...,
    {
      "index": 191,
      "pc": 3645,
      "op": "SSTORE",
      "gas": 10125,
      "gasCost": 2900,
      "depth": 1,
      "stack": [
        "0xa9059cbb",
        "0x700",
        "0x7fb610713c8404e21676c01c271bb662df6eb63c",
        "0x1d8b64f4775be40000",
        "0x0",
        "0x1e01",
        "0x68e224065325c640131672779181a2f2d1324c4d",
        "0x7fb610713c8404e21676c01c271bb662df6eb63c",
        "0x1d8b64f4775be40000",
        "0x0",
        "0x14af3e50252dfc40000",
        "0x14af3e50252dfc40000",
        "0x7d7d4dc7c32ad4c905ab39fc25c4323c4a85e4b1b17a396514e6b88ee8b814e8"
      ],
      "memory": [
        "00000000000000000000000068e224065325c640131672779181a2f2d1324c4d",
        "0000000000000000000000000000000000000000000000000000000000000002",
        "0000000000000000000000000000000000000000000000000000000000000080"
      ],
      "storage": {
        "7d7d4dc7c32ad4c905ab39fc25c4323c4a85e4b1b17a396514e6b88ee8b814e8": "00000000000000000000000000000000000000000000014af3e50252dfc40000"
      }
    },
    ...,
  ],
  "gas": 34718,
  "failed": false,
  "returnValue": "0000000000000000000000000000000000000000000000000000000000000001"
}
An overview of the fields for opcode execution trace:
index: The index we added indicates that the above opcode was the 191st one executed. This is helpful for staying oriented as you jump around the trace.pc: Program counter, for example, this opcode exists at index3645of the contract bytecode. You will notice thatpcincrements by one for many common opcodes, by more than one for PUSH opcodes, and is reset entirely by JUMP/JUMP opcodes.op: Name of the opcode. Since most of the actual data is hex-encoded, using grep or ctrl-f to search through the trace for opcode names is an effective strategy.gas: Remaining gas before the opcode is executedgasCost: Cost of this operation. For CALL and similar opcodes, this cost takes into account all gas spent by the child execution frame.depth: Each call creates a new child execution frame, and this variable tracks how many sub-frames exist. Generally, CALL opcodes increase the depth and RETURN opcodes decrease it.stack: A snapshot of the entire stack before the opcode executesmemory: A snapshot of the entire memory before the opcode executesstorage: An accumulation of all state changes made during the execution of the transaction being traced
Navigating a transaction trace can be challenging, especially when trying to match opcode executions to higher-level Solidity code. An effective first step is to identify uncommon opcodes that correspond to easily identifiable logic in the source code. Generally, expensive operations are relatively uncommon, so SLOAD and SSTORE are good ones to scan first and match against places where state variables are read or written in Solidity. Alternatively, CALL and related opcodes are relatively uncommon and can be matched with calls to other contracts in the source code.
If there is a specific part of the source code you are interested in tracing, matching uncommon opcodes to the source code will give you bounds on where to search. From this point, you will likely start walking through the trace opcode by opcode as you review the source code line by line. Leaving a few ephemeral comments in the source code, like # opcode 191, can help you keep track and pick up where you left off if you need to take a break.
Exploring transaction traces is challenging work, but the reward is an ultra-high-definition view of how the EVM operates internally and can help you identify problems that might not be apparent from just the source code.
Storage Tracing
Although you can get an overview of all the changes to the contract state by checking the storage field of the last executed opcode in the above trace, the following helper function will extract that for you for quicker and easier analysis. If you are conducting a more involved investigation into a contract's state, we recommend you check out the slither-read-storage command for a more powerful tool.
const traceStorage = async (txHash) => {
  await provider.send("debug_traceTransaction", [txHash]).then((res) => {
    log(res.structLogs[res.structLogs.length - 1].storage);
  });
};
A Guide on Performing Arithmetic Checks in the EVM
The Ethereum Virtual Machine (EVM) distinguishes itself from other virtual machines and computer systems through several unique aspects. One notable difference is its treatment of arithmetic checks. While most architectures and virtual machines provide access to carry bits or an overflow flag, these features are absent in the EVM. Consequently, these safeguards must be incorporated within the machine's constraints.
Starting with Solidity version 0.8.0 the compiler automatically includes over and underflow protection in all arithmetic operations. Prior to version 0.8.0, developers were required to implement these checks manually, often using a library known as SafeMath, originally developed by OpenZeppelin. The compiler incorporates arithmetic checks in a manner similar to SafeMath, through additional operations.
As the Solidity language has evolved, the compiler has generated increasingly optimized code for arithmetic checks. This trend is also observed in smart contract development in general, where highly optimized arithmetic code written in low-level assembly is becoming more common. However, there is still a lack of comprehensive resources explaining the nuances of how the EVM handles arithmetic for signed and unsigned integers of 256 bits and less.
This article serves as a guide for gaining a deeper understanding of arithmetic in the EVM by exploring various ways to perform arithmetic checks. We'll learn more about the two's complement system and some lesser-known opcodes. This article is designed for those curious about the EVM's inner workings and those interested in bit manipulations in general. A basic understanding of bitwise arithmetic and Solidity opcodes is assumed.
Additional references for complementary reading are:
Disclaimer: Please note that this article is for educational purposes. It is not our intention to encourage micro optimizations in order to save gas, as this can potentially introduce new, hard-to-detect bugs that may compromise the security and stability of a protocol. As a developer, prioritize the safety and security of the protocol over premature optimizations. Including redundant checks for critical operations may be a good practice when the protocol code is still evolving. However, we do encourage experimentation with these operations for educational purposes.
Arithmetic checks for uint256 addition
To examine how the solc compiler implements arithmetic checks, we can compile the code with the --asm flag and inspect the resulting bytecode.
Alternatively, using the --ir flag allows us to examine the Yul code that is generated as an intermediate representation (IR).
Note that Solidity aims to make the new Yul pipeline the standard. Certain operations (including arithmetic checks) are always included as Yul code, regardless of whether the code is compiled with the new pipeline using
--via-ir. This provides an opportunity to examine the Yul code and gain a better understanding of how arithmetic checks are executed in Solidity. However, keep in mind that the final bytecode may differ slightly when compiler optimizations are turned on.
To illustrate how the compiler detects overflow in unsigned integer addition, consider the following example of Yul code produced by the compiler before version 0.8.16.
function checked_add_t_uint256(x, y) -> sum {
    x := cleanup_t_uint256(x)
    y := cleanup_t_uint256(y)

    // overflow, if x > (maxValue - y)
    if gt(x, sub(0xffffffffffffffffffffffffffffffffffffffffffffffffffffffffffffffff, y)) { panic_error_0x11() }

    sum := add(x, y)
}
To improve readability, we can translate the Yul code back into high-level Solidity code.
/// @notice versions >=0.8.0 && <0.8.16
function checkedAddUint1(uint256 a, uint256 b) public pure returns (uint256 c) {
    unchecked {
        c = a + b;

        if (a > type(uint256).max - b) arithmeticError();
    }
}
Solidity's arithmetic errors are encoded as
abi.encodeWithSignature("Panic(uint256)", 0x11).
The check for overflow in unsigned integer addition involves calculating the largest value that one summand can have when added to the other without causing an overflow.
Specifically, in this case, the maximum value a can have is type(uint256).max - b.
If a exceeds this value, we can conclude that a + b will overflow.
An alternative and slightly more efficient approach for computing the maximum value of a involves inverting the bits of b.
/// @notice versions >=0.8.0 && <0.8.16 with compiler optimizations
function checkedAddUint2(uint256 a, uint256 b) public pure returns (uint256 c) {
    unchecked {
        c = a + b;

        if (a > ~b) arithmeticError();
    }
}
This is process is equivalent, because type(uint256).max is a 256-bit integer with all its bits set to 1.
Subtracting b from type(uint256).max can be viewed as inverting each bit in b.
This transformation is demonstrated by ~b = ~(0 ^ b) = ~0 ^ b = MAX ^ b = MAX - b.
Note that
a - b = a ^ bis NOT a general rule, except in special cases, such as when one of the values equalstype(uint256).max. The relation~b + 1 = 0 - b = -bis also obtained if we add1mod2**256to both sides of the previous equation.
By first calculating the result of the addition and then performing a check on the sum, the need performing extra arithmetic operations are removed. This is how the compiler implements arithmetic checks for unsigned integer addition in versions 0.8.16 and later.
/// @notice versions >=0.8.16
function checkedAddUint(uint256 a, uint256 b) public pure returns (uint256 c) {
    unchecked {
        c = a + b;

        if (a > c) arithmeticError();
    }
}
Overflow is detected when the sum is smaller than one of its addends.
In other words, if a > a + b, then overflow has occurred.
To fully prove this, it is necessary to verify that overflow occurs if and only if a > a + b.
An important observation is that a > a + b (mod 2**256) for b > 0 is only possible when b >= 2**256, which exceeds the maximum possible value.
Arithmetic checks for int256 addition
The Solidity compiler generates the following (equivalent) code for detecting overflow in signed integer addition for versions below 0.8.16.
/// @notice versions >=0.8.0 && <0.8.16
function checkedAddInt(int256 a, int256 b) public pure returns (int256 c) {
    unchecked {
        c = a + b;

        // If `a > 0`, then `b` can't exceed `type(int256).max - a`.
        if (a > 0 && b > type(int256).max - a) arithmeticError();
        // If `a < 0`, then `b` can't be less than `type(int256).min - a`.
        if (a < 0 && b < type(int256).min - a) arithmeticError();
    }
}
Similar to the previous example, we can compute the maximum and minimum value of one addend, given that the other is either positive or negative.
For reference, this is the Yul code that is produced when compiling via IR.
function checked_add_t_int256(x, y) -> sum {
    x := cleanup_t_int256(x)
    y := cleanup_t_int256(y)

    // overflow, if x >= 0 and y > (maxValue - x)
    if and(iszero(slt(x, 0)), sgt(y, sub(0x7fffffffffffffffffffffffffffffffffffffffffffffffffffffffffffffff, x))) { panic_error_0x11() }
    // underflow, if x < 0 and y < (minValue - x)
    if and(slt(x, 0), slt(y, sub(0x8000000000000000000000000000000000000000000000000000000000000000, x))) { panic_error_0x11() }

    sum := add(x, y)
}
It's important to note that when comparing signed values, the opcodes slt (signed less than) and sgt (signed greater than) must be used to avoid interpreting signed integers as unsigned integers.
Solidity will automatically insert the correct opcode based on the value's type. This applies to other signed operations as well.
Quick primer on a two's complement system
In a two's complement system, the range of possible integers is divided into two halves: the positive and negative domains.
The first bit of an integer represents the sign, with 0 indicating a positive number and 1 indicating a negative number.
For positive integers (those with a sign bit of 0), their binary representation is the same as their unsigned bit representation.
However, the negative domain is shifted to lie "above" the positive domain.
$$\text{uint256 domain}$$
$$ ├\underset{\hskip -0.5em 0}{─}────────────────────────────\underset{\hskip -3em 2^{256} - 1}{─}┤ $$
0x0000000000000000000000000000000000000000000000000000000000000000 // 0
0xffffffffffffffffffffffffffffffffffffffffffffffffffffffffffffffff // uint256_max
$$\text{int256 domain}$$
$$ \overset{positive}{ ├\underset{\hskip -0.5em 0}{─}────────────\underset{\hskip -3em 2^{255} - 1}{─}┤ } \overset{negative}{ ├──\underset{\hskip -2.1em - 2^{255}}{─}──────────\underset{\hskip -1 em -1}{─}┤ } $$
0x0000000000000000000000000000000000000000000000000000000000000000 // 0
0x7fffffffffffffffffffffffffffffffffffffffffffffffffffffffffffffff // int256_max
0x8000000000000000000000000000000000000000000000000000000000000000 // int256_min
0xffffffffffffffffffffffffffffffffffffffffffffffffffffffffffffffff // -1
The maximum positive integer that can be represented in a two's complement system using 256 bits is
0x7fffffffffffffffffffffffffffffffffffffffffffffffffffffffffffffff which is roughly equal to half of the maximum value that can be represented using uint256.
The most significant bit of this number is 0, while all other bits are 1.
On the other hand, all negative numbers start with a 1 as their first bit.
If we look at the underlying hex representation of these numbers, they are all greater than or equal to the smallest integer that can be represented using int256, which is 0x8000000000000000000000000000000000000000000000000000000000000000. The integer's binary representation is a 1 followed by 255 0's.
To obtain the negative value of an integer in a two's complement system, we flip the underlying bits and add 1: -a = ~a + 1.
An example illustrates this.
0x0000000000000000000000000000000000000000000000000000000000000003 // 3
0xfffffffffffffffffffffffffffffffffffffffffffffffffffffffffffffffc // ~3
0xfffffffffffffffffffffffffffffffffffffffffffffffffffffffffffffffd // -3 = ~3 + 1
To verify that -a + a = 0 holds for all integers, we can use the property of two's complement arithmetic that -a = ~a + 1.
By substituting this into the equation, we get -a + a = (~a + 1) + a = MAX + 1 = 0, where MAX is the maximum integer value.
In two's complement arithmetic, there is a unique case that warrants special attention. The smallest possible integer int256).min = 0x8000000000000000000000000000000000000000000000000000000000000000 = -57896044618658097711785492504343953926634992332820282019728792003956564819968
does not have a positive inverse, making it the only negative number with this property.
Interestingly, if we try to compute -type(int256).min, we obtain the same number, as -type(int256).min = ~type(int256).min + 1 = type(int256).min.
This means there are two fixed points for additive inverses: -0 = 0 and -type(int256).min = type(int256).min.
It's important to note that Solidity's arithmetic checks will throw an error when evaluating -type(int256).min (outside of unchecked blocks).
Examining the underlying bit (or hex) representation emphasizes the importance of using the correct operators for signed integers, such as slt instead of lt, to prevent misinterpreting negative values as large numbers.
  0xffffffffffffffffffffffffffffffffffffffffffffffffffffffffffffffff // int256(-1) or type(uint256).max
< 0x0000000000000000000000000000000000000000000000000000000000000000 // 0
// When using `slt`, the comparison is interpreted as `-1 < 0 = true`.
= 0x0000000000000000000000000000000000000000000000000000000000000001
// When using `lt`, the comparison is interpreted as `type(uint256).max < 0 = false`.
= 0x0000000000000000000000000000000000000000000000000000000000000000
Starting with Solidity versions 0.8.16, integer overflow is prevented by using the computed result c = a + b to check for overflow/underflow.
However, signed addition requires two separate checks instead of one, unlike unsigned addition.
/// @notice versions >=0.8.16
function checkedAddInt2(int256 a, int256 b) public pure returns (int256 c) {
    unchecked {
        c = a + b;

        // If `a` is positive, then the sum `c = a + b` can't be less than `b`.
        if (a > 0 && c < b) arithmeticError();
        // If `a` is negative, then the sum `c = a + b` can't be greater than `b`.
        if (a < 0 && c > b) arithmeticError();
    }
}
Nevertheless, by utilizing the boolean exclusive-or, we can combine these checks into a single step.
Although Solidity does not allow the xor operation for boolean values, it can be used in inline-assembly.
While doing so, it is important to validate our assumptions that both inputs are genuinely boolean (either 0 or 1), as the xor operation functions bitwise and is not limited to only boolean values.
function checkedAddInt3(int256 a, int256 b) public pure returns (int256 c) {
    unchecked {
        c = a + b;

        bool overflow;

        assembly {
            // If `a >= 0`, then the sum `c = a + b` can't be less than `b`.
            // If `a <  0`, then the sum `c = a + b` can't be greater than `b`.
            // We combine these two conditions into one using `xor`.
            overflow := xor(slt(a, 0), sgt(b, c))
        }

        if (overflow) arithmeticError();
    }
}
An alternative approach to detecting overflow in addition is based on the observation that adding two integers with different signs will never result in an overflow. This simplifies the check to the case when both operands have the same sign. If the sign of the sum differs from one of the operands, the result has overflowed.
function checkedAddInt4(int256 a, int256 b) public pure returns (int256 c) {
    unchecked {
        c = a + b;

        // Overflow, if the signs of `a` and `b` are the same,
        // but the sign of the result `c = a + b` differs from its summands.
        // When the signs of `a` and `b` differ overflow is not possible.
        if ((~a ^ b) & (a ^ c) < 0) arithmeticError();
    }
}
Instead of checking the sign bit explicitly, which can be done by shifting the value to the right by 255 bits and verifying that it is non-zero,
we can use the slt operation to compare the value with 0.
Arithmetic checks for uint256 subtraction
The process of checking for underflow in subtraction is similar to that of addition.
When subtracting a - b, and b is greater than a, an underflow occurs.
function checkedSubUint(uint256 a, uint256 b) public pure returns (uint256 c) {
    unchecked {
        c = a - b;

        if (b > a) arithmeticError();
    }
}
Alternatively, we could perform the check on the result itself using if (c > a) arithmeticError();, because subtracting a positive value from a should yield a value less than or equal to a.
However, in this case, we don't save any operations.
Similar to addition, for signed integers, we can combine the checks for both scenarios into a single check using xor.
function checkedSubInt(int256 a, int256 b) public pure returns (int256 c) {
    unchecked {
        c = a - b;

        bool overflow;

        assembly {
            // If `b >= 0`, then the result `c = a - b` can't be greater than `a`.
            // If `b <  0`, then the result `c = a - b` can't be less than `a`.
            overflow := xor(sgt(b, 0), sgt(a, c))
        }

        if (overflow) arithmeticError();
    }
}
Arithmetic checks for uint256 multiplication
To detect overflow when multiplying two unsigned integers, we can use the approach of computing the maximum possible value of a multiplicand and check that it isn't exceeded.
/// @notice versions >=0.8.0 && <0.8.17
function checkedMulUint1(uint256 a, uint256 b) public pure returns (uint256 c) {
    unchecked {
        c = a * b;

        if (a != 0 && b > type(uint256).max / a) arithmeticError();
    }
}
The Solidity compiler always includes a zero check for all division and modulo operations, irrespective of whether an unchecked block is present. The EVM itself, however, returns
0when dividing by0, which applies to inline-assembly as well. Evaluating the boolean expressiona != 0 && b > type(uint256).max / ain reverse order would cause an incorrect reversion whena = 0.
We can compute the maximum value for b as long as a is non-zero. However, if a is zero, we know that the result will be zero as well, and there is no need to check for overflow.
Like before, we can also make use of the result and try to reconstruct one multiplicand from it. This is possible if the product didn't overflow and the first multiplicand is non-zero.
/// @notice versions >=0.8.17
function checkedMulUint2(uint256 a, uint256 b) public pure returns (uint256 c) {
    unchecked {
        c = a * b;

        if (a != 0 && b != c / a) arithmeticError();
    }
}
For reference, we can further remove the additional division by zero check by writing the code in assembly.
function checkedMulUint3(uint256 a, uint256 b) public pure returns (uint256 c) {
    unchecked {
        c = a * b;

        bool overflow;

        assembly {
            // This version does not include a redundant division-by-0 check
            // which the Solidity compiler includes when performing `c / a`.
            overflow := iszero(or(iszero(a), eq(div(c, a), b)))
        }

        if (overflow) arithmeticError();
    }
}
Arithmetic checks for int256 multiplication
In versions before 0.8.17, the Solidity compiler uses four separate checks to detect integer multiplication overflow. The produced Yul code is equivalent to the following high-level Solidity code.
/// @notice versions >=0.8.0 && <0.8.17
function checkedMulInt(int256 a, int256 b) public pure returns (int256 c) {
    unchecked {
        c = a * b;

        if (a > 0 && b > 0 && a > type(int256).max / b) arithmeticError();
        if (a > 0 && b < 0 && a < type(int256).min / b) arithmeticError();
        if (a < 0 && b > 0 && a < type(int256).min / b) arithmeticError();
        if (a < 0 && b < 0 && a < type(int256).max / b) arithmeticError();
    }
}
Since Solidity version 0.8.17, the check is performed by utilizing the computed product in the check.
/// @notice versions >=0.8.17
function checkedMulInt2(int256 a, int256 b) public pure returns (int256 c) {
    unchecked {
        c = a * b;

        if (a < 0 && b == type(int256).min) arithmeticError();
        if (a != 0 && b != c / a) arithmeticError();
    }
}
When it comes to integer multiplication, it's important to handle the case when a < 0 and b == type(int256).min.
The actual case, where the product c will overflow, is limited to a == -1 and b == type(int256).min.
This is because -b cannot be represented as a positive signed integer, as previously mentioned.
Arithmetic checks for addition with sub-32-byte types
When performing arithmetic checks on data types that use less than 32 bytes, there are some additional steps to consider. First, let's take a look at the addition of signed 64-bit integers.
On a 64-bit system, integer addition works in the same way as before.
  0xfffffffffffffffe // int64(-2)
+ 0x0000000000000003 // int64(3)
= 0x0000000000000001 // int64(1)
However, when performing the same calculations on a 256-bit machine, we need to extend the sign of the int64 value over all unused bits,
otherwise the value won't be interpreted correctly.
                                   extended sign ──┐┌── 64-bit information
  0xfffffffffffffffffffffffffffffffffffffffffffffffffffffffffffffffe // int64(-2)
+ 0x0000000000000000000000000000000000000000000000000000000000000003 // int64(3)
= 0x0000000000000000000000000000000000000000000000000000000000000001 // int64(1)
It's worth noting that not all operations require clean upper bits. In fact, even if the upper bits are dirty, we can still get correct results for addition. However, the sum will usually contain dirty upper bits that will need to be cleaned. For example, we can perform addition without knowledge of the upper bits.
  0x????????????????????????????????????????????????fffffffffffffffe // int64(-2)
+ 0x????????????????????????????????????????????????0000000000000003 // int64(3)
= 0x????????????????????????????????????????????????0000000000000001 // int64(1)
It is crucial to be mindful of when to clean the bits before and after operations. By default, Solidity takes care of cleaning the bits before operations on smaller types and lets the optimizer remove any redundant steps. However, values accessed after operations included by the compiler are not guaranteed to be clean. In particular, this is the case for addition with small data types. For example, the bit cleaning steps will be removed by the optimizer (even without optimizations enabled) if a variable is only accessed in a subsequent assembly block. Refer to the Solidity documentation for further information on this matter.
When performing arithmetic checks in the same way as before, it is necessary to include a step to clean the bits on the sum.
One approach to achieve this is by performing signextend(7, value), which extends the sign of a 64-bit (7 + 1 = 8 bytes) integer over all upper bits.
function checkedAddInt64_1(int64 a, int64 b) public pure returns (int64 c) {
    unchecked {
        bool overflow;

        c = a + b;

        assembly {
            // Note that we must manually clean the upper bits in this case.
            // Solidity will optimize the cleaning away otherwise.
            // Extend the sign of the sum to 256 bits.
            c := signextend(7, c)

            // Perform the same arithmetic overflow check as before.
            overflow := xor(slt(a, 0), sgt(b, c))
        }

        if (overflow) arithmeticError();
    }
}
If we remove the line that includes c := signextend(7, c) the overflow check will not function correctly.
This is because Solidity does not take into account the fact that the variable is used in an assembly block, and the optimizer removes the bit cleaning operation, even if the Yul code includes it after the addition.
One thing to keep in mind is that since we are performing a 64-bit addition in 256 bits, we practically have access to the carry/overflow bits.
If our computed value does not overflow, then it will fall within the correct bounds type(int64).min <= c <= type(int64).max.
The actual overflow check in Solidity involves verifying both the upper and lower bounds.
/// @notice version >= 0.8.16
function checkedAddInt64_2(int64 a, int64 b) public pure returns (int64 c) {
    unchecked {
        // Perform the addition in int256.
        int256 uc = int256(a) + b;

        // If the value can not be represented by a int64, there is overflow.
        if (uc > type(int64).max || uc < type(int64).min) arithmeticError();

        // We can safely cast the result.
        c = int64(uc);
    }
}
There are a few ways to verify that the result in its 256-bit representation will fit into the expected data type. This is only true when all upper bits are the same. The most direct method, as previously shown, involves verifying both the lower and upper bounds.
/// @notice Check used in int64 addition for version >= 0.8.16.
function overflowInt64(int256 value) public pure returns (bool overflow) {
    overflow = value > type(int64).max || value < type(int64).min;
}
We can simplify the expression to a single comparison if we can shift the disjointed number domain back so that it's connected.
To accomplish this, we subtract the smallest negative int64 (type(int64).min) from a value (or add the underlying unsigned value).
A better way to understand this is by visualizing the signed integer number domain in relation to the unsigned domain (which is demonstrated here using int128).
$$\text{uint256 domain}$$
$$ ├\underset{\hskip -0.5em 0}{─}────────────────────────────\underset{\hskip -3em 2^{256} - 1}{─}┤ $$
$$\text{int256 domain}$$
$$ \overset{positive}{ ├\underset{\hskip -0.5em 0}{─}────────────\underset{\hskip -3em 2^{255} - 1}{─}┤ } \overset{negative}{ ├──\underset{\hskip -2.1em - 2^{255}}{─}──────────\underset{\hskip -1 em -1}{─}┤ } $$
The domain for uint128/int128 can be visualized as follows.
$$\text{uint128 domain}$$
$$ ├\underset{\hskip -0.5em 0}─────────────\underset{\hskip -3em 2^{128}-1}─┤ \hskip 7em┆ $$
$$\text{int128 domain}$$
$$ ├\underset{\hskip -0.5em 0}{─}────\underset{\hskip -3em 2^{127} - 1}─\overset{\hskip -3em positive}{┤} \hskip 7em ├──\underset{\hskip -2.1em - 2^{127}}───\underset{\hskip -1 em -1}{─}\overset{\hskip -3em negative}{┤} $$
Note that the scales of the number ranges in the previous section do not accurately depict the magnitude of numbers that are representable with the different types and only serve as a visualization. We can represent twice as many numbers with only one additional bit, yet the uint256 domain has twice the number of bits compared to uint128.
After subtracting type(int128).min (or adding 2**127) and essentially shifting the domains to the right, we get the following, connected set of values.
$$ ├\underset{\hskip -0.5em 0}{─}────────────\underset{\hskip -3em 2^{128}-1}─┤ \hskip 7em┆ $$
$$ ├──────\overset{\hskip -3em negative}{┤} ├──────\overset{\hskip -3em positive}{┤} \hskip 7em┆ $$
If we interpret the shifted value as an unsigned integer, we only need to check whether it exceeds the maximum unsigned integer type(uint128).max.
The corresponding check in Solidity is shown below.
function overflowInt64_2(int256 value) public pure returns (bool overflow) {
    unchecked {
        overflow = uint256(value) - uint256(int256(type(int64).min)) > type(uint64).max;
    }
}
In this case the verbose assembly code might actually be easier to follow than the Solidity code which sometimes contains implicit operations.
int64 constant INT64_MIN = -0x8000000000000000;
uint64 constant UINT64_MAX = 0xffffffffffffffff;

function overflowInt64_2_yul(int256 value) public pure returns (bool overflow) {
    assembly {
        overflow := gt(sub(value, INT64_MIN), UINT64_MAX)
    }
}
As mentioned earlier, this approach is only effective for negative numbers when all of their upper bits are set to 1, allowing us to overflow back into the positive domain.
An alternative and more straightforward method would be to simply verify that all of the upper bits are equivalent to the sign bit for all integers.
function overflowInt64_3(int256 value) public pure returns (bool overflow) {
    overflow = value != int64(value);
}
In Yul, the equivalent resembles the following.
function overflowInt64_3_yul(int256 value) public pure returns (bool overflow) {
    assembly {
        overflow := iszero(eq(value, signextend(7, value)))
    }
}
Another way of extending the sign is to make use of sar (signed arithmetic right shift).
function overflowInt64_4(int256 value) public pure returns (bool overflow) {
    overflow = value != (value << 192) >> 192;
}

function overflowInt64_4_yul(int256 value) public pure returns (bool overflow) {
    assembly {
        overflow := iszero(eq(value, sar(192, shl(192, value))))
    }
}
Finally, a full example for detecting signed 64-bit integer overflow, implemented in Solidity can be seen below:
function checkedAddInt64_2(int64 a, int64 b) public pure returns (int64 c) {
    unchecked {
        // Cast the first summand.
        // The second summand is implicitly casted.
        int256 uc = int256(a) + b;

        // Check whether the result `uc` can be represented by 64 bits
        // by shifting the values to the uint64 domain.
        // This is done by subtracting the smallest value in int64.
        if (uint256(uc) - uint256(int256(type(int64).min)) > type(uint64).max) arithmeticError();

        // We can safely cast the result.
        c = int64(uc);
    }
}
One further optimization that we could perform is to add -type(int64).min instead of subtracting type(int64).min. This would not reduce computation costs, however it could end up reducing bytecode size. This is because when we subtract -type(int64).min, we need to push 32 bytes (0xffffffffffffffffffffffffffffffffffffffffffffffff8000000000000000), whereas when we add -type(int64).min, we only end up pushing 8 bytes (0x8000000000000000). However, as soon as we turn on compiler optimizations, the produced bytecode ends up being the same.
Arithmetic checks for multiplication with sub-32-byte types
When the product c = a * b can be calculated in 256 bits without the possibility of overflowing, we can verify whether the result can fit into the anticipated data type. This is also the way Solidity handles the check in versions 0.8.17 and later.
/// @notice version >= 0.8.17
function checkedMulInt64(int64 a, int64 b) public pure returns (int64 c) {
    unchecked {
        int256 uc = int256(a) * int256(b);

        // If the product can not be represented with 64 bits,
        // there is overflow.
        if (overflowInt64(uc)) arithmeticError();

        c = int64(uc);
    }
}
However, if the maximum value of a product exceeds 256 bits, then this method won't be effective.
This happens, for instance, when working with int192. The product type(int192).min * type(int192).min requires 192 + 192 = 384 bits to be stored, which exceeds the maximum of 256 bits.
Overflow occurs in 256 bits, causing a loss of information, and it won't be logical to check if the result fits into 192 bits.
In this scenario, we can rely on the previous checks and, for example, attempt to reconstruct one of the multiplicands.
function checkedMulInt192_1(int192 a, int192 b) public pure returns (int192 c) {
    unchecked {
        c = a * b;

        if (a != 0 && b != c / a) arithmeticError();
        if (a = -1 && b == type(int192).min) arithmeticError();
    }
}
We must consider the two special circumstances:
- When one of the multiplicands is zero (
a == 0), the other multiplicand cannot be retrieved. However, this case never results in overflow. - Even if the multiplication is correct in 256 bits, the calculation overflows when only examining the least-significant 192 bits if the first multiplicand is negative one (
a = -1) and the other multiplicand is the minimum value.
An example might help explain the second case.
  0xffffffffffffffff800000000000000000000000000000000000000000000000 // type(int192).min
* 0xffffffffffffffffffffffffffffffffffffffffffffffffffffffffffffffff // -1
= 0x0000000000000000800000000000000000000000000000000000000000000000 // type(int192).min (when looking at the first 192 bits)
A method to address this issue is to always start by sign-extending or cleaning the result before attempting to reconstruct the other multiplicand. By doing so, it eliminates the need to check for the special condition.
/// @notice version >= 0.8.17
function checkedMulInt192_2(int192 a, int192 b) public pure returns (int192 c) {
    unchecked {
        bool overflow;

        assembly {
            // Extend the sign for int192 (24 = 23 + 1 bytes).
            c := signextend(23, mul(a, b))

            // Overflow, if `a != 0 && b != c / a`.
            overflow := iszero(or(iszero(a), eq(b, sdiv(c, a))))
        }

        if (overflow) arithmeticError();
    }
}
Conclusion
In conclusion, we hope this article has served as an informative guide on signed integer arithmetic within the EVM and the two's complement system. We have explored:
- How the EVM makes use of the two's complement representation
- How integer values are interpreted as signed or unsigned depending on the opcodes used
- The added complexity from handling arithmetic for signed vs. unsigned integers
- The intricacies involved in managing sub 32-byte types
- The importance of bit-cleaning and the significance of
signextend
While low-level optimizations are attractive, they are also heavily error-prone. This article aims to deepen one's understanding of low-level arithmetic, to reduce these risks. Nevertheless, it is crucial to integrate custom low-level optimizations only after thorough manual analysis, automated testing, and to document any non-obvious assumptions.
Ethereum Yellow Paper
So, you want to read the Yellow Paper? Before we dive in, keep in mind that the Yellow Paper is outdated, and some in the community might refer to it as being deprecated. Check out the yellowpaper repository on GitHub and its BRANCHES.md file to stay up-to-date on how closely this document tracks the latest version of the Ethereum protocol. At the time of writing, the Yellow Paper is up to date with the Berlin hardfork, which occurred in April 2021. For an overview of all Ethereum forks and which EIPs are included in each of them, see the EIPs Forks page.
For a more up-to-date reference, check out the Ethereum Specification, which features a detailed description of each opcode for each hardfork in addition to reference implementations written in Python.
That said, the Yellow Paper is still a rich resource for ramping up on the fundamentals of the Ethereum protocol. This document aims to provide some guidance and assistance in deciphering Ethereum's flagship specification.
Mathematical Symbols
One challenging part of the Yellow Paper, for those of us who are not well-trained in formal mathematics, is comprehending the mathematical symbols. A cheat-sheet of some of these symbols is provided below:
∃: there exists∀: for all∧: and∨: or
And some more Ethereum-specific symbols:
N_{H}: 1,150,000, aka block number at which the protocol was upgraded from Homestead to Frontier.T: a transaction, e.g.,T = {n: nonce, p: gasPrice, g: gasLimit, t: to, v: value, i: initBytecode, d: data}S(): returns the sender of a transaction, e.g.,S(T) = T.fromΛ: (lambda) account creation functionKEC: Keccak SHA-3 hash functionRLP: Recursive Length Prefix encoding
High-level Glossary
The following are symbols and function representations that provide a high-level description of Ethereum. Many of these symbols represent a data structure, the details of which are described in subsequent sections.
σ: Ethereum world stateB: blockμ: EVM stateA: accumulated transaction sub-stateI: execution environmento: output ofH(μ,I); i.e., null if we're good to go or a set of data if execution should haltΥ(σ,T) => σ': the transaction-level state transition functionΠ(σ,B) => σ': the block-level state transition function; processes all transactions then finalizes with ΩΩ(B,σ) => σ: block-finalization state transition functionO(σ,μ,A,I): one iteration of the execution cycleH(μ,I) => o: outputs null while execution should continue or a series if execution should halt.
Ethereum World-State: σ
A mapping between addresses (external or contract) and account states. Saved as a Merkle-Patricia tree whose root is recorded on the blockchain backbone.
σ = [account1={...}, account2={...},
  account3={
    n: nonce, aka number of transactions sent by account3
    b: balance, i.e., the number of wei account3 controls
    s: storage root, hash of the Merkle-Patricia tree that contains this account's long-term data store
    c: code, hash of the EVM bytecode that controls this account; if this equals the hash of an empty string, this is a non-contract account.
  }, ...
]
The Block: B
B = Block = {
  H: Header = {
    p: parentHash,
    o: ommersHash,
    c: beneficiary,
    r: stateRoot,
    t: transactionsRoot,
    e: receiptsRoot,
    b: logsBloomFilter,
    d: difficulty,
    i: number,
    l: gasLimit,
    g: gasUsed,
    s: timestamp,
    x: extraData,
    m: mixHash,
    n: nonce,
  },
  T: Transactions = [
    tx1, tx2...
  ],
  U: Uncle block headers = [
    header1, header2...
  ],
  R: Transaction Receipts = [
    receipt_1 = {
      σ: root hash of the ETH state after transaction 1 finishes executing,
      u: cumulative gas used immediately after this tx completes,
      b: bloom filter,
      l: set of logs created while executing this tx
    }
  ]
}
Execution Environment: I
I = Execution Environment = {
  a: address(this), address of the account which owns the executing code
  o: tx.origin, original sender of the tx that initialized this execution
  p: tx.gasPrice, price of gas
  d: data, aka byte array of method id & args
  s: sender of this tx or initiator of this execution
  v: value sent along with this execution or transaction
  b: byte array of machine code to be executed
  H: header of the current block
  e: current stack depth
}
EVM State: μ
The state of the EVM during execution. This is the data structure provided by the debug_traceTransaction JSON RPC method. See this page for more details about using this method to investigate transaction execution.
μ = {
  g: gas left
  pc: program counter, i.e., index into which instruction of I.b to execute next
  m: memory contents, lazily initialized to 2^256 zeros
  i: number of words in memory
  s: stack contents
}
Accrued Sub-state: A
The data accumulated during tx execution that needs to be available at the end to finalize the transaction's state changes.
A = {
  s: suicide set, i.e., the accounts to delete at the end of this tx
  l: logs
  t: touched accounts
  r: refunds, e.g., gas received when storage is freed
}
Contract Creation
If we send a transaction tx to create a contract, tx.to is set to null, and we include a tx.init field that contains bytecode. This is NOT the bytecode run by the contract. Rather, it RETURNS the bytecode run by the contract, i.e., the tx.init code is run ONCE at contract creation and never again.
If T.to == 0, then this is a contract creation transaction, and T.init != null, T.data == null.
The table below lists all EIPs associated with Ethereum forks:
| Fork | EIP | What it does | Opcode | Gas | Notes |
|---|---|---|---|---|---|
| Homestead (606) | 2 | Homestead Hard-fork Changes | X | ||
| Homestead (606) | 7 | Delegatecall | X | ||
| Homestead (606) | 8 | Networking layer: devp2p Forward Compatibility Requirements for Homestead | |||
| DAO Fork (779) | 779 | DAO Fork | |||
| Tangerine Whistle (608) | 150 | Gas cost changes for IO-heavy operations | X | Introduces the all but one 64th rule | |
| Spurious Dragon (607) | 155 | Simple replay attack protection | |||
| Spurious Dragon (607) | 160 | EXP cost increase | X | ||
| Spurious Dragon (607) | 161 | State trie clearing (invariant-preserving alternative) | X | ||
| Spurious Dragon (607) | 170 | Contract code size limit | Alters the semantics of CREATE | ||
| Byzantium (609) | 100 | Change difficulty adjustment to target mean block time including uncles | |||
| Byzantium (609) | 140 | REVERT instruction | X | ||
| Byzantium (609) | 196 | Precompiled contracts for addition and scalar multiplication on the elliptic curve alt_bn128 | |||
| Byzantium (609) | 197 | Precompiled contracts for optimal ate pairing check on the elliptic curve alt_bn128 | |||
| Byzantium (609) | 198 | Precompiled contract for bigint modular exponentiation | |||
| Byzantium (609) | 211 | RETURNDATASIZE and RETURNDATACOPY | X | ||
| Byzantium (609) | 214 | STATICCALL | X | ||
| Byzantium (609) | 649 | Metropolis Difficulty Bomb Delay and Block Reward Reduction | |||
| Byzantium (609) | 658 | Embedding transaction status code in receipts | |||
| Constantinople (1013) | 145 | Bitwise shifting instructions in EVM | X | ||
| Constantinople (1013) | 1014 | Skinny CREATE2 | X | ||
| Constantinople (1013) | 1234 | Constantinople Difficulty Bomb Delay and Block Reward Adjustment | |||
| Constantinople (1013) | 1283 | Net gas metering for SSTORE without dirty maps | X | This EIP leads to reentrancies risks (see EIP-1283 incident report) and was directly removed with EIP-1716 | |
| Petersburg (1716) | 1716 | Remove EIP-1283 | X | See EIP-1283 incident report | |
| Istanbul (1679) | 152 | Precompiled contract for the BLAKE2 F compression function | |||
| Istanbul (1679) | 1108 | Reduce alt_bn128 precompile gas costs | X | ||
| Istanbul (1679) | 1344 | ChainID opcode | X | ||
| Istanbul (1679) | 1884 | Repricing for trie-size-dependent opcodes | X | X | The EIP changes the gas cost of multiple opcodes, and add SELFBALANCE |
| Istanbul (1679) | 2028 | Transaction data gas cost reduction | X | ||
| Istanbul (1679) | 2200 | Structured Definitions for Net Gas Metering | X | ||
| Muir Glacier (2387) | 2384 | Istanbul/Berlin Difficulty Bomb Delay | |||
| Berlin (2070) | 2565 | ModExp Gas Cost | X | ||
| Berlin (2070) | 2929 | Gas cost increases for state access opcodes | X | ||
| Berlin (2718) | 2718 | Typed Transaction Envelope | |||
| Berlin (2718) | 2930 | Typed Transaction Envelope | |||
| London | 1559 | Fee market change for ETH 1.0 chain | X | Significant modifications of Ethereum gas pricing | |
| London | 3198 | BASEFEE | X | ||
| London | 3529 | Reduction in refunds | X | Remove gas tokens benefits | |
| London | 3554 | Difficulty Bomb Delay to December 1st 2021 | |||
| Arrow Glacier | 4345 | Difficulty Bomb Delay to June 2022 | |||
| Gray Glacier | 5133 | Difficulty Bomb Delay to mid-September 2022 | |||
| Paris | 3675 | Upgrade consensus to Proof-of-Stake | Changes to DIFFICULTY and BLOCKHASH | ||
| Paris | 4399 | Supplant DIFFICULTY opcode with PREVRANDAO | X | DIFFICULTY becomes PREVRANDAO | |
| Shanghai | 3651 | Warm COINBASE | X | ||
| Shanghai | 3855 | PUSH0 instruction | X | ||
| Shanghai | 3860 | Limit and meter initcode | X | Caps the size of initcode and charges to more accurately reflect the cost of creating contracts, especially via CREATE/CREATE2 | |
| Shanghai | 4895 | Beacon chain push withdrawals as operations | |||
| Shanghai | 6049 | Deprecate SELFDESTRUCT | No code changes. A warning that semantic changes are likely to come soon | ||
| Dencun (7569) | 1153 | Transient storage opcodes | X | TSTORE and TLOAD, cheaper storage access opcodes whose changes only persist within a single transaction | |
| Dencun (7569) | 4788 | Beacon block root in the EVM | |||
| Dencun (7569) | 4844 | Shard Blob Transactions | X | X | "Proto-Danksharding", allows large amounts of data (blobs) to be committed to the chain without being stored directly on-chain/accessible to the EVM. Uses a separate EIP-1559-style fee market priced in "blob gas" |
| Dencun (7569) | 5656 | MCOPY - Memory copying instruction | X | ||
| Dencun (7569) | 6780 | SELFDESTRUCT only in same transaction | Significant changes to the semantics of SELFDESTRUCT | ||
| Dencun (7569) | 7516 | BLOBBASEFEE opcode | X |
In this table:
Opcode: The EIP adds or removes an opcodeGas: The EIP changes the gas rules
The following list presents every CIP associated with a Celo fork. Celo is an EVM-compatible chain.
| Fork | CIP/EIP | What it does |
|---|---|---|
| Churrito | EIP 211 | Creates RETURNDATASIZE and RETURNDATACOPY opcodes |
| Donut | CIP 25 | Adds Ed25519 precompile |
| Donut | CIP 31 - copied from EIP-2539 | Adds precompile for BLS12-381 curve operations |
| Donut | CIP 30 - copied from EIP-2539 | Adds precompile for BLS12-377 curve operations |
| Donut | CIP 20 | Adds extensible hash function precompile |
| Donut | CIP 21 | Adds governable lookback window |
| Donut | CIP 22 | Upgrades epoch SNARK data |
| Donut | CIP 26 | Adds precompile to return BLS pubkey of given validator |
| Donut | CIP 28 | Splits etherbase into separate addresses |
| Donut | CIP 35 | Adds support for Ethereum-compatible transactions |
| Espresso | EIP 2565 | Defines gas cost of ModExp precompile |
| Espresso | CIP 48 - modified from EIP 2929 | Gas repricing |
| Espresso | EIP 2718 | Introduces typed transaction envelope |
| Espresso | EIP 2930 | Introduces optional access lists |
| Espresso | CIP 42 - modified from EIP 1559 | Fee market changes |
| Espresso | EIP 3529 | Reduction in gas refunds |
| Espresso | EIP 3541 | Rejects deployment of contract code starting with the 0xEF byte |
| Espresso | CIP 43 | Incorporates Block Context |
| Espresso | CIP 47 | Modifies round change timeout formula |
| Espresso | CIP 45 | Modifies transaction fee check |
| Espresso | CIP 50 | Makes replay protection optional |
The following list comprises every TIP associated with a TRON upgrade. TRON is an EVM-compatible chain.
| Upgrade | TIP | What it does |
|---|---|---|
| Odyssey-v3.5 | 12 | Introduces event subscription model |
| Odyssey-v3.5 | 16 | Supports account multi-signature and different permissions |
| Odyssey-v3.5 | 17 | Implements adaptive energy upper limit |
| Odyssey-v3.5.1 | 24 | Offers RocksDB as a storage engine |
| Odyssey-v3.6.0 | 26 | Adds create2 instruction to TVM |
| Odyssey-v3.6.0 | 28 | Integrates built-in message queue in event subscription model |
| Odyssey-v3.6.0 | 29 | Adds bitwise shifting instructions to TVM |
| Odyssey-v3.6.0 | 30 | Adds extcodehash instruction to TVM to return keccak256 hash of a contract's code |
| Odyssey-v3.6.0 | 31 | Adds triggerConstantContract API to support contracts without ABI |
| Odyssey-v3.6.0 | 32 | Adds clearContractABI API to clear existing ABI of contract |
| Odyssey-v3.6.1 | 41 | Optimizes transaction history store occupancy space |
| Odyssey-v3.6.5 | 37 | Prohibits use of TransferContract & TransferAssetContract for contract account |
| Odyssey-v3.6.5 | 43 | Adds precompiled contract function batchvalidatesign to TVM that supports parallel signature verification |
| Odyssey-v3.6.5 | 44 | Adds ISCONTRACT opcode |
| Odyssey-v3.6.5 | 53 | Optimizes current TRON delegation mechanism |
| Odyssey-v3.6.5 | 54 | Supports automatic account activation when transferring TRX/TRC10 tokens in contracts |
| Odyssey-v3.6.5 | 60 | Adds validatemultisign instruction to TVM to support multi-signature verification |
| GreatVoyage-v4.0.0 | 135 | Introduces shielded TRC-20 contract standards |
| GreatVoyage-v4.0.0 | 137 | Add ZKP verification functions to shielded TRC-20 contract - verifyMintProof, verifyTransferProof, and verifyBurnProof |
| GreatVoyage-v4.0.0 | 138 | Add Pedersen hash computation pedersenHash function to shielded TRC-20 contract |
| GreatVoyage-v4.1.0 | 127 | Add new system contracts to support token exchange (including TRX and TRC-10) |
| GreatVoyage-v4.1.0 | 128 | Add new node type: Lite Fullnode |
| GreatVoyage-v4.1.0 | 174 | Add CHAINID instruction to TVM |
| GreatVoyage-v4.1.0 | 175 | Add SELFBALANCE instruction to TVM |
| GreatVoyage-v4.1.0 | 176 | altbn128-related operation energy reduction in TVM |
| GreatVoyage-v4.1.2 | 196 | Reward SRs with tx fees |
| GreatVoyage-v4.1.2 | 204 | MAX_FEE_LIMIT is configurable |
| GreatVoyage-v4.1.2 | 209 | Adapt Solidity compilers to Solidity 0.6.0 |
| GreatVoyage-v4.2.0(Plato) | 157 | Add freeze instructions to TVM - FREEZE, UNFREEZE, and FREEZEEXPIRETIME |
| GreatVoyage-v4.2.0(Plato) | 207 | Optimize TRX freezing resource utilization |
| GreatVoyage-v4.2.2(Lucretius) | 268 | ABI optimization - Move ABI out of SmartContract and store it in a new ABI store to reduce execution speeds of certain opcodes |
| GreatVoyage-v4.2.2(Lucretius) | 269 | Optimize block processing speed |
| GreatVoyage-v4.2.2(Lucretius) | 281 | Optimize database query performance |
| GreatVoyage-v4.3.0(Bacon) | 271 | Add vote instructions and precompile contracts to TVM |
| GreatVoyage-v4.3.0(Bacon) | 276 | Optimize block verification logic |
| GreatVoyage-v4.3.0(Bacon) | 285 | Optimize node startup |
| GreatVoyage-v4.3.0(Bacon) | 292 | Adjust account free net limit |
| GreatVoyage-v4.3.0(Bacon) | 293 | Adjust total net limit |
| GreatVoyage-v4.3.0(Bacon) | 295 | Optimize account data structure |
| GreatVoyage-v4.3.0(Bacon) | 298 | Add new plugin to optimize levelDB performance startup |
| GreatVoyage-v4.3.0(Bacon) | 306 | Add Error type in smart contract ABI |
| GreatVoyage-v4.4.0(Rousseau) | 289 | Block broadcasting optimization |
| GreatVoyage-v4.4.0(Rousseau) | 290 | Optimize dynamic database query performance |
| GreatVoyage-v4.4.0(Rousseau) | 272 | TVM compatibility with EVM |
| GreatVoyage-v4.4.0(Rousseau) | 318 | Adapt to Ethereum London Upgrade |
| GreatVoyage-v4.4.2(Augustinus) | 343 | Optimize levelDB read performance |
| GreatVoyage-v4.4.2(Augustinus) | 343 | Optimize TVM instruction execution |
| GreatVoyage-v4.4.4(Plotinus) | 362 | Optimize node broadcast data caching |
| GreatVoyage-v4.4.4(Plotinus) | 366 | Optimize node startup process |
| GreatVoyage-v4.5.1(Tertullian) | 369 | Support prometheus (metrics interface) |
| GreatVoyage-v4.5.1(Tertullian) | 370 | Support node conditionalized stop |
| GreatVoyage-v4.5.1(Tertullian) | 382 | Optimize account assets data structure |
| GreatVoyage-v4.5.1(Tertullian) | 383 | Optimize transaction cache loading |
| GreatVoyage-v4.5.1(Tertullian) | 388 | Optimize light node synchronization logic |
| GreatVoyage-v4.5.1(Tertullian) | 391 | Optimize block process and broadcasting logic |
| GreatVoyage-v4.5.1(Tertullian) | 397 | Raise limit of the 13th network parameter |
| GreatVoyage-v4.5.2(Aurelius) | 425 | Speed up TCP connection establishment. |
| GreatVoyage-v4.5.2(Aurelius) | 440 | Optimize transaction cache |
| GreatVoyage-v4.5.2(Aurelius) | 428 | Optimize lock competition in block processing |
| GreatVoyage-v4.6.0(Socrates) | 461 | Upgrade checkpoint mechanism to V2 in database module |
| GreatVoyage-v4.6.0(Socrates) | 476 | Optimize delegate data structure |
| GreatVoyage-v4.6.0(Socrates) | 387 | Add transaction memo fee |
| GreatVoyage-v4.6.0(Socrates) | 465 | Optimize reward calculation algorithm |
The following list includes each BEP associated with a Binance Smart Chain fork.
| Release | BEP | Functionality |
|---|---|---|
| v1.0.6 | 84 | Issue or bind BEP2 with existing BEP20 tokens |
| v1.1.5 | 93 | Introduce new block synchronization protocol |
| v1.1.5 | 95 | Establish real-time burning mechanism |
| v1.1.11 | 127 | Implement "Temporary Maintenance" mode for validators |
| v1.1.11 | 131 | Expand validator set with "Candidate" validators |
| v1.1.18 | 153 | Develop native staking protocol |
(Not So) Smart Contracts
This repository contains examples of common smart contract vulnerabilities, including code from real smart contracts. Use Not So Smart Contracts to learn about vulnerabilities, as a reference when performing security reviews, and as a benchmark for security and analysis tools:
(Not So) Smart Contracts
This repository contains examples of common Algorand smart contract vulnerabilities, including code from real smart contracts. Use Not So Smart Contracts to learn about Algorand vulnerabilities, as a reference when performing security reviews, and as a benchmark for security and analysis tools.
Features
Each Not So Smart Contract includes a standard set of information:
- Description of the vulnerability type
- Attack scenarios to exploit the vulnerability
- Recommendations to eliminate or mitigate the vulnerability
- Real-world contracts that exhibit the flaw
- References to third-party resources with more information
Vulnerabilities
| Not So Smart Contract | Description | Applicable to smart signatures | Applicable to smart contracts |
|---|---|---|---|
| Rekeying | Attacker rekeys an account | yes | yes |
| Unchecked Transaction Fees | Attacker sets excessive fees for smart signature transactions | yes | no |
| Closing Account | Attacker closes smart signature accounts | yes | no |
| Closing Asset | Attacker transfers entire asset balance of a smart signature | yes | no |
| Group Size Check | Contract does not check transaction group size | yes | yes |
| Time-based Replay Attack | Contract does not use lease for periodic payments | yes | no |
| Access Controls | Contract does not enfore access controls for updating and deleting application | no | yes |
| Asset Id Check | Contract does not check asset id for asset transfer operations | yes | yes |
| Denial of Service | Attacker stalls contract execution by opting out of a asset | yes | yes |
| Inner Transaction Fee | Inner transaction fee should be set to zero | no | yes |
| Clear State Transaction Check | Contract does not check OnComplete field of an Application Call | yes | yes |
Credits
These examples are developed and maintained by Trail of Bits.
If you have questions, problems, or just want to learn more, then join the #ethereum channel on the Empire Hacking Slack or contact us directly.
Rekeying
The lack of check for RekeyTo field in the Teal program allows malicious actors to rekey the associated account and control the account assets directly, bypassing the restrictions imposed by the Teal contract.
Description
Rekeying is an Algorand feature which allows a user to transfer the authorization power of their account to a different account. When an account has been rekeyed, all the future transactions from that account are accepted by the blockchain, if and only if the transaction has been authorized by the rekeyed account.
A user can rekey their account to the selected account by sending a rekey-to transaction with rekey-to field set to the target account address. A rekey-to transaction is atransaction which has the rekey-to field set to a well formed Algorand address. Any algorand account can be rekeyed by sending a rekey-to transaction from that account, this includes the contract accounts.
Contract accounts are accounts which are derived from the Teal code that is in control of that account. Anyone can set the fields and submit a transaction from the contract account as long as it passes the checks enforced in the Teal code. This results in an issue if the Teal code is supposed to approve a transaction that passes specific checks and does not check the rekey-to field. A malicious user can first send a transaction approved by the Teal code with rekey-to set to their account. After rekeying, the attacker can transfer the assets, algos directly by authorizing the transactions with their private key.
Similar issue affects the accounts that created a delegate signature by signing a Teal program. Delegator is only needed to sign the contract and any user with access to delegate signature can construct and submit transactions. Because of this, a malicious user can rekey the sender’s account if the Teal logic accepts a transaction with the rekey-to field set to the user controlled address.
Note: From Teal v6, Applications can also be rekeyed by executing an inner transaction with "RekeyTo" field set to a non-zero address. Rekeying an application allows to bypass the application logic and directly transfer Algos and assets of the application account.
Exploit Scenarios
A user creates a delegate signature for recurring payments. Attacker rekeys the sender’s account by specifying the rekey-to field in a valid payment transaction.
Example
Note: This code contains several other vulnerabilities, Unchecked Transaction Fees, Closing Account, Time-based Replay Attack.
def withdraw(
    duration,
    period,
    amount,
    receiver,
    timeout,
):
    return And(
        Txn.type_enum() == TxnType.Payment,
        Txn.first_valid() % period == Int(0),
        Txn.last_valid() == Txn.first_valid() + duration,
        Txn.receiver() == receiver,
        Txn.amount() == amount,
        Txn.first_valid() < timeout,
    )
Recommendations
-
For the Teal programs written in Teal version 2 or greater, either used as delegate signature or contract account, include a check in the program that verifies rekey-to field to be equal to ZeroAddress or any intended address. Teal contracts written in Teal version 1 are not affected by this issue. Rekeying feature is introduced in version 2 and Algorand rejects transactions that use features introduced in the versions later than the executed Teal program version.
-
Use Tealer to detect this issue.
-
For Applications, verify that user provided value is not used for
RekeyTofield of a inner transaction. Additionally, avoid rekeying an application to admin controlled address. This allows for the possibility of "rug pull" by a malicious admin.
Unchecked Transaction Fee
Lack of transaction fee check in smart signatures allows malicious users to drain the contract account or the delegator’s account by specifying excessive fees.
Description
Any user can submit transactions using the smart signatures and decide on the transaction fields. It is the responsibility of the creator to enforce restrictions on all the transaction fields to prevent malicious users from misusing the smart signature.
One of these transaction fields is Fee. Fee field specifies the number of micro-algos paid for processing the transaction. Protocol only verifies that the transaction pays a fee greater than protocol decided minimum fee. If a smart signature doesn’t bound the transaction fee, a user could set an excessive fee and drain the sender funds. Sender will be the signer of the Teal program in case of delegate signature and the contract account otherwise.
Exploit Scenarios
A user creates a delegate signature for recurring payments. Attacker creates a valid transaction and drains the user funds by specifying excessive fee.
Examples
Note: This code contains several other vulnerabilities, see Rekeying, Closing Account, Time-based Replay Attack.
def withdraw(
    duration,
    period,
    amount,
    receiver,
    timeout,
):
    return And(
        Txn.type_enum() == TxnType.Payment,
        Txn.first_valid() % period == Int(0),
        Txn.last_valid() == Txn.first_valid() + duration,
        Txn.receiver() == receiver,
        Txn.amount() == amount,
        Txn.first_valid() < timeout,
    )
Recommendations
- Force the transaction fee to be
0and use fee pooling. If the users should be able to call the smart signature outside of a group, force the transaction fee to be minimum transaction fee:global MinTxnFee.
Closing Account
Lack of check for CloseRemainderTo transaction field in smart signatures allows attackers to transfer entire funds of the contract account or the delegator’s account to their account.
Description
Algorand accounts must satisfy minimum balance requirement and protocol rejects transactions whose execution results in account balance lower than the required minimum. In order to transfer the entire balance and close the account, users should use the CloseRemainderTo field of a payment transaction. Setting the CloseRemainderTo field transfers the entire account balance remaining after transaction execution to the specified address.
Any user with access to the smart signature may construct and submit the transactions using the smart signature. The smart signatures approving payment transactions have to ensure that the CloseRemainderTo field is set to the ZeroAddress or any other specific address to avoid unintended transfer of funds.
Exploit Scenarios
A user creates a delegate signature for recurring payments. Attacker creates a valid transaction and sets the CloseRemainderTo field to their address.
Examples
Note: This code contains several other vulnerabilities, see Rekeying, Unchecked Transaction Fees, Time-based Replay Attack.
def withdraw(
    duration,
    period,
    amount,
    receiver,
    timeout,
):
    return And(
        Txn.type_enum() == TxnType.Payment,
        Txn.first_valid() % period == Int(0),
        Txn.last_valid() == Txn.first_valid() + duration,
        Txn.receiver() == receiver,
        Txn.amount() == amount,
        Txn.first_valid() < timeout,
    )
Recommendations
Verify that the CloseRemainderTo field is set to the ZeroAddress or to any intended address before approving the transaction in the Teal contract.
Closing Asset
Lack of check for AssetCloseTo transaction field in smart signatures allows attackers to transfer the entire asset balance of the contract account or the delegator’s account to their account.
Description
Algorand supports Fungible and Non Fungible Tokens using Algorand Standard Assets(ASA). An Algorand account must first opti-in to the asset before that account can receive any tokens. Opting to an asset increases the minimum balance requirement of the account. Users can opt-out of the asset and decrease the minimum balance requirement using the AssetCloseTo field of Asset Transfer transaction. Setting the AssetCloseTo field transfers the account’s entire token balance remaining after transaction execution to the specified address.
Any user with access to the smart signature may construct and submit the transactions using the smart signature. The smart signatures approving asset transfer transactions have to ensure that the AssetCloseTo field is set to the ZeroAddress or any other specific address to avoid unintended transfer of tokens.
Exploit Scenarios
User creates a delegate signature that allows recurring transfers of a certain asset. Attacker creates a valid asset transfer transaction with AssetCloseTo field set to their address.
Examples
Note: This code contains several other vulnerabilities, see Rekeying, Unchecked Transaction Fees, Closing Asset, Time-based Replay Attack, Asset Id Check.
def withdraw_asset(
    duration,
    period,
    amount,
    receiver,
    timeout,
):
    return And(
        Txn.type_enum() == TxnType.AssetTransfer,
        Txn.first_valid() % period == Int(0),
        Txn.last_valid() == Txn.first_valid() + duration,
        Txn.asset_receiver() == receiver,
        Txn.asset_amount() == amount,
        Txn.first_valid() < timeout,
    )
Recommendations
Verify that the AssetCloseTo field is set to the ZeroAddress or to the intended address before approving the transaction in the Teal contract.
Group Size Check
Lack of group size check in contracts that are supposed to be called in an atomic group transaction might allow attackers to misuse the application.
Description
Algorand supports atomic transfers, an atomic transfer is a group of transactions that are submitted and processed as a single transaction. A group can contain upto 16 transactions and the group transaction fails if any of the included transactions fails. Algorand applications make use of group transactions to realize operations that may not be possible using a single transaction model. In such cases, it is necessary to check that the group transaction in itself is valid along with the individual transactions. One of the checks whose absence could be misused is group size check.
Exploit Scenarios
Application only checks that transactions at particular indices are meeting the criteria and performs the operations based on that. Attackers can create the transactions at the checked indices correctly and include equivalent application call transactions at all the remaining indices. Each application call executes successfully as every execution checks the same set of transactions. This results in performing operations multiple times, once for each application call. This could be damaging if those operations include funds or assets transfers among others.
Examples
Note: This code contains several other vulnerabilities, see Rekeying, Unchecked Transaction Fees, Closing Account, Time-based Replay Attack.
def split_and_withdraw(
    amount_1,
    receiver_1,
    amount_2,
    receiver_2,
    lock_expire_round,
):
    return And(
        Gtxn[0].type_enum() == TxnType.Payment,
        Gtxn[0].receiver() == receiver_1,
        Gtxn[0].amount() == amount_1,

        Gtxn[1].type_enum() == TxnType.Payment,
        Gtxn[1].receiver() == receiver_2,
        Gtxn[1].amount() == amount_2,

        Gtxn[0].first_valid == lock_expire_round,
    )
Recommendations
-
Verify that the group size of an atomic transfer is the intended size in the contracts.
-
Use Tealer to detect this issue.
-
Favor using ABI for smart contracts and relative indexes to verify the group transaction.
Time-based Replay Attack
Lack of check for lease field in smart signatures that intend to approve a single transaction in the particular period allows attackers to submit multiple valid transactions in that period.
Description
Algorand stops transaction replay attacks using a validity period. A validity period of a transaction is the sequence of blocks between FirstValid block and LastValid block. The transaction is considered valid only in that period and a transaction with the same hash can be processed only once in that period. Algorand also limits the period to a maximum of 1000 blocks. This allows the transaction creator to select the FirstValid, LastValid fields appropriately and feel assured that the transaction is processed only once in that period.
However, The same does not apply for transactions authorized by smart signatures. Even if the contract developer verifies the FirstValid and LastValid transaction fields to fixed values, an attacker can submit multiple transactions that are valid as per the contract. This is because any user can create and submit transactions authorized by a smart signature. The attacker can create transactions which have equal values for most transaction fields, for fields verified in the contract and slightly different values for the rest. Each one of these transactions will have a different hash and will be accepted by the protocol.
Exploit Scenarios
A user creates a delegate signature for recurring payments. Contract verifies the FirstValid and LastValid to only allow a single transaction each time. Attacker creates and submits multiple valid transactions with different hashes.
Examples
Note: This code contains several other vulnerabilities, see Rekeying, Unchecked Transaction Fees, Closing Account.
def withdraw(
    duration,
    period,
    amount,
    receiver,
    timeout,
):
    return And(
        Txn.type_enum() == TxnType.Payment,
        Txn.first_valid() % period == Int(0),
        Txn.last_valid() == Txn.first_valid() + duration,
        Txn.receiver() == receiver,
        Txn.amount() == amount,
        Txn.first_valid() < timeout,
    )
Recommendations
Verify that the Lease field of the transaction is set to a specific value. Lease enforces mutual exclusion, once a transaction with non-zero lease is confirmed by the protocol, no other transactions with same lease and sender will be accepted till the LastValid block
Access Controls
Lack of appropriate checks for application calls of type UpdateApplication and DeleteApplication allows attackers to update application’s code or delete an application entirely.
Description
When an application call is successful, additional operations are executed based on the OnComplete field. If the OnComplete field is set to UpdateApplication the approval and clear programs of the application are replaced with the programs specified in the transaction. Similarly, if the OnComplete field is set to DeleteApplication, application parameters are deleted. This allows attackers to update or delete the application if proper access controls are not enforced in the application.
Exploit Scenarios
A stateful contract serves as a liquidity pool for a pair of tokens. Users can deposit the tokens to get the liquidity tokens and can get back their funds with rewards through a burn operation. The contract does not enforce restrictions for UpdateApplication type application calls. Attacker updates the approval program with a malicious program that transfers all assets in the pool to the attacker's address.
Recommendations
-
Set proper access controls and apply various checks before approving applications calls of type UpdateApplication and DeleteApplication.
-
Use Tealer to detect this issue.
Asset Id Check
Lack of verification of asset id in the contract allows attackers to transfer a different asset in place of the expected asset and mislead the application.
Description
Contracts accepting and doing operations based on the assets transferred to the contract must verify that the transferred asset is the expected asset by checking the asset Id. Absence of check for expected asset Id could allow attackers to manipulate contract’s logic by transferring a fake, less or more valuable asset instead of the correct asset.
Exploit Scenarios
- A liquidity pool contract mints liquidity tokens on deposit of two tokens. Contract does not check that the asset Ids in the two asset transfer transactions are correct. Attacker deposits the same less valuable asset in the two transactions and withdraws both tokens by burning the pool tokens.
- User creates a delegate signature that allows recurring transfers of a certain asset. Attacker creates a valid asset transfer transaction of more valuable assets.
Examples
Note: This code contains several other vulnerabilities, see Rekeying, Unchecked Transaction Fees, Closing Asset, Time-based Replay Attack.
def withdraw_asset(
    duration,
    period,
    amount,
    receiver,
    timeout,
):
    return And(
        Txn.type_enum() == TxnType.AssetTransfer,
        Txn.first_valid() % period == Int(0),
        Txn.last_valid() == Txn.first_valid() + duration,
        Txn.asset_receiver() == receiver,
        Txn.asset_amount() == amount,
        Txn.first_valid() < timeout,
    )
Recommendations
Verify the asset id to be expected asset for all asset related operations in the contract.
Denial of Service
When a contract does not verify whether an account has opted in to an asset and attempts to transfer that asset, an attacker can DoS other users if the contract's operation is to transfer asset to multiple accounts.
Description
A user must explicitly opt-in to receive any particular Algorand Standard Asset(ASAs). A user may also opt out of an ASA. A transaction will fail if it attempts to transfer tokens to an account that didn’t opt in to that asset. This could be leveraged by attackers to DOS a contract if the contract’s operation depends on successful transfer of an asset to the attacker owned address.
Exploit Scenarios
Contract attempts to transfer assets to multiple users. One user is not opted in to the asset. The transfer operation fails for all users.
Examples
Note: This code contains several other vulnerabilities, see Rekeying, Unchecked Transaction Fees, Closing Asset, Group Size Check, Time-based Replay Attack, Asset Id Check
def split_and_withdraw_asset(
    amount_1,
    receiver_1,
    amount_2,
    receiver_2,
    lock_expire_round,
):
    return And(
        Gtxn[0].type_enum() == TxnType.AssetTransfer,
        Gtxn[0].asset_receiver() == receiver_1,
        Gtxn[0].asset_amount() == amount_1,

        Gtxn[1].type_enum() == TxnType.AssetTransfer,
        Gtxn[1].receiver() == receiver_2,
        Gtxn[1].amount() == amount_2,

        Gtxn[0].first_valid == lock_expire_round,
    )
Recommendations
Use pull over push pattern for transferring assets to users.
Inner Transaction Fee
Inner transaction fees are by default set to an estimated amount which are deducted from the application account if it is the Sender. An attacker can perform operations executing inner transactions and drain system funds, making it under-collateralized.
Description
Inner transactions are initialized with Sender set to the application account and Fee to the minimum allowable, taking into account MinTxnFee and credit from overpaying in earlier transactions. The inner transaction fee depends on the transaction fee paid by the user. As a result, the user controls, to some extent, the fee paid by the application.
If the application does not explicitly set the Fee to zero, an attacker can burn the application’s balance in the form of fees. This also becomes an issue if the application implements internal bookkeeping to track the application balance and does not account for fees.
Exploit Scenarios
@router.method(no_op=CallConfig.CALL)
def mint(pay: abi.PaymentTransaction) -> Expr:
    return Seq([
            # perform validations and other operations
            # [...]
            # mint wrapped-asset id
            InnerTxnBuilder.Begin(),
            InnerTxnBuilder.SetFields(
                {
                    TxnField.type_enum: TxnType.AssetTransfer,
                    TxnField.asset_receiver: Txn.sender(),
                    TxnField.xfer_asset: wrapped_algo_asset_id,
                    TxnField.asset_amount: pay.get().amount(),
                }
            ),
            InnerTxnBuilder.Submit(),
            # [...]
    ])
The application does not explicitly set the inner transaction fee to zero. When user mints wrapped-algo, some of the ALGO is burned in the form of fees. The amount of wrapped-algo in circulation will be greater than the application ALGO balance. The system will be under-collateralized.
Recommendations
Explicitly set the inner transaction fees to zero and use the fee pooling feature of the Algorand.
Clear State Transaction Check
The lack of checks on the OnComplete field of the application calls might allow an attacker to execute the clear state program instead of the approval program, breaking core validations.
Description
Algorand applications make use of group transactions to realize operations that may not be possible using a single transaction model. Some operations require that other transactions in the group call certain methods and applications. These requirements are asserted by validating that the transactions are ApplicationCall transactions. However, the OnComplete field of these transactions is not always validated, allowing an attacker to submit ClearState ApplicationCall transactions. The ClearState transaction invokes the clear state program instead of the intended approval program of the application.
Exploit Scenario
A protocol offers flash loans from a liquidity pool. The flash loan operation is implemented using two methods: take_flash_loan and pay_flash_loan. take_flash_loan method transfers the assets to the user and pay_flash_loan verifies that the user has returned the borrowed assets. take_flash_loan verifies that a later transaction in the group calls the pay_flash_loan method. However, It does not validate the OnComplete field.
@router.method(no_op=CallConfig.CALL)
def take_flash_loan(offset: abi.Uint64, amount: abi.Uint64) -> Expr:
    return Seq([
        # Ensure the pay_flash_loan method is called
        Assert(And(
            Gtxn[Txn.group_index() + offset.get()].type_enum == TxnType.ApplicationCall,
            Gtxn[Txn.group_index() + offset.get()].application_id() == Global.current_application_id(),
            Gtxn[Txn.group_index() + offset.get()].application_args[0] == MethodSignature("pay_flash_loan(uint64)")
        )),
        # Perform other validations, transfer assets to the user, update the global state
        # [...]
    ])

@router.method(no_op=CallConfig.CALL)
def pay_flash_loan(offset: abi.Uint64) -> Expr:
    return Seq([
        # Validate the "take_flash_loan" transaction at `Txn.group_index() - offset.get()`
        # Ensure the user has returned the funds to the pool along with the fee. Fail the transaction otherwise
        # [...]
    ])
An attacker constructs a valid group transaction for flash loan but sets the OnComplete field of pay_flash_loan call to ClearState. The clear state program is executed for complete_flash_loan call, which does not validate that the attacker has returned the funds. The attacker steals all the assets in the pool.
Recommendations
Validate the OnComplete field of the ApplicationCall transactions.
(Not So) Smart Contracts
This repository contains examples of common Cairo smart contract vulnerabilities, featuring code from real smart contracts. Utilize the Not So Smart Contracts to learn about Cairo vulnerabilities, refer to them during security reviews, and use them as a benchmark for security analysis tools.
Features
Each Not So Smart Contract consists of a standard set of information:
- Vulnerability type description
- Attack scenarios to exploit the vulnerability
- Recommendations to eliminate or mitigate the vulnerability
- Real-world contracts exhibiting the flaw
- References to third-party resources providing more information
Vulnerabilities
| Not So Smart Contract | Description |
|---|---|
| Arithmetic overflow | Insecure arithmetic in Cairo for the felt252 type |
| L1 to L2 Address Conversion | Essential L2 address checks for L1 to L2 messaging |
| L1 to L2 message failure | Messages sent from L1 may not be processed by the sequencer |
| Overconstrained L1 <-> L2 interaction | Asymmetrical checks on the L1 or L2 side can cause a DOS |
| Signature replays | Necessary robust reuse protection due to account abstraction |
| Unchecked from address in L1 Handler | Access control issue when sending messages from L1 to L2 |
Credits
These examples are developed and maintained by Trail of Bits.
If you have any questions, issues, or wish to learn more, join the #ethereum channel on the Empire Hacking Slack or contact us directly.
Arithmetic Overflow with Felt Type
The default primitive type, the field element (felt), behaves much like an integer in other languages, but there are a few important differences to keep in mind. A felt can be interpreted as an unsigned integer in the range [0, P], where P, a 252 bit prime, represents the order of the field used by Cairo. Arithmetic operations using felts are unchecked for overflow or underflow, which can lead to unexpected results if not properly accounted for. Do note that Cairo's builtin primitives for unsigned integers are overflow/underflow safe and will revert.
Example
The following simplified code highlights the risk of felt underflow. The check_balance function is used to validate if a user has a large enough balance. However, the check is faulty because passing an amount such that amt > balance will underflow and the check will be true.
struct Storage {
    balances: LegacyMap<ContractAddress, felt252>
}

fn check_balance(self: @ContractState, amt: felt252) {
    let caller = get_caller_address();
    let balance = self.balances.read(caller);
    assert(balance - amt >= 0);
}
Mitigations
- Always add checks for overflow when working with felts directly.
- Use the default signed integer types unless a felt is explicitly required.
- Consider using Caracal, as it comes with a detector for checking potential overflows when doing felt252 arithmetic operaitons.
L1 to L2 Address Conversion
In Starknet, addresses are of the felt type, while on L1 addresses are of the uint160 type. To pass address types during cross-layer messaging, the address variable is typically given as a uint256. However, this may create an issue where an address on L1 maps to the zero address (or an unexpected address) on L2. This is because the primitive type in Cairo is the felt, which lies within the range 0 < x < P, where P is the prime order of the curve. Usually, we have P = 2^251 + 17 * 2^192 + 1.
Example
Consider the following code to initiate L2 deposits from L1. The first example has no checks on the to parameter, and depending on the user's address, it could transfer tokens to an unexpected address on L2. The second example, however, adds verification to ensure this does not happen. Note that the code is a simplified version of how messages are sent on L1 and processed on L2. For a more comprehensive overview, see here: https://www.cairo-lang.org/docs/hello_starknet/l1l2.html.
contract L1ToL2Bridge {
    uint256 public constant STARKNET_FIELD_PRIME; // the prime order P of the elliptic curve used
    IERC20 public constant token; // some token to deposit on L2

    event Deposited(uint256 to, uint256 amount);

    function badDepositToL2(uint256 to, uint256 amount) public returns (bool) {
        token.transferFrom(msg.sender, address(this), amount);
        emit Deposited(to, amount); // this message gets processed on L2
        return true;
    }

    function betterDepositToL2(uint256 to, uint256 amount) public returns (bool) {
        require(to != 0 && to < STARKNET_FIELD_PRIME, "invalid address"); // verifies 0 < to < P
        token.transferFrom(msg.sender, address(this), amount);
        emit Deposited(to, amount); // this message gets processed on L2
        return true;
    }
}
Mitigations
When sending a message from L1 to L2, ensure verification of parameters, particularly user-supplied ones. Keep in mind that Cairo's default felt type range is smaller than the uint256 type used by Solidity.
L1 to L2 Message Failure
In Starknet, Ethereum contracts can send messages from L1 to L2 using a bridge. However, it is not guaranteed that the message will be processed by the sequencer. For instance, a message can fail to be processed if there is a sudden spike in the gas price and the value provided is too low. To address this issue, Starknet developers have provided an API to cancel ongoing messages.
Example
Consider the following code to initiate L2 deposits from L1, taking the tokens from the user:
contract L1ToL2Bridge {
    IERC20 public token; // some token to deposit on L2

    function depositToL2(address to, uint256 amount) public returns (bool) {
        require(token.transferFrom(msg.sender, address(this), amount));
        // ...
        StarknetCore.sendMessageToL2(data);
        return true;
    }
}
If an L1 message is never processed by the sequencer, users will never receive their tokens in either L1 or L2, and they need a way to cancel the message.
A recent AAVE audit highlighted this issue and required the addition of code to cancel messages.
Mitigations
When sending a message from L1 to L2, it is essential to consider the possibility that a message may never be processed by the sequencer. This can block either the contract from reaching a certain state or users from retrieving their funds. If needed, allow the use of startL1ToL2MessageCancellation and cancelL1ToL2Message to cancel ongoing messages.
Overconstrained L1 <-> L2 interaction
When interacting with contracts that are designed to interact with both L1 and L2, care must be taken that the checks and validations on both sides are symmetrical. If one side has more validations than the other, this could create a situation where a user performs an action on one side, but is unable to perform the corresponding action on the other side, leading to a loss of funds or a denial of service.
Example
The following Starknet bridge contract allows for permissionless deposit to any address on L1 via the deposit_to_L1 function. In particular, someone can deposit tokens to the BAD_ADDRESS. However, in that case the tokens will be lost forever, because the tokens are burned on L2 and the L1 contract's depositFromL2 function prevents BAD_ADDRESS from being the recipient.
#[storage]
struct Storage {
    l1_bridge: EthAddress,
    balances: LegacyMap<ContractAddress,u256>
}

#[derive(Serde)]
struct Deposit {
    recipient: EthAddress,
    token: EthAddress,
    amount: u256
}

fn deposit_to_l1(ref self: ContractState, deposit: Deposit) {
    let caller = get_caller_address();
    //burn the tokens on the L2 side
    self.balances.write(caller, self.balances.read(caller) - deposit.amount);
    let payload = ArrayTrait::new();
    starknet::send_message_to_l1_syscall(self.l1_bridge.read(), deposit.serialize(ref payload)).unwrap();
}
address public immutable MESSENGER_CONTRACT;
address public immutable L2_TOKEN_BRIDGE;
address public constant BAD_ADDRESS = address(0xdead);

constructor(address _messenger, address _bridge) {
    MESSENGER_CONTRACT = _messenger;
    L2_TOKEN_BRIDGE = _bridge;
}

function depositFromL2(address recipient, address token, uint256 amount) external {
    require(recipient != BAD_ADDRESS, "blacklisted");
    uint256[] memory payload = _buildPayload(recipient,token,amount);
    MESSENGER_CONTRACT.consumeMessageFromL2(L2_TOKEN_BRIDGE,payload);
    //deposit logic
    [...]
}

function _buildPayload(address recipient, address token, uint256 amount) internal returns (uint256[] memory) {
    //payload building logic for Starknet message
    [...]
}
Mitigations
- Make sure to validate that the checks on both the L1 and L2 side are similar enough to prevent unexpected behavior. Ensure that any unsymmetric validations on either side cannot lead to a tokens being trapped or any other denial of service.
Signature Replay Protection
The StarkNet account abstraction model enables offloading many authentication details to contracts, providing a higher degree of flexibility. However, this also means that signature schemes must be designed with great care. Signatures should be resistant to replay attacks and signature malleability. They must include a nonce and preferably have a domain separator to bind the signature to a specific contract and chain. For instance, this prevents testnet signatures from being replayed against mainnet contracts.
Example
Consider the following function that validates a signature for EIP712-style permit functionality. Notice that the contract lacks a way of keeping track of nonces. As a result, the same signature can be replayed over and over again. In addition, there is no method for identifying the specific chain a signature is designed for. Consequently, this signature schema would allow signatures to be replayed both on the same chain and across different chains, such as between a testnet and mainnet.
    #[storage]
    struct Storage {
        authorized_pubkey: felt252
    }

    #[derive(Hash)]
    struct Signature {
        sig_r: felt252,
        sig_s: felt252,
        amount: u256,
        recipient: ContractAddress
    }

    fn bad_is_valid_signature(self: @ContractState, sig: Signature) {
        let hasher = PoseidonTrait::new();
        let hash = hasher.update_with(sig).finalize();
        ecdsa::check_ecdsa_signature(hash,authorized_pubkey,sig.r,sig.s);
    }
Mitigations
- Consider using the OpenZeppelin Contracts for Cairo Account contract or another existing account contract implementation.
Unchecked from address in L1 Handler function
A function with the l1_handler annotation is intended to be called from L1. The first parameter of the l1_handler function is always from, which represents the msg.sender of the L1 transaction that attempted to invoke the function on Starknet. If the l1_handler function is designed to be invoked from a specific address on mainnet, not checking the from address may allow anyone to call the function, opening up access control vulnerabilities.
Example
The following Starknet bridge contract's owner, specified in the uint256[] calldata payload array, is designed to be called only from the setOwnerOnL2() function. Even though the owner is checked on the solidity side, the lack of validation of the from_address parameter allows anyone to call the function from an arbitrary L1 contract, becoming the owner of the bridge on L2.
address public immutable OWNER;
address public immutable MESSENGER_CONTRACT;
address public immutable L2_BRIDGE_ADDRESS;
constructor(address _owner, address _messenger, address _bridge) {
    OWNER = _owner;
    MESSENGER_CONTRACT = _messenger;
    L2_BRIDGE_ADDRESS = _bridge;

}

function setOwnerOnL2(uint256[] calldata payload, uint256 selector) external {
    require(owner == msg.sender, "not owner");
    IStarknetMessaging(MESSENGER_CONTRACT).sendMessageToL2(L2_BRIDGE_ADDRESS, selector, payload);
}
#[storage]
struct Storage {
    owner: ContractAddress
}

#[l1_handler]
fn set_owner_from_l1(ref self: ContractState, from_address: felt252, new_owner: ContractAddress) {
    self.owner.write(new_owner);
}
Mitigations
- Make sure to validate the
from_address, otherwise any L1 contract can invoke the annotated Starknet function. - Consider using Caracal, as it comes with a detector for verifying if the
from_addressis unchecked in anl1_handlerfunction.
(Not So) Smart Cosmos
This repository contains examples of common Cosmos applications vulnerabilities, including code from real applications. Use Not So Smart Cosmos to learn about Cosmos (Tendermint) vulnerabilities, as a reference when performing security reviews, and as a benchmark for security and analysis tools.
Features
Each Not So Smart Cosmos includes a standard set of information:
- Description of the vulnerability type
- Attack scenarios to exploit the vulnerability
- Recommendations to eliminate or mitigate the vulnerability
- Real-world contracts that exhibit the flaw
- References to third-party resources with more information
Vulnerabilities
| Not So Smart Contract | Description |
|---|---|
| Incorrect signers | Broken access controls due to incorrect signers validation |
| Non-determinism | Consensus failure because of non-determinism |
| Not prioritized messages | Risks arising from usage of not prioritized message types |
| Slow ABCI methods | Consensus failure because of slow ABCI methods |
| ABCI methods panic | Chain halt due to panics in ABCI methods |
| Broken bookkeeping | Exploit mismatch between different modules' views on balances |
| Rounding errors | Bugs related to imprecision of finite precision arithmetic |
| Unregistered message handler | Broken functionality because of unregistered msg handler |
| Missing error handler | Missing error handling leads to successful execution of a transaction that should have failed |
Credits
These examples are developed and maintained by Trail of Bits.
If you have questions, problems, or just want to learn more, then join the #ethereum channel on the Empire Hacking Slack or contact us directly.
Incorrect Signers
In Cosmos, transaction's signature(s) are validated against public keys (addresses) taken from the transaction itself,
where locations of the keys are specified in GetSigners methods.
In the simplest case there is just one signer required, and its address is simple to use correctly. However, in more complex scenarios like when multiple signatures are required or a delegation schema is implemented, it is possible to make mistakes about what addresses in the transaction (the message) are actually authenticated.
Fortunately, mistakes in GetSigners should make part of application's intended functionality not working,
making it easy to spot the bug.
Example
The example application allows an author to create posts. A post can be created with a MsgCreatePost message, which has signer and author fields.
service Msg {
      rpc CreatePost(MsgCreatePost) returns (MsgCreatePostResponse);
}

message MsgCreatePost {
  string signer = 1;
  string author = 2;
  string title = 3;
  string body = 4;
}

message MsgCreatePostResponse {
  uint64 id = 1;
}

message Post {
  string author = 1;
  uint64 id = 2;
  string title = 3;
  string body = 4;
}
The signer field is used for signature verification - as can be seen in GetSigners method below.
func (msg *MsgCreatePost) GetSigners() []sdk.AccAddress {
    signer, err := sdk.AccAddressFromBech32(msg.Signer)
    if err != nil {
        panic(err)
    }
    return []sdk.AccAddress{Signer}
}

func (msg *MsgCreatePost) GetSignBytes() []byte {
    bz := ModuleCdc.MustMarshalJSON(msg)
    return sdk.MustSortJSON(bz)
}

func (msg *MsgCreatePost) ValidateBasic() error {
    _, err := sdk.AccAddressFromBech32(msg.Signer)
    if err != nil {
        return sdkerrors.Wrapf(sdkerrors.ErrInvalidAddress, "invalid creator address (%s)", err)
    }
    return nil
}
The author field is saved along with the post's content:
func (k msgServer) CreatePost(goCtx context.Context, msg *types.MsgCreatePost) (*types.MsgCreatePostResponse, error) {
    ctx := sdk.UnwrapSDKContext(goCtx)

    var post = types.Post{
        Author: msg.Author,
        Title:  msg.Title,
        Body:   msg.Body,
    }

    id := k.AppendPost(ctx, post)

    return &types.MsgCreatePostResponse{Id: id}, nil
}
The bug here - mismatch between the message signer address and the stored address - allows users to impersonate other users by sending an arbitrary author field.
Mitigations
- Keep signers-related logic simple
- Implement basic sanity tests for all functionalities
Non-determinism
Non-determinism in conensus-relevant code will cause the blockchain to halt. There are quite a few sources of non-determinism, some of which are specific to the Go language:
rangeiterations over an unordered map or other operations involving unordered structures- Implementation (platform) dependent types like
intorfilepath.Ext - goroutines and
selectstatement - Memory addresses
- Floating point arithmetic operations
- Randomness (may be problematic even with a constant seed)
- Local time and timezones
- Packages like
unsafe,reflect, andruntime
Example
Below we can see an iteration over a amounts map. If k.GetPool fails for more than one asset, then different nodes will fail with different errors, causing the chain to halt.
func (k msgServer) CheckAmounts(goCtx context.Context, msg *types.MsgCheckAmounts) (*types.MsgCheckAmountsResponse, error) {
    ctx := sdk.UnwrapSDKContext(goCtx)

    amounts := make(map[Asset]int)
    for asset, coin := range allMoney.Coins {
        amounts[asset] = Compute(coin)
    }

    total int := 0
    for asset, f := range amounts {
        poolSize, err := k.GetPool(ctx, asset, f)
        if err != nil {
            return nil, err
        }
        total += poolSize
    }

    if total == 0 {
        return nil, errors.New("Zero total")
    }

    return &types.MsgCheckAmountsResponse{}, nil
}
Even if we fix the map problem, it is still possible that the total overflows for nodes running on 32-bit architectures earlier than for the rest of the nodes, again causing the chain split.
Mitigations
- Use static analysis, for example custom CodeQL rules
- Test your application with nodes running on various architectures or require nodes to run on a specific one
- Prepare and test procedures for recovering from a blockchain split
External examples
- ThorChain halt due to "iteration over a map error-ing at different indexes"
- Cyber's had problems with
float64type
Not prioritized messages
Some message types may be more important than others and should have priority over them. That is, the more significant a message type is, the more quickly it should be included in a block, before other messages are.
Failing to prioritize message types allows attackers to front-run them, possibly gaining unfair advantage. Moreover, during high network congestion, the message may be simply not included in a block for a long period, causing the system to malfunction.
In the Cosmos's mempool, transactions are ordered in first-in-first-out (FIFO) manner by default. Especially, there is no fee-based ordering.
Example
An example application implements a lending platform. It uses a price oracle mechanism, where privileged entities can vote on new assets' prices. The mechanism is implemented as standard messages.
service Msg {
  rpc Lend(MsgLend) returns (MsgLendResponse);

  rpc Borrow(MsgBorrow) returns (MsgBorrowResponse);

  rpc Liquidate(MsgLiquidate) returns (MsgLiquidateResponse);

  rpc OracleCommitPrice(MsgOracleCommitPrice) returns (MsgOracleCommitPriceResponse);

  rpc OracleRevealPrice(MsgOracleRevealPrice) returns (MsgOracleRevealPriceResponse);
}
Prices ought to be updated (committed and revealed) after every voting period. However, an attacker can spam the network with low-cost transactions to completely fill blocks, leaving no space for price updates. He can then profit from the fact that the system uses outdated, stale prices.
Example 2
Lets consider a liquidity pool application that implements the following message types:
service Msg {
  rpc CreatePool(MsgCreatePool) returns (MsgCreatePoolResponse);

  rpc Deposit(MsgDeposit) returns (MsgDepositResponse);

  rpc Withdraw(MsgWithdraw) returns (MsgWithdrawResponse);

  rpc Swap(MsgSwap) returns (MsgSwapResponse);

  rpc Pause(MsgPause) returns (MsgPauseResponse);

  rpc Resume(MsgResume) returns (MsgResumeResponse);
}
There is the Pause message, which allows privileged users to stop the pool.
Once a bug in pool's implementation is discovered, attackers and the pool's operators will compete for whose message is first executed (Swap vs Pause). Prioritizing Pause messages will help pool's operators to prevent exploitation, but in this case it won't stop the attackers completely. They can outrun the Pause message by order of magnitude - so the priority will not matter - or even cooperate with a malicious validator node - who can order his mempool in an arbitrary way.
Mitigations
- Use
CheckTx'spriorityreturn value to prioritize messages. Please note that this feature has a transaction (not a message) granularity - users can send multiple messages in a single transaction, and it is the transaction that will have to be prioritized. - Perform authorization for prioritized transactions as early as possible. That is, during the
CheckTxphase. This will prevent attackers from filling whole blocks with invalid, but prioritized transactions. In other words, implement a mechanism that will prevent validators from accepting not-authorized, prioritized messages into a mempool. - Alternatively, charge a high fee for prioritized transactions to disincentivize attackers.
External examples
- Terra Money's oracle messages were not prioritized. It was fixed with modifications to Tendermint.
- Umee oracle and orchestrator messages were not prioritized (search for finding TOB-UMEE-20 and TOB-UMEE-31).
Slow ABCI methods
ABCI methods (like EndBlocker) are not constrained by gas. Therefore, it is essential to ensure that they always will finish in a reasonable time. Otherwise, the chain will halt.
Example
Below you can find part of a tokens lending application. Before a block is executed, the BeginBlocker method charges an interest for each borrower.
func BeginBlocker(ctx sdk.Context, k keeper.Keeper) {
    updatePrices(ctx, k)
    accrueInterest(ctx, k)
}

func accrueInterest(ctx sdk.Context, k keeper.Keeper) {
    for _, pool := range k.GetLendingPools() {
        poolAssets := k.GetPoolAssets(ctx, pool.Id)
        for userId, _ := range k.GetAllUsers() {
            for _, asset := range poolAssets {
                for _, loan := range k.GetUserLoans(ctx, pool, asset, userId) {
                    if err := k.AccrueInterest(ctx, loan); err != nil {
                        k.PunishUser(ctx, userId)
                    }
                }
            }
        }
    }
}
The accrueInterest contains multiple nested for loops and is obviously too complex to be efficient. Mischievous
users can take a lot of small loans to slow down computation to a point where the chain is not able to keep up with blocks production and halts.
Mitigations
- Estimate computational complexity of all implemented ABCI methods and ensure that they will scale correctly with the application's usage growth
- Implement stress tests for the ABCI methods
- Ensure that minimal fees are enforced on all messages to prevent spam
External examples
ABCI methods panic
A panic inside an ABCI method (e.g., EndBlocker) will stop the chain. There should be no unanticipated panics in these methods.
Some less expected panic sources are:
Coins,DecCoins,Dec,Int, andUInttypes panics a lot, for example on overflows and rounding errorsnew Decpanicsx/params'sSetParamSetpanics if arguments are invalid
Example
The application below enforces limits on how much coins can be borrowed globally. If the loan.Borrowed array of Coins can be forced to be not-sorted (by coins' denominations), the Add method will panic.
Moreover, the Mul may panic if some asset's price becomes large.
func BeginBlocker(ctx sdk.Context, k keeper.Keeper) {
    if !validateTotalBorrows(ctx, k) {
        k.PauseNewLoans(ctx)
    }
}

func validateTotalBorrows(ctx sdk.Context, k keeper.Keeper) {
    total := sdk.NewCoins()
    for _, loan := range k.GetUsersLoans() {
        total.Add(loan.Borrowed...)
    }

    for _, totalOneAsset := range total {
        if totalOneAsset.Amount.Mul(k.GetASsetPrice(totalOneAsset.Denom)).GTE(k.GetGlobalMaxBorrow()) {
            return false
        }
    }
    return true
}
Mitigations
- Use CodeQL static analysis to detect
panics in ABCI methods - Review the code against unexpected
panics
External examples
- Gravity Bridge can
panicin multiple locations in theEndBlockermethod - Agoric
panics purposefully if thePushActionmethod returns an error - Setting invalid parameters in
x/distributionmodule causespanicinBeginBlocker. Valid parameters are described in the documentation.
Broken Bookkeeping
The x/bank module is the standard way to manage tokens in a cosmos-sdk based applications. The module allows to mint, burn, and transfer coins between both users' and modules' accounts. If an application implements its own, internal bookkeeping, it must carefully use the x/bank's features.
Example
An application enforces the following invariant as a sanity-check: amount of tokens owned by a module equals to the amount of tokens deposited by users via the custom x/hodl module.
func BalanceInvariant(k Keeper) sdk.Invariant {
    return func(ctx sdk.Context) (string, bool) {
        weAreFine := true
        msg := "hodling hard"

        weHold := k.bankKeeper.SpendableCoins(authtypes.NewModuleAddress(types.ModuleName)).AmountOf("BTC")
        usersDeposited := k.GetTotalDeposited("BTC")

        if weHold != usersDeposited {
            msg = fmt.Sprintf("%dBTC missing! Halting chain.\n", usersDeposited - weHold)
            weAreFine = false
        }

        return sdk.FormatInvariant(types.ModuleName, "hodl-balance",), weAreFine
    }
}
A spiteful user can simply transfer a tiny amount of BTC tokens directly to the x/hodl module via a message to the x/bank module. That would bypass accounting of the x/hodl, so the GetTotalDeposited function would report a not-updated amount, smaller than the module's SpendableCoins.
Because an invariant's failure stops the chain, the bug constitutes a simple Denial-of-Service attack vector.
Example 2
An example application implements a lending platform. It allows users to deposit Tokens in exchange for xTokens - similarly to the Compound's cTokens. Token:xToken exchange rate is calculated as (amount of Tokens borrowed + amount of Tokens held by the module account) / (amount of uTokens in circulation).
Implementation of the GetExchangeRate method computing an exchange rate is presented below.
func (k Keeper) GetExchangeRate(tokenDenom string) sdk.Coin {
    uTokenDenom := createUDenom(tokenDenom)

    tokensHeld := k.bankKeeper.SpendableCoins(authtypes.NewModuleAddress(types.ModuleName)).AmountOf(tokenDenom).ToDec()
    tokensBorrowed := k.GetTotalBorrowed(tokenDenom)
    uTokensInCirculation := k.bankKeeper.GetSupply(uTokenDenom).Amount

    return (tokensHeld + tokensBorrowed) / uTokensInCirculation
}
A malicious user can screw an exchange rate in two ways:
- by force-sending Tokens to the module, changing the
tokensHeldvalue - by transferring uTokens to another chain via IBC, chaning
uTokensInCirculationvalue
The first "attack" could be pulled of by sending MsgSend message. However, it would be not profitable (probably), as executing it would irreversibly decrease an attacker's resources.
The second one works because the IBC module burns transferred coins in the source chain and mints corresponding tokens in the destination chain. Therefore, it will decrease the supply reported by the x/bank module, increasing the exchange rate. After the attack the malicious user can just transfer back uTokens.
Mitigations
- Use
Blocklistto prevent unexpected token transfers to specific addresses - Use
SendEnabledparameter to prevent unexpected transfers of specific tokens (denominations) - Ensure that the blocklist is explicitly checked whenever a new functionality allowing for tokens transfers is implemented
External examples
- Umee was vulnerable to the token:uToken exchange rate manipulation (search for finding TOB-UMEE-21).
- Desmos incorrectly blocklisted addresses (check app.go file in the commits diff)
Rounding errors
Application developers must take care of correct rounding of numbers, especially if the rounding impacts tokens amounts.
Cosmos-sdk offers two custom types for dealing with numbers:
sdk.Int(sdk.UInt) type for integral numberssdk.Dectype for decimal arithmetic
The sdk.Dec type has problems with precision and does not guarantee associativity, so it must be used carefully. But even if a more robust library for decimal numbers is deployed in the cosmos-sdk, rounding may be unavoidable.
Example
Below we see a simple example demonstrating sdk.Dec type's precision problems.
func TestDec() {
    a := sdk.MustNewDecFromStr("10")
    b := sdk.MustNewDecFromStr("1000000010")
    x := a.Quo(b).Mul(b)
    fmt.Println(x)  // 9.999999999999999000

    q := float32(10)
    w := float32(1000000010)
    y := (q / w) * w
    fmt.Println(y)  // 10
}
Mitigations
-
Ensure that all tokens operations that must round results always benefit the system (application) and not users. In other words, always decide on the correct rounding direction. See Appendix G in the Umee audit report
-
Apply "multiplication before division" pattern. That is, instead of computing
(x / y) * zdo(x * z) / y -
Observe issue #11783 for a replacement of the
sdk.Dectype
External examples
Unregistered message handler
In the legacy version of the Msg Service, all messages have to be registered in a module keeper's NewHandler method. Failing to do so would prevent users from sending the not-registered message.
In the recent Cosmos version manual registration is no longer needed.
Example
There is one message handler missing.
service Msg {
  rpc ConfirmBatch(MsgConfirmBatch) returns (MsgConfirmBatchResponse) {
      option (google.api.http).post = "/gravity/v1/confirm_batch";
  }
  rpc UpdateCall(MsgUpdateCall) returns (MsgUpdateCallResponse) {
      option (google.api.http).post = "/gravity/v1/update_call";
  }
  rpc CancelCall(MsgCancelCall) returns (MsgCancelCallResponse) {
      option (google.api.http).post = "/gravity/v1/cancel_call";
  }
  rpc SetCall(MsgSetCall) returns (MsgSetCallResponse) {
      option (google.api.http).post = "/gravity/v1/set_call";
  }
  rpc SendCall(MsgSendCall) returns (MsgSendCallResponse) {
      option (google.api.http).post = "/gravity/v1/send_call";
  }
  rpc SetUserAddress(MsgSetUserAddress) returns (MsgSetUserAddressResponse) {
      option (google.api.http).post = "/gravity/v1/set_useraddress";
  }
  rpc SendUserAddress(MsgSendUserAddress) returns (MsgSendUserAddressResponse) {
      option (google.api.http).post = "/gravity/v1/send_useraddress";
  }
  rpc RequestBatch(MsgRequestBatch) returns (MsgRequestBatchResponse) {
      option (google.api.http).post = "/gravity/v1/request_batch";
  }
  rpc RequestCall(MsgRequestCall) returns (MsgRequestCallResponse) {
      option (google.api.http).post = "/gravity/v1/request_call";
  }
  rpc RequestUserAddress(MsgRequestUserAddress) returns (MsgRequestUserAddressResponse) {
      option (google.api.http).post = "/gravity/v1/request_useraddress";
  }
  rpc ConfirmEthClaim(MsgConfirmEthClaim) returns (MsgConfirmEthClaimResponse) {
      option (google.api.http).post = "/gravity/v1/confirm_ethclaim";
  }
  rpc UpdateEthClaim(MsgUpdateEthClaim) returns (MsgUpdateEthClaimResponse) {
      option (google.api.http).post = "/gravity/v1/update_ethclaim";
  }
  rpc SetBatch(MsgSetBatch) returns (MsgSetBatchResponse) {
      option (google.api.http).post = "/gravity/v1/set_batch";
  }
  rpc SendBatch(MsgSendBatch) returns (MsgSendBatchResponse) {
      option (google.api.http).post = "/gravity/v1/send_batch";
  }
  rpc CancelUserAddress(MsgCancelUserAddress) returns (MsgCancelUserAddressResponse) {
      option (google.api.http).post = "/gravity/v1/cancel_useraddress";
  }
  rpc CancelEthClaim(MsgCancelEthClaim) returns (MsgCancelEthClaimResponse) {
      option (google.api.http).post = "/gravity/v1/cancel_ethclaim";
  }
  rpc RequestEthClaim(MsgRequestEthClaim) returns (MsgRequestEthClaimResponse) {
      option (google.api.http).post = "/gravity/v1/request_ethclaim";
  }
  rpc UpdateBatch(MsgUpdateBatch) returns (MsgUpdateBatchResponse) {
      option (google.api.http).post = "/gravity/v1/update_batch";
  }
  rpc SendEthClaim(MsgSendEthClaim) returns (MsgSendEthClaimResponse) {
      option (google.api.http).post = "/gravity/v1/send_ethclaim";
  }
  rpc SetEthClaim(MsgSetEthClaim) returns (MsgSetEthClaimResponse) {
      option (google.api.http).post = "/gravity/v1/set_ethclaim";
  }
  rpc CancelBatch(MsgCancelBatch) returns (MsgCancelBatchResponse) {
      option (google.api.http).post = "/gravity/v1/cancel_batch";
  }
  rpc UpdateUserAddress(MsgUpdateUserAddress) returns (MsgUpdateUserAddressResponse) {
      option (google.api.http).post = "/gravity/v1/update_useraddress";
  }
  rpc ConfirmCall(MsgConfirmCall) returns (MsgConfirmCallResponse) {
      option (google.api.http).post = "/gravity/v1/confirm_call";
  }
  rpc ConfirmUserAddress(MsgConfirmUserAddress) returns (MsgConfirmUserAddressResponse) {
      option (google.api.http).post = "/gravity/v1/confirm_useraddress";
  }
}
func NewHandler(k keeper.Keeper) sdk.Handler {
    msgServer := keeper.NewMsgServerImpl(k)

    return func(ctx sdk.Context, msg sdk.Msg) (*sdk.Result, error) {
        ctx = ctx.WithEventManager(sdk.NewEventManager())
        switch msg := msg.(type) {
        case *types.MsgSetBatch:
            res, err := msgServer.SetBatch(sdk.WrapSDKContext(ctx), msg)
            return sdk.WrapServiceResult(ctx, res, err)
        case *types.MsgUpdateUserAddress:
            res, err := msgServer.UpdateUserAddress(sdk.WrapSDKContext(ctx), msg)
            return sdk.WrapServiceResult(ctx, res, err)
        case *types.MsgUpdateCall:
            res, err := msgServer.UpdateCall(sdk.WrapSDKContext(ctx), msg)
            return sdk.WrapServiceResult(ctx, res, err)
        case *types.MsgSendBatch:
            res, err := msgServer.SendBatch(sdk.WrapSDKContext(ctx), msg)
            return sdk.WrapServiceResult(ctx, res, err)
        case *types.MsgCancelUserAddress:
            res, err := msgServer.CancelUserAddress(sdk.WrapSDKContext(ctx), msg)
            return sdk.WrapServiceResult(ctx, res, err)
        case *types.MsgRequestBatch:
            res, err := msgServer.RequestBatch(sdk.WrapSDKContext(ctx), msg)
            return sdk.WrapServiceResult(ctx, res, err)
        case *types.MsgUpdateEthClaim:
            res, err := msgServer.UpdateEthClaim(sdk.WrapSDKContext(ctx), msg)
            return sdk.WrapServiceResult(ctx, res, err)
        case *types.MsgSendCall:
            res, err := msgServer.SendCall(sdk.WrapSDKContext(ctx), msg)
            return sdk.WrapServiceResult(ctx, res, err)
        case *types.MsgSetCall:
            res, err := msgServer.SetCall(sdk.WrapSDKContext(ctx), msg)
            return sdk.WrapServiceResult(ctx, res, err)
        case *types.MsgCancelEthClaim:
            res, err := msgServer.CancelEthClaim(sdk.WrapSDKContext(ctx), msg)
            return sdk.WrapServiceResult(ctx, res, err)
        case *types.MsgConfirmEthClaim:
            res, err := msgServer.ConfirmEthClaim(sdk.WrapSDKContext(ctx), msg)
            return sdk.WrapServiceResult(ctx, res, err)
        case *types.MsgConfirmCall:
            res, err := msgServer.ConfirmCall(sdk.WrapSDKContext(ctx), msg)
            return sdk.WrapServiceResult(ctx, res, err)
        case *types.MsgRequestCall:
            res, err := msgServer.RequestCall(sdk.WrapSDKContext(ctx), msg)
            return sdk.WrapServiceResult(ctx, res, err)
        case *types.MsgConfirmUserAddress:
            res, err := msgServer.ConfirmUserAddress(sdk.WrapSDKContext(ctx), msg)
            return sdk.WrapServiceResult(ctx, res, err)
        case *types.MsgRequestUserAddress:
            res, err := msgServer.RequestUserAddress(sdk.WrapSDKContext(ctx), msg)
            return sdk.WrapServiceResult(ctx, res, err)
        case *types.MsgSendEthClaim:
            res, err := msgServer.SendEthClaim(sdk.WrapSDKContext(ctx), msg)
            return sdk.WrapServiceResult(ctx, res, err)
        case *types.MsgSetEthClaim:
            res, err := msgServer.SetEthClaim(sdk.WrapSDKContext(ctx), msg)
            return sdk.WrapServiceResult(ctx, res, err)
        case *types.MsgCancelBatch:
            res, err := msgServer.CancelBatch(sdk.WrapSDKContext(ctx), msg)
            return sdk.WrapServiceResult(ctx, res, err)
        case *types.MsgSetUserAddress:
            res, err := msgServer.SetUserAddress(sdk.WrapSDKContext(ctx), msg)
            return sdk.WrapServiceResult(ctx, res, err)
        case *types.MsgRequestEthClaim:
            res, err := msgServer.RequestEthClaim(sdk.WrapSDKContext(ctx), msg)
            return sdk.WrapServiceResult(ctx, res, err)
        case *types.MsgConfirmBatch:
            res, err := msgServer.ConfirmBatch(sdk.WrapSDKContext(ctx), msg)
            return sdk.WrapServiceResult(ctx, res, err)
        case *types.MsgUpdateBatch:
            res, err := msgServer.UpdateBatch(sdk.WrapSDKContext(ctx), msg)
            return sdk.WrapServiceResult(ctx, res, err)
        case *types.MsgSendUserAddress:
            res, err := msgServer.SendUserAddress(sdk.WrapSDKContext(ctx), msg)
            return sdk.WrapServiceResult(ctx, res, err)

        default:
            return nil, sdkerrors.Wrap(sdkerrors.ErrUnknownRequest, fmt.Sprintf("Unrecognized Gravity Msg type: %v", msg.Type()))
        }
    }
}
And it is the CancelCall msg.
Mitigations
- Use the recent Msg Service mechanism
- Test all functionalities
- Deploy static-analysis tests in CI pipeline for all manually maintained code that must be repeated in multiple files/methods
External examples
- The bug occurred in the Gravity Bridge. It was impossible to send evidence of malicious behavior, which impacted Gravity Bridge's security model.
Missing error handler
The idiomatic way of handling errors in Go is to compare the returned error to nil. This way of checking for errors gives the programmer a lot of control. However, when error handling is ignored it can also lead to numerous problems. The impact of this is most obvious in method calls in the bankKeeper module, which even causes some accounts with insufficient balances to perform SendCoin operations normally without triggering a transaction failure.
Example
In the following code, k.bankKeeper.SendCoins(ctx, sender, receiver, amount) does not have any return values being used, including err. This results in SendCoin not being able to prevent the transaction from executing even if there is an error due to insufficient balance in SendCoin.
func (k msgServer) Transfer(goCtx context.Context, msg *types.MsgTransfer) (*types.MsgTransferResponse, error) {
	...
	k.bankKeeper.SendCoins(ctx, sender, receiver, amount)
	...
	return &types.MsgTransferResponse{}, nil
}
Mitigations
- Implement the error handling process instead of missing it
External examples
(Not So) Smart Contracts
This repository contains examples of common Solana smart contract vulnerabilities, including code from real smart contracts. Use Not So Smart Contracts to learn about Solana vulnerabilities, as a reference when performing security reviews, and as a benchmark for security and analysis tools.
Features
Each Not So Smart Contract includes a standard set of information:
- Description of the vulnerability type
- Attack scenarios to exploit the vulnerability
- Recommendations to eliminate or mitigate the vulnerability
- Real-world contracts that exhibit the flaw
- References to third-party resources with more information
Vulnerabilities
| Not So Smart Contract | Description |
|---|---|
| Arbitrary CPI | Arbitrary program account passed in upon invocation |
| Improper PDA Validation | PDAs are vulnerable to being spoofed via bump seeds |
| Ownership Check | Broken access control due to missing ownership validation |
| Signer Check | Broken access control due to missing signer validation |
| Sysvar Account Check | Sysvar accounts are vulnerable to being spoofed |
| Improper Instruction Introspection | Program accesses instruction using absolute index |
Credits
These examples are developed and maintained by Trail of Bits.
If you have questions, problems, or just want to learn more, then join the #solana channel on the Empire Hacking Slack or contact us directly.
Arbitrary CPI
Solana allows programs to call one another through cross-program invocation (CPI). This can be done via invoke, which is responsible for routing the passed in instruction to the program. Whenever an external contract is invoked via CPI, the program must check and verify the program ID. If the program ID isn't verified, then the contract can call an attacker-controlled program instead of the intended one.
View ToB's lint implementation for the arbitrary CPI issue here.
Exploit Scenario
Consider the following withdraw function. Tokens are able to be withdrawn from the pool to a user account. The program invoked here is user-controlled and there's no check that the program passed in is the intended token_program. This allows a malicious user to pass in their own program with functionality to their discretion - such as draining the pool of the inputted amount tokens.
Example Contract
#![allow(unused)]
fn main() {
   pub fn withdraw(accounts: &[AccountInfo], amount: u64) -> ProgramResult {
        let account_info_iter = &mut accounts.iter();
        let token_program = next_account_info(account_info_iter)?;
        let pool = next_account_info(account_info_iter)?;
        let pool_auth = next_account_info(account_info_iter)?;
        let destination = next_account_info(account_info_iter)?;
        invoke(
            &spl_token::instruction::transfer(
                &token_program.key,
                &pool.key,
                &destination.key,
                &pool_auth.key,
                &[],
                amount,
            )?,
            &[
                &pool.clone(),
                &destination.clone(),
                &pool_auth.clone(),
            ],
        )
    }
}
Inspired by Sealevel
Mitigation
#![allow(unused)]
fn main() {
        if INPUTTED_PROGRAM.key != &INTENDED_PROGRAM::id() {
            return Err(ProgramError::InvalidProgramId);
        }
}
Improper PDA bump seed validation
PDAs (Program Derived Addresses) are, by definition, program-controlled accounts and therefore can be used to sign without the need to provide a private key. PDAs are generated through a set of seeds and a program id, which are then collectively hashed to verify that the point doesn't lie on the ed25519 curve (the curve used by Solana to sign transactions).
Values on this elliptic curve have a corresponding private key, which wouldn't make it a PDA. In the case a point lying on the elliptic curve is found, our 32-byte address is modified through the addition of a bump to "bump" it off the curve. A bump, represented by a singular byte iterating through 255 to 0, is added onto our input until a point that doesn’t lie on the elliptic curve is generated, meaning that we’ve found an address without an associated private key.
The issue arises with seeds being able to have multiple bumps, thus allowing varying PDAs that are valid from the same seeds. An attacker can create a PDA with the correct program ID but with a different bump. Without any explicit check against the bump seed itself, the program leaves itself vulnerable to the attacker tricking the program into thinking they’re using the expected PDA when in fact they're interacting with an illegitimate account.
View ToB's lint implementation for the bump seed canonicalization issue here.
Exploit Scenario
In Solana, the create_program_address function creates a 32-byte address based off the set of seeds and program address. On its own, the point may lie on the ed25519 curve. Consider the following without any other validation being referenced within a sensitive function, such as one that handles transfers. That PDA could be spoofed by a passed in user-controlled PDA.
Example Contract
#![allow(unused)]
fn main() {
let program_address = Pubkey::create_program_address(&[key.to_le_bytes().as_ref(), &[reserve_bump]], program_id)?;

...
}
Mitigation
The find_program_address function finds the largest bump seeds for which there exists a corresponding PDA (i.e., a point not on the ed25519 curve), and returns both the address and the bump seed. The function panics in the case that no PDA address can be found.
#![allow(unused)]
fn main() {
        let (address, _system_bump) = Pubkey::find_program_address(&[key.to_le_bytes().as_ref()], program_id);

        if program_address != &account_data.key() {
            return Err(ProgramError::InvalidAddress);
        }
}
Missing Ownership Check
Accounts in Solana include metadata of an owner. These owners are identified by their own program ID. Without sufficient checks that the expected program ID matches that of the passed in account, an attacker can fabricate an account with spoofed data to pass any other preconditions.
This malicious account will inherently have a different program ID as owner, but considering there’s no check that the program ID is the same, as long as the other preconditions are passed, the attacker can trick the program into thinking their malicious account is the expected account.
Exploit Scenario
The following contract allows funds to be dispersed from an escrow account vault, provided the escrow account's state is Complete. Unfortunately, there is no check that the State account is owned by the program.
Therefore, a malicious actor can pass in their own fabricated State account with spoofed data, allowing the attacker to send the vault's funds to themselves.
Example Contract
#![allow(unused)]
fn main() {
fn pay_escrow(_program_id: &Pubkey, accounts: &[AccountInfo], _instruction_data: &[u8]) -> ProgramResult {
    let account_info_iter = &mut accounts.iter();
    let state_info = next_account_info(account_info_iter)?;
    let escrow_vault_info = next_account_info(account_info_iter)?;
    let escrow_receiver_info = next_account_info(account_info_iter)?;

    let state = State::deserialize(&mut &**state_info.data.borrow())?;

    if state.escrow_state == EscrowState::Complete {
        **escrow_vault_info.try_borrow_mut_lamports()? -= state.amount;
        **escrow_receiver_info.try_borrow_mut_lamports()? += state.amount;
    }

    Ok(())
}
}
Inspired by SPL Lending Program
Mitigation
#![allow(unused)]
fn main() {
  	if EXPECTED_ACCOUNT.owner != program_id {
    	    return Err(ProgramError::IncorrectProgramId);
	}
}
For further reading on different forms of account verification in Solana and implementation refer to the Solana Cookbook.
Missing Signer Check
In Solana, each public key has an associated private key that can be used to generate signatures. A transaction lists each account public key whose private key was used to generate a signature for the transaction. These signatures are verified using the inputted public keys prior to transaction execution.
In case certain permissions are required to perform a sensitive function of the contract, a missing signer check becomes an issue. Without this check, an attacker would be able to call the respective access controlled functions permissionlessly.
Exploit Scenario
The following contract sets an escrow account's state to Complete. Unfortunately, the contract does not check whether the State account's authority has signed the transaction.
Therefore, a malicious actor can set the state to Complete, without needing access to the authority’s private key.
Example Contract
#![allow(unused)]
fn main() {
fn complete_escrow(_program_id: &Pubkey, accounts: &[AccountInfo], _instruction_data: &[u8]) -> ProgramResult {
    let account_info_iter = &mut accounts.iter();
    let state_info = next_account_info(account_info_iter)?;
    let authority = next_account_info(account_info_iter)?;

    let mut state = State::deserialize(&mut &**state_info.data.borrow())?;

    if state.authority != *authority.key {
        return Err(ProgramError::IncorrectAuthority);
    }

    state.escrow_state = EscrowState::Complete;
    state.serialize(&mut &mut **state_info.data.borrow_mut())?;

    Ok(())

}
}
Inspired by SPL Lending Program
Mitigation
#![allow(unused)]
fn main() {
  	if !EXPECTED_ACCOUNT.is_signer {
    	return Err(ProgramError::MissingRequiredSignature);
	}
}
For further reading on different forms of account verification in Solana and implementation refer to the Solana Cookbook.
Missing Sysvar Account Check
The sysvar (system account) account is often used while validating access control for restricted functions by confirming that the inputted sysvar account by the user matches up with the expected sysvar account. Without this check in place, any user is capable of passing in their own spoofed sysvar account and in turn bypassing any further authentication associated with it, causing potentially disastrous effects.
Exploit Scenario
secp256k1 is an elliptic curve used by a number of blockchains for signatures. Validating signatures is crucial as by bypassing signature checks, an attacker can gain access to restricted functions that could lead to drainage of funds.
Here, load_current_index and load_instruction_at are functions that don't verify that the inputted sysvar account is authorized, therefore allowing serialized maliciously fabricated data to successfully spoof as an authorized secp256k1 signature.
Example Contract
#![allow(unused)]
fn main() {
pub fn verify_signatures(account_info: &AccountInfo) -> ProgramResult {
    let index = solana_program::sysvar::instructions::load_current_index(
        &account_info.try_borrow_mut_data()?,
    );

    let secp_instruction = sysvar::instructions::load_instruction_at(
        (index - 1) as usize,
        &account_info.try_borrow_mut_data()?,
    );
    if secp_instruction.program_id != secp256k1_program::id() {
        return Err(InvalidSecpInstruction.into());
    }
    ...
}
}
Refer to Mitigation to understand what's wrong with these functions and how sysvar account checks were added.
Mitigation
- Solana libraries should be running on version 1.8.1 and up
- Use
load_instruction_at_checkedandload_current_index_checked
Utilizing the latest Solana version and referencing checked functions, especially on sensitive parts of a contract is crucial even if potential attack vectors have been fixed post-audit. Leaving the system exposed to any point of failure compromises the entire system's integrity, especially while the contracts are being constantly updated.
Here is the code showing the sysvar account checks added between unchecked and checked functions:
Example: Wormhole Exploit (February 2022)
Funds lost: ~326,000,000 USD
Note: The following analysis is condensed down to be present this attack vector as clearly as possible, and certain details might’ve been left out for the sake of simplification
The Wormhole hack serves to be one of the most memorable exploits in terms of impact DeFi has ever seen.
This exploit also happens to incorporate a missing sysvar account check that allowed the attacker to:
- Spoof Guardian signatures as valid
- Use them to create a Validator Action Approval (VAA)
- Mint 120,000 ETH via calling complete_wrapped function
(These actions are all chronologically dependent on one another based on permissions and conditions - this analysis will only dive into “Step 1”)
The SignatureSet was able to be faked because the verify_signatures function failed to appropriately verify the sysvar account passed in:
#![allow(unused)]
fn main() {
let secp_ix = solana_program::sysvar::instructions::load_instruction_at(
    secp_ix_index as usize,
    &accs.instruction_acc.try_borrow_mut_data()?,
)
}
load_instruction_at doesn't verify that the inputted data came from the authorized sysvar account.
The fix for this was to upgrade the Solana version and get rid of these unsafe deprecated functions (see Mitigation). Wormhole had caught this issue but didn't update their deployed contracts in time before the exploiter had already managed to drain funds.
Resources:
samczsun's Wormhole exploit breakdown thread
Improper Instruction Introspection
Solana allows programs to inspect other instructions in the transaction using the Instructions sysvar. The programs requiring instruction introspection divide an operation into two or more instructions. The program have to ensure that all the instructions related to an operation are correlated. The program could access the instructions using absolute indexes or relative indexes. Using relative indexes ensures that the instructions are implicitly correlated. The programs using absolute indexes might become vulnerable to exploits if additional validations to ensure the correlation between instructions are not performed.
Exploit Scenario
A program mints tokens based on the amount of tokens transferred to it. A program checks that Token::transfer instruction is called in the first instruction of the transaction. The program uses absolute index 0 to access the instruction data, program id and validates them. If the first instruction is a Token::transfer then program mints some tokens.
#![allow(unused)]
fn main() {
pub fn mint(
    ctx: Context<Mint>,
    // ...
) -> Result<(), ProgramError> {
    // [...]
    let transfer_ix = solana_program::sysvar::instructions::load_instruction_at_checked(
        0usize,
        ctx.instructions_account.to_account_info(),
    )?;

    if transfer_ix.program_id != spl_token::id() {
        return Err(ProgramError::InvalidInstructionData);
    }
    // check transfer_ix transfers
    // mint to the user account
    // [...]
    Ok(())
}
}
The program uses absolute index to access the transfer instruction. An attacker can create transaction containing multiple calls to mint and single transfer instruction.
transfer()mint(, ...)mint(, ...)mint(, ...)mint(, ...)mint(, ...)
All the mint instructions verify the same transfer instruction. The attacker gets 4 times more than the intended tokens.
Mitigation
Use a relative index, for example -1, and ensure the instruction at that offset is the transfer instruction.
#![allow(unused)]
fn main() {
pub fn mint(
    ctx: Context<Mint>,
    // ...
) -> Result<(), ProgramError> {
    // [...]
    let transfer_ix = solana_program::sysvar::instructions::get_instruction_relative(
        -1i64,
        ctx.instructions_account.to_account_info(),
    )?;
    // [...]
}
}
(Not So) Smart Pallets
This repository contains examples of common Substrate pallet vulnerabilities. Use Not So Smart Pallets to learn about Substrate vulnerabilities, as a reference when performing security reviews, and as a benchmark for security and analysis tools.
Features
Each Not So Smart Pallet includes a standard set of information:
- Description of the vulnerability type
- Attack scenarios to exploit the vulnerability
- Recommendations to eliminate or mitigate the vulnerability
- A mock pallet that exhibits the flaw
- References to third-party resources with more information
Vulnerabilities
| Not So Smart Pallet | Description |
|---|---|
| Arithmetic overflow | Integer overflow due to incorrect use of arithmetic operators |
| Don't panic! | System panics create a potential DoS attack vector |
| Weights and fees | Incorrect weight calculations can create a potential DoS attack vector |
| Verify first | Verify first, write last |
| Unsigned transaction validation | Insufficient validation of unsigned transactions |
| Bad randomness | Unsafe sources of randomness in Substrate |
| Bad origin | Incorrect use of call origin can lead to bypassing access controls |
Credits
These examples are developed and maintained by Trail of Bits.
If you have questions, problems, or just want to learn more, then join the #ethereum channel on the Empire Hacking Slack or contact us directly.
Arithmetic overflow
Arithmetic overflow in Substrate occurs when arithmetic operations are performed using primitive operations instead of specialized functions that check for overflow. When a Substrate node is compiled in debug mode, integer overflows will cause the program to panic. However, when the node is compiled in release mode (e.g. cargo build --release), Substrate will perform two's complement wrapping. A production-ready node will be compiled in release mode, which makes it vulnerable to arithmetic overflow.
Example
In the pallet-overflow pallet, notice that the transfer function sets update_sender and update_to using primitive arithmetic operations.
#![allow(unused)]
fn main() {
   /// Allow minting account to transfer a given balance to another account.
   ///
   /// Parameters:
   /// - `to`: The account to receive the transfer.
   /// - `amount`: The amount of balance to transfer.
   ///
   /// Emits `Transferred` event when successful.
   #[pallet::weight(10_000)]
   pub fn transfer(
       origin: OriginFor<T>,
       to: T::AccountId,
       amount: u64,
   ) -> DispatchResultWithPostInfo {
       let sender = ensure_signed(origin)?;
       let sender_balance = Self::get_balance(&sender);
       let receiver_balance = Self::get_balance(&to);

       // Calculate new balances.
       let update_sender = sender_balance - amount;
       let update_to = receiver_balance + amount;
       [...]
   }
}
The sender of the extrinsic can exploit this vulnerability by causing update_sender to underflow, which artificially inflates their balance.
Note: Aside from the stronger mitigations mentioned below, a check to make sure that sender has at least amount balance would have also prevented an underflow.
Mitigations
- Use
checkedorsaturatingfunctions for arithmetic operations.
References
- https://doc.rust-lang.org/book/ch03-02-data-types.html#integer-overflow
- https://docs.substrate.io/reference/how-to-guides/basics/use-helper-functions/
Don't Panic!
Panics occur when the node enters a state that it cannot handle and stops the program / process instead of trying to proceed. Panics can occur for a large variety of reasons such as out-of-bounds array access, incorrect data validation, type conversions, and much more. A well-designed Substrate node must NEVER panic! If a node panics, it opens up the possibility for a denial-of-service (DoS) attack.
Example
In the pallet-dont-panic pallet, the find_important_value dispatchable checks to see if useful_amounts[0] is greater than 1_000. If so, it sets the ImportantVal StorageValue to the value held in useful_amounts[0].
#![allow(unused)]
fn main() {
    /// Do some work
    ///
    /// Parameters:
    /// - `useful_amounts`: A vector of u64 values in which there is a important value.
    ///
    /// Emits `FoundVal` event when successful.
    #[pallet::weight(10_000)]
    pub fn find_important_value(
        origin: OriginFor<T>,
        useful_amounts: Vec<u64>,
    ) -> DispatchResultWithPostInfo {
        let sender = ensure_signed(origin)?;

        ensure!(useful_amounts[0] > 1_000, <Error<T>>::NoImportantValueFound);

        // Found the important value
        ImportantValue::<T>::put(&useful_amounts[0]);
        [...]
    }
}
However, notice that there is no check before the array indexing to see whether the length of useful_amounts is greater than zero. Thus, if useful_amounts is empty, the indexing will cause an array out-of-bounds error which will make the node panic. Since the find_important_value function is callable by anyone, an attacker can set useful_amounts to an empty array and spam the network with malicious transactions to launch a DoS attack.
Mitigations
- Write non-throwing Rust code (e.g. prefer returning
Resulttypes, useensure!, etc.). - Proper data validation of all input parameters is crucial to ensure that an unexpected panic does not occur.
- A thorough suite of unit tests should be implemented.
- Fuzz testing (e.g. using
test-fuzz) can aid in exploring more of the input space.
References
- https://docs.substrate.io/main-docs/build/events-errors/#errors
Weights and Fees
Weights and transaction fees are the two main ways to regulate the consumption of blockchain resources. The overuse of blockchain resources can allow a malicious actor to spam the network to cause a denial-of-service (DoS). Weights are used to manage the time it takes to validate the block. The larger the weight, the more "resources" / time the computation takes. Transaction fees provide an economic incentive to limit the number of resources used to perform operations; the fee for a given transaction is a function of the weight required by the transaction.
Weights can be fixed or a custom "weight annotation / function" can be implemented. A weight function can calculate the weight, for example, based on the number of database read / writes and the size of the input parameters (e.g. a long Vec<>). To optimize the weight such that users do not pay too little or too much for a transaction, benchmarking can be used to empirically determine the correct weight in worst case scenarios.
Specifying the correct weight function and benchmarking it is crucial to protect the Substrate node from denial-of-service (DoS) attacks. Since fees are a function of weight, a bad weight function implies incorrect fees. For example, if some function performs heavy computation (which takes a lot of time) but specifies a very small weight, it is cheap to call that function. In this way an attacker can perform a low-cost attack while still stealing a large amount of block execution time. This will prevent regular transactions from being fit into those blocks.
Example
In the pallet-bad-weights pallet, a custom weight function, MyWeightFunction, is used to calculate the weight for a call to do_work. The weight required for a call to do_work is 10_000_000 times the length of the useful_amounts vector.
#![allow(unused)]
fn main() {
impl WeighData<(&Vec<u64>,)> for MyWeightFunction {
    fn weigh_data(&self, (amounts,): (&Vec<u64>,)) -> Weight {
        self.0.saturating_mul(amounts.len() as u64).into()
    }
}
}
However, if the length of the useful_amounts vector is zero, the weight to call do_work would be zero. A weight of zero implies that calling this function is financially cheap. This opens the opportunity for an attacker to call do_work a large number of times to saturate the network with malicious transactions without having to pay a large fee and could cause a DoS attack.
One potential fix for this is to set a fixed weight if the length of useful_amounts is zero.
#![allow(unused)]
fn main() {
impl WeighData<(&Vec<u64>,)> for MyWeightFunction {
    fn weigh_data(&self, (amounts,): (&Vec<u64>,)) -> Weight {
        // The weight function is `y = mx + b` where `m` and `b` are both `self.0` (the static fee) and `x` is the length of the `amounts` array.
        // If `amounts.len() == 0` then the weight is simply the static fee (i.e. `y = b`)
        self.0 + self.0.saturating_mul(amounts.len() as u64).into()
    }
}
}
In the example above, if the length of amounts (i.e. useful_amounts) is zero, then the function will return self.0 (i.e. 10_000_000).
On the other hand, if an attacker sends a useful_amounts vector that is incredibly large, the returned Weight can become large enough such that the dispatchable takes up a large amount block execution time and prevents other transactions from being fit into the block. A fix for this would be to bound the maximum allowable length for useful_amounts.
Note: Custom fee functions can also be created. These functions should also be carefully evaluated and tested to ensure that the risk of DoS attacks is mitigated.
Mitigations
- Use benchmarking to empirically test the computational resources utilized by various dispatchable functions. Additionally, use benchmarking to define a lower and upper weight bound for each dispatchable.
- Create bounds for input arguments to prevent a transaction from taking up too many computational resources. For example, if a
Vec<>is being taken as an input argument to a function, prevent the length of theVec<>from being too large. - Be wary of fixed weight dispatchables (e.g.
#[pallet::weight(1_000_000)]). A weight that is completely agnostic to database read / writes or input parameters may open up avenues for DoS attacks.
References
- https://docs.substrate.io/main-docs/build/tx-weights-fees/
- https://docs.polkadot.com/develop/parachains/testing/benchmarking/
Verify First, Write Last
NOTE: As of Polkadot v0.9.25, the Verify First, Write Last practice is no longer required. However, since older versions are still vulnerable and because it is still best practice, it is worth discussing the "Verify First, Write Last" idiom.
Substrate does not cache state prior to extrinsic dispatch. Instead, state changes are made as they are invoked. This is in contrast to a transaction in Ethereum where, if the transaction reverts, no state changes will persist. In the case of Substrate, if a state change is made and then the dispatch throws a DispatchError, the original state change will persist. This unique behavior has led to the "Verify First, Write Last" practice.
#![allow(unused)]
fn main() {
{
  // all checks and throwing code go here

  // ** no throwing code below this line **

  // all event emissions & storage writes go here
}
}
Example
In the pallet-verify-first pallet, the init dispatchable is used to set up the TotalSupply of the token and transfer them to the sender. init should be only called once. Thus, the Init boolean is set to true when it is called initially. If init is called more than once, the transaction will throw an error because Init is already true.
#![allow(unused)]
fn main() {
/// Initialize the token
/// Transfers the total_supply amount to the caller
/// If init() has already been called, throw AlreadyInitialized error
#[pallet::weight(10_000)]
pub fn init(
    origin: OriginFor<T>,
    supply: u64
) -> DispatchResultWithPostInfo {
    let sender = ensure_signed(origin)?;

    if supply > 0 {
        <TotalSupply<T>>::put(&supply);
    }
    // Set sender's balance to total_supply()
    <BalanceToAccount<T>>::insert(&sender, supply);

    // Revert above changes if init() has already been called
    ensure!(!Self::is_init(), <Error<T>>::AlreadyInitialized);

    // Set Init StorageValue to `true`
    Init::<T>::put(true);

    // Emit event
    Self::deposit_event(Event::Initialized(sender));

    Ok(().into())
}
}
However, notice that the setting of TotalSupply and the transfer of funds happens before the check on Init. This violates the "Verify First, Write Last" practice. In an older version of Substrate, this would allow a malicious sender to call init multiple times and change the value of TotalSupply and their balance of the token.
Mitigations
- Follow the "Verify First, Write Last" practice by doing all the necessary data validation before performing state changes and emitting events.
References
- https://docs.substrate.io/main-docs/build/runtime-storage/#best-practices
Unsigned Transaction Validation
There are three types of transactions allowed in a Substrate runtime: signed, unsigned, and inherent. An unsigned transaction does not require a signature and does not include information about who sent the transaction. This is naturally problematic because there is no by-default deterrent to spam or replay attacks. Because of this, Substrate allows users to create custom functions to validate unsigned transaction. However, incorrect or improper validation of an unsigned transaction can allow anyone to perform potentially malicious actions. Usually, unsigned transactions are allowed only for select parties (e.g., off-chain workers (OCW)). But, if improper data validation of an unsigned transaction allows a malicious actor to spoof data as if it came from an OCW, this can lead to unexpected behavior. Additionally, improper validation opens up the possibility to replay attacks where the same transaction can be sent to the transaction pool again and again to perform some malicious action repeatedly.
The validation of an unsigned transaction must be provided by the pallet that chooses to accept them. To allow unsigned transactions, a pallet must implement the frame_support::unsigned::ValidateUnsigned trait. The validate_unsigned function, which must be implemented as part of the ValidateUnsigned trait, will provide the logic necessary to ensure that the transaction is valid. An off chain worker (OCW) can be implemented directly in a pallet using the offchain_worker hook. The OCW can send an unsigned transaction by calling SubmitTransaction::submit_unsigned_transaction. Upon submission, the validate_unsigned function will ensure that the transaction is valid and then pass the transaction on towards towards the final dispatchable function.
Example
The pallet-bad-unsigned pallet is an example that showcases improper unsigned transaction validation. The pallet tracks the average, rolling price of some "asset"; this price data is being retrieved by an OCW. The fetch_price function, which is called by the OCW, naively returns 100 as the current price (note that an HTTP request can be made here for true price data). The validate_unsigned function (see below) simply validates that the Call is being made to submit_price_unsigned and nothing else.
#![allow(unused)]
fn main() {
/// By default unsigned transactions are disallowed, but implementing the validator
/// here we make sure that some particular calls (the ones produced by offchain worker)
/// are being whitelisted and marked as valid.
fn validate_unsigned(_source: TransactionSource, call: &Self::Call) -> TransactionValidity {
    // If `submit_price_unsigned` is being called, the transaction is valid.
    // Otherwise, it is an InvalidTransaction.
    if let Call::submit_price_unsigned { block_number, price: new_price } = call {
        let avg_price = Self::average_price()
        .map(|price| if &price > new_price { price - new_price } else { new_price - price })
        .unwrap_or(0);

        let valid_tx = | provide | {
            ValidTransaction::with_tag_prefix("ExampleOffchainWorker")
            .priority(T::UnsignedPriority::get().saturating_add(avg_price as _))
            .and_provides([&provide])
            .longevity(5)
            .propagate(true)
            .build()
        };
        valid_tx(b"submit_price_unsigned".to_vec())
    } else {
        InvalidTransaction::Call.into()
    }
}
}
However, notice that there is nothing preventing an attacker from sending malicious price data. Both block_number and price can be set to arbitrary values. For block_number, it would be valuable to ensure that it is not a block number in the future; only price data for the current block can be submitted. Additionally, medianization can be used to ensure that the reported price is not severely affected by outliers. Finally, unsigned submissions can be throttled by enforcing a delay after each submission.
Note that the simplest solution would be to sign the offchain submissions so that the runtime can validate that a known OCW is sending the price submission transactions.
Mitigations
- Consider whether unsigned transactions is a requirement for the runtime that is being built. OCWs can also submit signed transactions or transactions with signed payloads.
- Ensure that each parameter provided to
validate_unsignedis validated to prevent the runtime from entering a state that is vulnerable or undefined.
References
- https://docs.substrate.io/main-docs/fundamentals/transaction-types/#unsigned-transactions
- https://docs.substrate.io/main-docs/fundamentals/offchain-operations/
- https://github.com/paritytech/substrate/blob/polkadot-v0.9.26/frame/examples/offchain-worker/src/lib.rs
- https://docs.substrate.io/tutorials/build-application-logic/add-offchain-workers/
- https://docs.substrate.io/reference/how-to-guides/offchain-workers/offchain-http-requests/
Bad Randomness
To use randomness in a Substrate pallet, all you need to do is require a source of randomness in the Config trait of a pallet. This source of Randomness must implement the Randomness trait. The trait provides two methods for obtaining randomness.
random_seed: This function takes no arguments and returns back a random value. Calling this value multiple times in a block will result in the same value.random: Takes in a byte-array (a.k.a "context-identifier") and returns a value that is as independent as possible from other contexts.
Substrate provides the Randomness Collective Flip Pallet and a Verifiable Random Function implementation in the BABE pallet. Developers can also choose to build their own source of randomness.
A bad source of randomness can lead to a variety of exploits such as the theft of funds or undefined system behavior.
Example
The pallet-bad-lottery pallet is a simplified "lottery" system that requires one to guess the next random number. If they guess correctly, they are the winner of the lottery.
#![allow(unused)]
fn main() {
#[pallet::call]
impl<T:Config> Pallet<T> {
/// Guess the random value
/// If you guess correctly, you become the winner
#[pallet::weight(10_000)]
pub fn guess(
    origin: OriginFor<T>,
    guess: T::Hash
) -> DispatchResultWithPostInfo {
    let sender = ensure_signed(origin)?;
    // Random value.
    let nonce = Self::get_and_increment_nonce();
    let (random_value, _) = T::MyRandomness::random(&nonce);
    // Check if guess is correct
    ensure!(guess == random_value, <Error<T>>::IncorrectGuess);
    <Winner<T>>::put(&sender);

    Self::deposit_event(Event::NewWinner(sender));

    Ok(().into())
}
}

impl<T:Config> Pallet<T> {
/// Increment the nonce each time guess() is called
pub fn get_and_increment_nonce() -> Vec<u8> {
    let nonce = Nonce::<T>::get();
    Nonce::<T>::put(nonce.wrapping_add(1));
    nonce.encode()
}
}
}
Note that the quality of randomness provided to the pallet-bad-lottery pallet is related to the randomness source. If the randomness source is the "Randomness Collective Flip Pallet", this lottery system is insecure. This is because the collective flip pallet implements "low-influence randomness". This makes it vulnerable to a collusion attack where a small minority of participants can give the same random number contribution making it highly likely to have the seed be this random number (click here to learn more). Additionally, as mentioned in the Substrate documentation, "low-influence randomness can be useful when defending against relatively weak adversaries. Using this pallet as a randomness source is advisable primarily in low-security situations like testing."
Mitigations
- Use the randomness implementation provided by the BABE pallet. This pallet provides "production-grade randomness, and is used in Polkadot. Selecting this randomness source dictates that your blockchain use Babe consensus."
- Defer from creating a custom source of randomness unless specifically necessary for the runtime being developed.
- Do not use
random_seedas the method of choice for randomness unless specifically necessary for the runtime being developed.
References
- https://docs.substrate.io/main-docs/build/randomness/
- https://docs.substrate.io/reference/how-to-guides/pallet-design/incorporate-randomness/
- https://ethresear.ch/t/rng-exploitability-analysis-assuming-pure-randao-based-main-chain/1825/7
- https://ethresear.ch/t/collective-coin-flipping-csprng/3252/21
- https://github.com/use-ink/ink/issues/57#issuecomment-486998848
Origins
The origin of a call tells a dispatchable function where the call has come from. Origins are a way to implement access controls in the system.
There are three types of origins that can used in the runtime:
#![allow(unused)]
fn main() {
pub enum RawOrigin<AccountId> {
	Root,
	Signed(AccountId),
	None,
}
}
Outside of the out-of-box origins, custom origins can also be created that are catered to a specific runtime. The primary use case for custom origins is to configure privileged access to dispatch calls in the runtime, outside of RawOrigin::Root.
Using privileged origins, like RawOrigin::Root or custom origins, can lead to access control violations if not used correctly. It is a common error to use ensure_signed in place of ensure_root which would allow any user to bypass the access control placed by using ensure_root.
Example
In the pallet-bad-origin pallet, there is a set_important_val function that should be only callable by the ForceOrigin custom origin type. This custom origin allows the pallet to specify that only a specific account can call set_important_val.
#![allow(unused)]
fn main() {
#[pallet::call]
impl<T:Config> Pallet<T> {
    /// Set the important val
    /// Should be only callable by ForceOrigin
    #[pallet::weight(10_000)]
    pub fn set_important_val(
        origin: OriginFor<T>,
        new_val: u64
    ) -> DispatchResultWithPostInfo {
        let sender = ensure_signed(origin)?;
        // Change to new value
        <ImportantVal<T>>::put(new_val);

        // Emit event
        Self::deposit_event(Event::ImportantValSet(sender, new_val));

        Ok(().into())
    }
}
}
However, the set_important_val is using ensure_signed; this allows any account to set ImportantVal. To allow only the ForceOrigin to call set_important_val the following change can be made:
#![allow(unused)]
fn main() {
T::ForceOrigin::ensure_origin(origin.clone())?;
let sender = ensure_signed(origin)?;
}
Mitigations
- Ensure that the correct access controls are placed on privileged functions.
- Develop user documentation on all risks associated with the system, including those associated with privileged users.
- A thorough suite of unit tests that validates access controls is crucial.
References
- https://docs.substrate.io/main-docs/build/origins/
- https://docs.substrate.io/tutorials/build-application-logic/specify-the-origin-for-a-call/
- https://paritytech.github.io/substrate/master/pallet_sudo/index.html#
- https://paritytech.github.io/substrate/master/pallet_democracy/index.html
(Not So) Smart Contracts (Sui)
This repository contains examples of common Sui Move smart contract vulnerabilities, including code from real smart contracts. Use Not So Smart Contracts to learn about Sui vulnerabilities, as a reference when performing security reviews, and as a benchmark for security and analysis tools.
Features
Each Not So Smart Contract includes:
- Description of the vulnerability type
- Attack scenarios to exploit the vulnerability
- Recommendations to eliminate or mitigate the vulnerability
Vulnerabilities
| Name | Description |
|---|---|
| Mutable Reference Shadowing | Destructured mut bindings silently fail to write through to struct fields |
| Unvalidated Shared Object Identity | Functions accept any shared object of the correct type without ID validation |
| Verifier Bypass via Package Upgrade | Adding key ability on upgrade bypasses the id_leak_verifier |
| Runtime Limit Denial of Service | Hard runtime limits abort on shared objects causing permanent denial of service |
| Missing Object Uniqueness | No built-in one-per-address constraint allows duplicate singleton objects |
| Type Parameter Griefing | Callers substitute wrong generic types to destroy state before validation |
Credits
These examples are developed and maintained by Trail of Bits.
Contact us if you need help with smart contract security.
Mutable Reference Shadowing
Destructured mut bindings in Sui Move silently rebind local variables instead of writing through to struct fields.
Description
In Sui Move, destructuring a mutable reference with mut creates a local mutable binding rather than a mutable borrow of the underlying field. Assigning to this binding (e.g., left = limit) only reassigns the local variable -- it does not write through the reference to update the struct field. To actually modify the field, the developer must dereference explicitly with *left = *limit. This is a subtle quirk of Move's ownership and reference system.
Unlike Rust, which would emit a compiler warning about the unused write, Move silently accepts the reassignment. The practical result is that state updates appear correct in source code but silently fail to persist, leaving on-chain data unchanged after a transaction that was supposed to mutate it.
Exploit Scenario
Alice deploys a minting module with a MinterCap shared object that tracks how many tokens remain mintable per epoch. When a new epoch starts, the mint function is supposed to reset the remaining allowance by assigning left = limit. Bob notices the destructured mut left binding only rebinds the local variable. Bob waits until the epoch rolls over and then calls mint repeatedly. Because the allowance was never actually reset on-chain, all minting attempts after the first epoch's supply is exhausted permanently fail, denying service to all users.
Example
A minting module tracks how many tokens can still be minted in the current epoch. When a new epoch begins, the remaining allowance should reset to the configured limit. The destructuring below introduces a local left binding that shadows the reference to the actual field.
public fun mint(cap: &mut MinterCap, ctx: &mut TxContext) {
    let MinterCap { limit, epoch, mut left } = cap;

    // If the epoch has rolled over, reset the remaining allowance
    if (tx_context::epoch(ctx) > *epoch) {
        *epoch = tx_context::epoch(ctx);
        // BUG: reassigns the local variable, not the struct field
        left = limit;
    };

    assert!(*left > 0, EMintExhausted);
    *left = *left - 1;
}
The assignment left = limit only points the local left at the same value as limit. The MinterCap.left field on-chain is never updated, so the minting allowance is never actually reset.
The fix is to dereference both sides of the assignment:
*left = *limit;
Mitigations
- Always dereference when writing through struct field references (
*field = value); a plain assignment only rebinds the local variable. - Add integration tests that verify on-chain state actually changes after functions that are supposed to mutate it.
- Include
mutdestructuring patterns in code-review checklists, specifically checking that every assignment to a destructured binding uses the*dereference operator. - Prefer direct field assignment on the struct reference (e.g.,
cap.left = cap.limit) where the Move version supports it, as this avoids the shadowing problem entirely.
Unvalidated Shared Object Identity
Functions that accept shared objects by type without verifying object ID allow attackers to substitute fake instances.
Description
In Sui Move, functions accept objects by type rather than by address. Any shared object matching the expected type can be passed as an argument by any caller. Unlike the EVM, where contract addresses are typically hardcoded, Sui functions implicitly trust that the caller provides the correct object instance. If a function accepts &mut Pool<A, B> without verifying the object's ID matches the expected instance, an attacker can create their own Pool<A, B> with manipulated reserves and pass it in place of the legitimate one, leading to skewed exchange rates, incorrect accounting, or loss of funds.
Exploit Scenario
Alice deploys a DEX router that accepts a Pool<SUI, USDC> shared object reference for executing swaps. The router validates its own version but never checks the pool's object ID. Bob creates a fake Pool<SUI, USDC> with near-zero USDC reserves. Bob calls the router's swap function, passing his fake pool instead of the legitimate one. The calculate_output function returns an inflated amount based on the manipulated reserves, and Bob drains real liquidity from the system.
Example
A DEX router executes swaps through a pool and a fee configuration, both passed as shared object references. The router validates its own version but never checks that the pool is the correct instance:
public fun swap<A, B>(
    router: &mut Router,
    pool: &mut Pool<A, B>,
    coin_in: Coin<A>,
    ctx: &mut TxContext,
) {
    router::assert_version(router);
    // BUG: no validation that `pool` is the correct instance
    let amount_out = pool::calculate_output(pool, coin::value(&coin_in));
    let coin_out = pool::do_swap(pool, coin_in, ctx);
    transfer::public_transfer(coin_out, tx_context::sender(ctx));
}
Mitigations
- Store the expected object ID of each dependency inside the parent object (e.g.,
router.pool_id) and validate withassert!(object::id(pool) == router.pool_id)on every entry point. - Never assume the caller provides the correct object instance; treat all shared object parameters as untrusted input and validate them against stored references before performing any state-changing operations.
Verifier Bypass via Package Upgrade
Adding the key ability to a struct during a package upgrade bypasses Sui's id_leak_verifier checks on prior versions.
Description
Sui's id_leak_verifier ensures that the id field of any struct with the key ability originates from object::new() and is never transferred between different struct types. This prevents object identity spoofing at the bytecode level. However, the verifier only enforces this rule on structs that currently possess the key ability -- structs without key are free to pack arbitrary UIDs without restriction.
Sui's upgrade model historically allowed adding abilities (including key) to existing structs during a package upgrade. Combined with Programmable Transaction Blocks (PTBs), which can invoke functions from different package versions in the same transaction, an attacker can exploit the gap: publish V0 with a struct that lacks key and a helper function that packs it from any UID, upgrade to V1 adding key to that struct (and removing the helper), then use a PTB to call V0's helper (still on-chain) to mint a forged object and pass it into V1's functions as a legitimate Sui object. The verifier is bypassed because V0's bytecode was validated without key checks on the struct.
Exploit Scenario
Alice publishes package V0 containing a Bar struct with only the store ability and a public function build_bar_from_foo that packs a Bar from an arbitrary UID. Alice then upgrades to V1, adding key to Bar and removing the helper function. Bob constructs a Programmable Transaction Block that calls V0's build_bar_from_foo (still deployed on-chain) to forge a Bar with a copied UID, then passes this forged object into V1's take_bar function. The runtime accepts it as a valid Sui object because Bar now has key in V1, allowing Bob to spoof object identity.
Example
// === V0: Bar has no `key`, so the verifier ignores UID reuse ===
module example::token {
    use sui::object::{Self, UID};
    use sui::tx_context::TxContext;

    struct Foo has key { id: UID, value: u64 }
    struct Bar has store { id: UID, value: u64 }

    // Verifier allows this because Bar is not a Sui object
    public fun build_bar_from_foo(foo: &Foo, ctx: &mut TxContext): Bar {
        Bar { id: object::new(ctx), value: foo.value }
        // A malicious version could copy foo.id directly into Bar
    }
}

// === V1: Bar gains `key`, build_bar_from_foo is removed ===
module example::token {
    use sui::object::UID;

    struct Foo has key { id: UID, value: u64 }
    struct Bar has key, store { id: UID, value: u64 }

    public fun take_bar(bar: Bar): u64 {
        let Bar { id, value } = bar;
        object::delete(id);
        value
    }
}

// === Attack via PTB (pseudocode) ===
// 1. Call V0::example::token::build_bar_from_foo(foo) -> bar
// 2. Call V1::example::token::take_bar(bar)
// The runtime accepts `bar` as a valid Sui object because Bar
// now has `key` in V1, even though it was forged in V0.
Mitigations
- The Sui framework now prevents adding the
keyability to a struct during package upgrades, closing this attack vector at the platform level. - Set the upgrade policy to
immutablewhen the package is finalized and no further upgrades are needed. - Use the most restrictive upgrade policy available (
additiveordep_only) to limit what changes an upgrade can introduce. - Audit all struct ability changes during upgrade reviews; any addition of
keyorstoreto a previously ability-less struct should be treated as a red flag. - Avoid publishing helper functions that pack structs from caller-supplied UIDs, even when the struct currently lacks
key.
Runtime Limit Denial of Service
Sui's hard runtime limits on shared objects allow attackers to permanently brick shared state with crafted input.
Description
Sui enforces several hard runtime limits that, when exceeded, abort the entire transaction. Because shared objects persist across transactions, malicious data that triggers these limits can permanently brick shared state. An attacker only needs to push a shared object past a single limit once -- every future transaction that touches that object will also abort, locking out all users.
The key limits are: dynamic field accesses (1,000 per transaction), maximum object size (256,000 bytes), computation budget (max_computation_budget), and event processing (50 per checkpoint). Each can be weaponized when user-controlled input determines how much work a transaction performs or how large an object grows. The common thread is an asymmetry: the attacker's setup cost is O(1) or very cheap, while the resulting damage forces O(n) costs on every other user.
Exploit Scenario
Alice deploys a vault contract that distributes rewards to all participants by iterating over a dynamic field table. Each user requires two dynamic field accesses per iteration. Bob creates 501 accounts and joins the vault with each one. When Alice or any user calls distribute_funds, the function attempts over 1,000 dynamic field accesses, exceeding Sui's per-transaction limit. The transaction aborts, and because the shared vault object retains all 501 entries, every future call to distribute_funds also aborts, permanently locking all deposited funds.
Example
A vault distributes funds to all participants by iterating over a dynamic field table. Each user requires two dynamic field accesses (one to read the balance, one to write the updated balance). An attacker joins the vault with enough accounts to push the total past 501 users, causing every call to distribute_funds to exceed the 1,000 dynamic field access limit and abort.
public fun distribute_funds(vault: &mut Vault, amount: u64) {
    let total_users = vault.user_count;
    let per_user = amount / total_users;
    let i = 0;
    while (i < total_users) {
        // Two dynamic field accesses per iteration:
        let balance = dynamic_field::borrow_mut<u64, u64>(&mut vault.id, i);
        *balance = *balance + per_user;
        i = i + 1;
    };
}
A separate class of attack targets the 256KB object size limit. A shared registry stores participant metadata including user-controlled string fields. A malicious user sets display_name and bio to very long byte strings, bloating the shared Registry object past the size cap and blocking all subsequent writes, including withdrawals.
public fun register_participant(
    registry: &mut Registry,
    display_name: String,
    bio: String,
    ctx: &mut TxContext,
) {
    // An attacker sets display_name and bio to ~256KB each,
    // pushing the Registry object past the 256,000-byte limit.
    let participant = ParticipantInfo {
        id: object::new(ctx),
        display_name,
        bio,
        deposit: 0,
    };
    vector::push_back(&mut registry.participants, participant);
}
Mitigations
- Use pull-based (claim) patterns instead of push-based iteration over shared objects so that each user's transaction only touches their own data.
- Paginate batch operations with a cursor or index parameter so no single transaction iterates the full collection.
- Cap the byte length of all user-controlled string fields before storing them in shared objects.
- Configure data structure parameters (e.g.,
max_slice_sizein BigVector) well below the 256KB object size limit to prevent individual nodes from exceeding it. - Enforce minimum deposit or stake amounts to make it expensive for an attacker to create many entries.
- Test every shared-object function with the maximum expected data size to verify it stays within runtime limits.
- Treat any O(n) loop over a shared object as a potential DoS vector during security review.
Missing Object Uniqueness Enforcement
Sui's object model lacks built-in one-per-address constraints, allowing duplicate singleton objects to bypass restrictions.
Description
In Sui, every call to object::new(ctx) creates a new object with a unique UID, and transfer::transfer sends it to an address in a one-way operation with no built-in deduplication. Unlike the EVM, where writing to a mapping(address => Struct) naturally enforces one entry per address, Sui has no mapping-equivalent that ties a single value to each address at the storage layer. Once an object is transferred, the contract cannot enumerate which objects an address already owns -- there is no on-chain index of objects by type and owner accessible from Move code.
This architectural gap means that if a registration function creates and transfers a new object without explicitly checking a separate registry, users can accumulate duplicate objects. A user holding two Membership objects can have is_active = true on one and is_active = false on the other, allowing them to bypass single-use restrictions by switching to the unconsumed copy. The same class of bug applies to any system that assumes one-object-per-user semantics -- profiles, accounts, memberships, or any singleton-like abstraction built on transferred objects.
Exploit Scenario
Alice deploys a membership module where an admin registers members by creating a Membership object and calling transfer::transfer to send it to the member's address. Bob convinces the admin to register his address twice (or exploits a public registration function). Bob now owns two Membership objects. When the protocol deactivates Bob's first membership by setting is_active = false, Bob simply passes his second Membership object to bypass the restriction, breaking the single-membership invariant the protocol depends on.
Example
A module lets an admin register members. The function creates a fresh Membership and transfers it to the given address, but nothing prevents the admin from calling it twice for the same user:
public struct Membership has key, store {
    id: UID,
    is_active: bool,
}

public fun register_member(
    _: &AdminCap,
    member_addr: address,
    ctx: &mut TxContext,
) {
    let membership = Membership {
        id: object::new(ctx),
        is_active: false,
    };
    // BUG: no check whether member_addr already has a Membership object
    transfer::transfer(membership, member_addr);
}
Mitigations
- Track registered entities in a
Table<address, ID>orObjectTablekeyed by address and assert the key does not exist before creating a new object. - Consider using dynamic fields on a shared registry object instead of transferring individual objects, making uniqueness structurally enforced by the key.
- Write tests that attempt duplicate registration and confirm the transaction aborts.
- Audit every function that calls
object::newfollowed bytransfer::transferfor missing uniqueness checks.
Type Parameter Griefing
Callers can substitute arbitrary generic type parameters to destroy shared state before type validation occurs.
Description
In Sui Move, public entry functions with generic type parameters (e.g., <ASSET: key + store>) can be called by any user with any type that satisfies the ability constraints. The caller controls which concrete type is substituted at the call site. If the function performs an irreversible state change -- like popping an order from a queue -- before validating that the generic type matches the expected asset, an attacker can call the function with a wrong type. The type mismatch causes downstream logic to fail (e.g., a precheck returns false), but the state change has already occurred and the order is consumed without being executed.
This is Sui-specific because Move generics are resolved at the call site -- any caller can pass any qualifying type. On the EVM, function signatures are fixed and there are no generics. The practical impact is that an attacker can repeatedly invoke the function with a mismatched type to drain an entire order queue, destroying every pending order without executing any of them.
Exploit Scenario
Alice deploys a task-processing module with a shared RequestQueue that holds pending orders, each associated with a specific asset type. The process_request<ASSET> entry function pops the next request and validates each step against the ASSET type parameter. Bob calls process_request<FakeToken> instead of the correct process_request<RealToken>. The function pops the request from the queue (an irreversible mutation), but every validation step fails because FakeToken does not match the request's actual asset. The request is permanently lost. Bob repeats this call to drain the entire queue, destroying all pending orders without executing any of them.
Example
A task-processing entry function pops the next request from a shared queue and then iterates over its steps. Each step calls a validation function parameterized by the generic ASSET type. When the caller supplies a type that does not match the request's actual asset, every validation returns false and the steps are skipped -- but the request has already been removed from the queue and is permanently lost.
public entry fun process_request<ASSET: key + store>(
    queue: &mut RequestQueue,
    ctx: &mut TxContext,
) {
    // Irreversible: request is removed from the queue
    let request = request_queue::pop_front(queue);

    let i = 0;
    while (i < vector::length(&request.steps)) {
        let step = vector::borrow(&request.steps, i);
        // BUG: if ASSET does not match the request's real asset, validation
        // returns false and the step is silently skipped
        if (validate_step<ASSET>(step)) {
            execute_step<ASSET>(step, ctx);
        };
        i = i + 1;
    };
    // request is consumed; if every validation failed, all work is lost
}
Mitigations
- Validate that the generic type parameter matches the expected asset type before any irreversible state mutations such as pops, deletions, or transfers.
- Abort on type mismatch (
assert!with an error code) instead of returningfalseand silently skipping work, so the entire transaction reverts and no state is lost. - Separate type validation into a guard function that runs before the destructive action, making it impossible to reach the mutation without passing the check.
- Consider using phantom type parameters or witness patterns to bind the type at object creation time, preventing arbitrary type substitution at the call site.
(Not So) Smart Contracts
This repository contains examples of common TON smart contract vulnerabilities, featuring code from real smart contracts. Utilize the Not So Smart Contracts to learn about TON vulnerabilities, refer to them during security reviews, and use them as a benchmark for security analysis tools.
Features
Each Not So Smart Contract consists of a standard set of information:
- Vulnerability type description
- Attack scenarios to exploit the vulnerability
- Recommendations to eliminate or mitigate the vulnerability
- Real-world contracts exhibiting the flaw
- References to third-party resources providing more information
Vulnerabilities
| Not So Smart Contract | Description |
|---|---|
| Int as boolean | Unexpected result of logical operations on the int type |
| Fake Jetton contract | Any contract can send a transfer_notification message |
| Forward TON without gas check | Users can drain TON balance of a contract lacking gas check |
| Missing Bounce Handler | Bounceable messages without bounce processing cause fund loss |
| Irreversible State Changes | Multi-contract flows leave state inconsistent on failure |
| Raw Reserve Before Validation | Calling raw_reserve before checks locks funds permanently |
| Unvalidated Storage Upgrade | Saving unvalidated cells via set_data bricks the contract |
Missing impure Specifier | Functions without impure can be removed by the FunC compiler |
| Silent Message Failure | SendIgnoreErrors silently drops messages when balance is insufficient |
| Race Conditions | Concurrent message flows corrupt shared state |
Credits
These examples are developed and maintained by Trail of Bits.
If you have any questions, issues, or wish to learn more, join the #ethereum channel on the Empire Hacking Slack or contact us directly.
Fake Jetton Contract
TON smart contracts use the transfer_notification message sent by the receiver's Jetton wallet contract to specify and process a user request along with the transfer of a Jetton. Users add a forward_payload to the Jetton transfer message when transferring their Jettons, this forward_payload is forwarded by the receiver's Jetton wallet contract to the receiver in the transfer_notification message. The transfer_notification message has the following TL-B schema:
transfer_notification#7362d09c query_id:uint64 amount:(VarUInteger 16)
                              sender:MsgAddress forward_payload:(Either Cell ^Cell)
                              = InternalMsgBody;
The amount and sender are added by the receiver's Jetton wallet contract as the amount of Jettons transferred and the sender of Jettons (owner of the Jetton wallet that sent of the internal_transfer message). However, all the other values specified by the user in the forward_payload are not parsed or validated by the Jetton wallet contract, they are added as it and sent in the transfer_notification message. Therefore, the receiver of the transfer_notification message must consider malicious values in the forward_payload and validate them properly to prevent any contract state manipulation.
Example
The following simplified code highlights the lack of token_id validation in the transfer_notification message. This contract tracks user deposits by updating the token0_balances dictionary entry for the user's address. However, the transfer_notification message handler does not verify that the sender_address is equal to one of the token0 or token1 Jetton wallets owned by this contract. This allows users to manipulate their deposit values by sending the transfer_notification message from a fake Jetton wallet contract.
#include "imports/stdlib.fc";

() recv_internal(int my_balance, int msg_value, cell in_msg_full, slice in_msg_body) impure {
    slice cs = in_msg_full.begin_parse();
    int flags = cs~load_uint(4);
    ;; ignore all bounced messages
    if (is_bounced?(flags)) {
        return ();
    }
    slice sender_address = cs~load_msg_addr(); ;; incorrectly assumed to be Jetton wallet contract owned by this contract

    (cell token0_balances, cell token1_balances) = load_data(); ;; balances dictionaries

    (int op, int query_id) = in_msg_body~load_op_and_query_id();

    if (op == op::transfer_notification) {
        (int amount, slice from_address) = (in_msg_body~load_coins(), in_msg_body~load_msg_addr());
        cell forward_payload_ref = in_msg_body~load_ref();
        slice forward_payload = forward_payload_ref.begin_parse();

        int is_token0? = forward_payload~load_int(1);

        if (is_token0?) {
            slice balance_before = token0_balances.dict_get?(267, from_address);
            int balance = balance_before~load_coins();
            balance = balance + amount;
            slice balance_after = begin_cell().store_coinds(balance).end_cell().being_parse();
            token0_balances~dict_set(267, from_address, balance_after);
        } else {
            slice balance_before = token1_balances.dict_get?(267, from_address);
            int balance = balance_before~load_coins();
            balance = balance + amount;
            slice balance_after = begin_cell().store_coinds(balance).end_cell().being_parse();
            token1_balances~dict_set(267, from_address, balance_after);
        }

        save_data();
        return ();
    }
}
Mitigations
- Store the address of Jetton wallet contract owned by the current contract at the time of contract initialization and use this stored value to verify the sender of the
transfer_notificationmessage. - Validate all the user provided values in the
forward_payloadinstead of trusting users to send correct values.
Foward TON without gas check
TON smart contracts needs to send TON as gas fee along with the Jetton transfers or any other message they send to another contract. If a contract allows its users to specify the amount of TON to be sent with an outgoing message then it must check that the user supplied enough TON with their message to cover for the transaction fee and the forward TON amount.
If a contract lacks such a gas check then users can specify a higher forward TON amount to drain the TON balance of the smart contract, freezing the smart contract and potentially destroying it.
Example
The following simplified code highlights the lack of a gas check. The contract implements a withdraw operation that allows users to specify a forward TON amount and a forward payload to send with the Jettons. However, the contract does not check if the user included enough TON with the withdraw message to cover the withdraw message transaction, the Jetton transfer gas fee, and the forward TON amount. This allows users to drain the TON balance of the smart contract.
#include "imports/stdlib.fc";

() recv_internal(int my_balance, int msg_value, cell in_msg_full, slice in_msg_body) impure {
    slice cs = in_msg_full.begin_parse();
    int flags = cs~load_uint(4);
    ;; ignore all bounced messages
    if (is_bounced?(flags)) {
        return ();
    }
    slice sender_address = cs~load_msg_addr(); ;; incorrectly assumed to be Jetton wallet contract owned by this contract

    (int op, int query_id) = in_msg_body~load_op_and_query_id();

    if (op == op::withdraw) {
        int amount = in_msg_body~load_coins();
        slice to_address = in_msg_body~load_msg_addr();
        int forward_ton_amount = in_msg_body~load_coins(); ;; user specified forward TON amount
        cell forward_payload = begin_cell().store_slice(in_msg_body).end_cell();

        var msg_body = begin_cell()
            .store_op_and_query_id(op::transfer, query_id)
            .store_coins(amount)
            .store_slice(to_address)
            .store_slice(to_address)
            .store_uint(0, 1)
            .store_coins(forward_ton_amount)
            .store_maybe_ref(forward_payload)
            .end_cell();

        cell msg = begin_cell()
            .store_uint(0x18, 6)
            .store_slice(USDT_WALLET_ADDRESS)
            .store_coins(JETTON_TRANSFER_GAS + forward_ton_amount) ;; sending user specified forward TON amount
            .store_uint(1, 1 + 4 + 4 + 64 + 32 + 1 + 1) ;; message parameters
            .store_ref(ref)
            .end_cell();

        send_raw_message(msg, 0);

        return ();
    }
}
Mitigations
- Avoid allowing users to specify forward TON amount with the outgoing messages.
- Always check that the user sent enough TON in the
msg_valueto cover for the current transaction fee and sum of all the outgoing message values.
Using int as boolean values
In FunC, booleans are represented as integers; false is represented as 0 and true is represented as -1 (257 ones in binary notation).
Logical operations are done as bitwise operations over the binary representation of the integer values. Notably, The not operation ~ flips all the bits of an integer value; therefore, a non-zero value other than -1 becomes another non-zero value.
When a condition is checked, every non-zero integer is considered a true value. This, combined with the logical operations being bitwise operations, leads to an unexpected behavior of if conditions using the logical operations.
Example
The following simplified code highlights the unexpected behavior of the ~ operator on a non-zero interger value.
#include "imports/stdlib.fc";

() recv_internal(int my_balance, int msg_value, cell in_msg_full, slice in_msg_body) impure {
    int correct_true = -1;
    if (correct_true) {
        ~strdump("correct_true is true"); ;; printed
    } else {
        ~strdump("correct_true is false");
    }

    if (~ correct_true) {
        ~strdump("~correct_true is true");
    } else {
        ~strdump("~correct_true is false"); ;; printed
    }

    int correct_false = 0;
    if (correct_false) {
        ~strdump("correct_false is true");
    } else {
        ~strdump("correct_false is false"); ;; printed
    }

    if (~ correct_false) {
        ~strdump("~correct_false is true"); ;; printed
    } else {
        ~strdump("~correct_false is false");
    }

    int positive = 10;
    if (positive) {
        ~strdump("positive is true"); ;; printed
    } else {
        ~strdump("positive is false");
    }

    if (~ positive) {
        ~strdump("~positive is true"); ;; printed but unexpected
    } else {
        ~strdump("~positive is false");
    }

    int negative = -10;
    if (negative) {
        ~strdump("negative is true"); ;; printed
    } else {
        ~strdump("negative is false");
    }

    if (~ negative) {
        ~strdump("~negative is true"); ;; printed but unexpected
    } else {
        ~strdump("~negative is false");
    }
}
The recv_internal function above prints the following debug logs:
    #DEBUG#: correct_true is true
    #DEBUG#: ~correct_true is false
    #DEBUG#: correct_false is false
    #DEBUG#: ~correct_false is true
    #DEBUG#: positive is true
    #DEBUG#: ~positive is true
    #DEBUG#: negative is true
    #DEBUG#: ~negative is true
It demonstrats that the ~ 10 and ~ -10 both evaluate to true instead of becoming false with the ~ operator.
Mitigations
- Always use
0or-1in condition checks to get correct results. - Be careful with the logical operator usage on non-zero integer values.
- Implement test cases to verify correct behavior of all condition checks with different integer values.
Missing Bounce Handler
Contracts that ignore bounced bounceable messages silently lose funds and enter inconsistent state.
Description
TON smart contracts can send messages with the bounceable flag, which means the message will be returned to the sender if the destination contract fails to process it (e.g., due to an unhandled opcode, insufficient gas, or a thrown exception). If the sending contract does not implement a bounce handler, the bounced message is silently ignored. This can lead to loss of funds or inconsistent state, because the sender assumes the operation succeeded when it did not.
This issue is particularly dangerous in contracts that transfer Jettons or native TON via bounceable messages. If the transfer bounces and the sending contract has already updated its internal accounting (e.g., reduced a user's balance), the funds are effectively lost — the recipient never received them, and the sender's state reflects a completed transfer.
Exploit Scenario
Alice deploys a vault contract that allows users to withdraw Jettons. The vault sends Jetton transfer messages using the bounceable flag (0x18) but does not implement any bounce handling logic in recv_internal. Bob requests a withdrawal of 1000 Jettons. The vault decrements Bob's internal balance by 1000 and sends a bounceable transfer message to Bob's Jetton wallet. However, the destination wallet contract runs out of gas and the message bounces back. Because the vault has no bounce handler, the bounced message is silently discarded. Bob's internal balance now shows 0, but the 1000 Jettons were never transferred — the funds are permanently lost.
Example
The following simplified code sends a Jetton transfer using a bounceable message but does not handle the bounce. If the transfer fails (e.g., the destination wallet does not exist or runs out of gas), the bounced message is silently discarded and the user's withdrawal is lost.
#include "imports/stdlib.fc";

() send_jettons(slice to_address, int amount, slice jetton_wallet) impure {
    cell msg = begin_cell()
        .store_uint(0x18, 6)       ;; bounceable message
        .store_slice(jetton_wallet)
        .store_coins(50000000)
        .store_uint(0, 107)
        .store_uint(op::transfer, 32)
        .store_uint(0, 64)         ;; query_id
        .store_coins(amount)
        .store_slice(to_address)
        .store_uint(0, 2)          ;; empty response destination
        .store_uint(0, 1)          ;; no custom payload
        .store_coins(0)            ;; no forward TON
        .store_uint(0, 1)          ;; no forward payload
        .end_cell();

    send_raw_message(msg, 0);
    ;; No bounce handler exists in recv_internal
}

() recv_internal(int my_balance, int msg_value, cell in_msg_full, slice in_msg_body) impure {
    slice cs = in_msg_full.begin_parse();
    int flags = cs~load_uint(4);

    if (is_bounced?(flags)) {
        return ();  ;; Bounce silently ignored — funds lost
    }

    ;; ... normal message handling ...
}
Mitigations
- Implement a bounce handler in
recv_internalthat parses the bounced message opcode and reverts the corresponding state changes (e.g., restores the user's balance). - Use non-bounceable messages (
0x10flag instead of0x18) when the destination contract is already validated and the message does not need to bounce, such as when creating new wallets. - As per TON documentation, creating new accounts cannot be done with a bounceable message — use non-bounceable messages for account initialization.
- Review all outgoing messages in the contract and ensure that every bounceable message has a corresponding bounce handler.
Irreversible State Changes in Multi-Contract Flows
Multi-contract message cascades on TON lack atomic rollback, leaving state permanently inconsistent on failure.
Description
TON smart contracts communicate asynchronously via messages. Complex operations often span multiple contracts in a message cascade: contract A sends to B, B sends to C, and C sends back to A. Each contract updates its own state upon receiving a message. If any step in the cascade fails (e.g., due to insufficient gas, a thrown exception, or an out-of-gas error), the state changes made in earlier steps are not automatically rolled back. Unlike EVM transactions, there is no atomic transaction boundary across multiple TON contracts.
This means a multi-step operation can leave the system in an inconsistent state. A common pattern is a "lock-then-execute" flow: contract A increments a lock counter to prevent concurrent operations, sends a message to contract B for processing, and expects a response to decrement the lock. If contract B fails, the lock is never released, and the user's funds become permanently inaccessible.
Exploit Scenario
Alice deploys a DEX consisting of a user contract and a pool contract. When a user initiates a swap, the user contract increments a state lock and forwards the request to the pool contract. Bob calls the swap function with just enough gas for the user contract but insufficient gas for the pool contract. The user contract increments its state lock to 1 and sends the swap message to the pool. The pool contract runs out of gas and fails. The completion message is never sent back to the user contract, so the state lock is never decremented. Bob's user contract is now permanently locked with state = 1, and all subsequent withdrawal attempts are rejected.
Example
The following simplified code shows a DEX where the user contract increments a state counter when a swap begins. If the pool contract fails to complete the swap (e.g., runs out of gas), the user contract never receives the completion message and remains permanently locked.
;; User contract — receives swap request and locks state
() handle_swap_request(slice in_msg_body) impure {
    (int code_version, slice pool_address, slice owner_address,
     cell user_balances, int state, cell user_rewards,
     cell backup_cell_1, cell backup_cell_2) = load_data();

    ;; Lock the user contract by incrementing state
    save_data(
        code_version, pool_address, owner_address,
        user_balances,
        state + 1,    ;; State incremented — withdrawals now blocked
        user_rewards, backup_cell_1, backup_cell_2
    );

    ;; Forward to pool for processing
    send_raw_message(build_pool_message(in_msg_body), 64);
    ;; If pool fails, state is never decremented back
}

;; User contract — blocks withdrawals when state > 0
() handle_withdrawal(slice in_msg_body) impure {
    (_, _, _, _, int state, _, _, _) = load_data();

    if (state != 0) {
        ;; Withdrawal blocked — contract is locked
        send_error_response(error::contract_locked);
        return ();
    }

    ;; ... process withdrawal ...
}
Mitigations
- Ensure that every state-locking operation has a guaranteed unlock path, including explicit timeout-based recovery mechanisms.
- Validate that sufficient gas is available for the entire message cascade before making any state changes.
- Implement explicit error handling at each step in a multi-contract flow so that failures at any point trigger appropriate state rollbacks via response messages.
- Add administrative recovery functions that can unlock contracts stuck in an inconsistent state, protected by appropriate access controls.
- Test all failure paths in multi-contract flows, including out-of-gas conditions at each intermediate step.
Raw Reserve Before Validation
Calling raw_reserve before input validation locks deposited TON permanently when subsequent checks fail.
Description
The raw_reserve function in FunC reserves a specified amount of TON in the contract's balance, making it unavailable for outgoing messages in the current transaction. If raw_reserve is called before validation checks (such as gas sufficiency or input validation), and a subsequent check fails, the contract may attempt to refund the user but cannot access the reserved funds. The refund message is sent with insufficient value, and the reserved TON becomes permanently locked in the contract.
This pattern is especially dangerous in deposit flows where the contract receives TON from a user, reserves it for protocol accounting, and then validates whether the user provided enough gas for the operation. If the gas check fails after the reserve, the user's deposited TON is trapped.
Exploit Scenario
Alice deploys a lending protocol that accepts TON deposits. The protocol's supply function calls raw_reserve to lock the deposited amount before validating gas. Bob sends a deposit of 10 TON but attaches only a minimal gas fee. The contract calls raw_reserve(10 TON, 2), locking the 10 TON. It then checks whether Bob sent enough gas for the subsequent message cascade and determines the fee is insufficient. The contract attempts to refund Bob using CARRY_ALL_BALANCE mode, but the reserved 10 TON is excluded from the available balance. Bob receives a near-zero refund, and his 10 TON is permanently locked in the contract.
Example
The following simplified code shows a supply function that reserves the user's deposit before checking whether enough gas was provided. If the gas check fails, the refund cannot access the reserved funds.
;; Called when user supplies TON to the protocol
() supply_withdraw_ton(int supply_amount, int msg_value, slice sender,
                       int fwd_fee, cell custom_payload) impure inline {
    ;; Reserve the supply amount BEFORE any validation
    raw_reserve(supply_amount, 2);  ;; Funds now locked

    return master_core_logic(
        supply_amount, msg_value, sender, fwd_fee, custom_payload
    );
}

() master_core_logic(int supply_amount, int msg_value, slice sender,
                     int fwd_fee, cell custom_payload) impure {
    int enough_fee = calculate_required_fee(fwd_fee);

    if (msg_value < enough_fee) {
        ;; Gas check failed — try to refund
        cell body = begin_cell()
            .store_uint(error::insufficient_fee, 32)
            .store_uint(0, 64)
            .end_cell();

        ;; This message cannot access the reserved funds
        ;; User's TON is permanently locked
        send_raw_message(
            begin_cell()
                .store_uint(0x10, 6)
                .store_slice(sender)
                .store_coins(0)
                .store_uint(1, 107)
                .store_ref(body)
                .end_cell(),
            128  ;; CARRY_ALL_BALANCE — but reserved funds are excluded
        );
        return ();
    }

    ;; ... process supply ...
}
Mitigations
- Perform all validation checks (gas sufficiency, input validation, access control) before calling
raw_reserve. - Structure the code so that
raw_reserveis the last operation before sending the final outgoing message, not the first. - Implement a recovery mechanism for locked funds in case similar issues occur, such as an admin-callable sweep function.
- Add tests that verify refund paths return the correct amount of TON to the user, including cases where validation fails.
Unvalidated Storage Upgrade
Passing unvalidated cells to set_data during upgrades can permanently brick the contract and lock all funds.
Description
TON smart contracts can update their storage using set_data, which replaces the contract's entire persistent state with a new cell. Upgrade operations that accept a user-provided or admin-provided cell and pass it directly to set_data without validation can permanently brick the contract. If the new cell is malformed, incomplete, or empty, every subsequent call to the contract's load_data function will throw an exception, making the contract completely unusable.
This is particularly dangerous because set_data is irreversible in most cases — once the storage is corrupted, the contract cannot parse its own state to execute any recovery logic. The contract becomes a permanent black hole for any funds it holds.
Exploit Scenario
Alice deploys a Jetton master contract with an admin-only upgrade_storage operation. The admin key is held by a multisig. During a routine upgrade, the multisig signers submit a transaction that includes a new storage cell with a missing field — the total_supply value is omitted. The contract calls set_data with the incomplete cell. On the next user interaction, load_data attempts to parse total_supply and throws an exception. Every subsequent call to the contract fails at load_data. The contract holds 500,000 TON in reserves, all of which are now permanently inaccessible.
Example
The following simplified code shows an upgrade_storage operation that saves an arbitrary cell as contract storage without any validation.
() recv_internal(int my_balance, int msg_value, cell in_msg_full, slice in_msg_body) impure {
    slice cs = in_msg_full.begin_parse();
    int flags = cs~load_uint(4);
    slice sender_address = cs~load_msg_addr();

    (int op, int query_id) = (in_msg_body~load_uint(32), in_msg_body~load_uint(64));

    if (op == op::upgrade_storage) {
        check_sender_is_admin(sender_address);
        cell new_storage = in_msg_body~load_ref();
        set_data(new_storage);   ;; No validation — any cell is accepted
        throw(0);                ;; Success exit
    }

    ;; Normal operation — will fail if storage was corrupted
    (slice admin, int balance, cell users) = load_data();
    ;; ... rest of contract logic ...
}
If the admin accidentally sends an empty cell or a cell with missing fields, load_data will throw on every subsequent call. The contract is permanently bricked, and all funds are locked.
The same issue affects upgrade processes where a new configuration variable is computed but not persisted to storage. For example, if an upgrade function generates a new_upgrade_config cell but fails to call save_data, the contract's storage remains unchanged despite the upgrade appearing to succeed.
Mitigations
- Validate that the new storage cell can be parsed by the contract's
load_datafunction before committing it withset_data. - Implement a dry-run validation that attempts to parse all required fields from the new cell and throws a descriptive error if any field is missing or malformed.
- Ensure that upgrade processes persist all computed variables to storage, and verify in tests that both master and user contract code updates correctly after each upgrade.
- Consider implementing a time-locked upgrade mechanism that allows reverting within a grace period.
Missing impure Specifier
The FunC compiler silently removes side-effecting functions lacking impure, eliminating security checks.
Description
In FunC, the impure specifier indicates that a function has side effects — it modifies state, sends messages, or can throw exceptions. If a function that performs these actions is not marked as impure, the FunC compiler may optimize it away entirely when it determines that the function's return value is unused. This means critical operations such as access control checks, state validations, and error-throwing guard functions can be silently removed from the compiled contract.
This is especially dangerous for helper functions that are called solely for their side effects (e.g., throw_unless wrappers, permission checks). If the compiler removes such a function, the contract deploys without the intended security check, and no error or warning is produced during compilation.
Exploit Scenario
Alice deploys a DEX contract with a check_swap_allowed function that verifies only the admin can initiate swaps. The function calls throw_unless if the sender is not the admin, but it is not marked as impure. The FunC compiler determines that check_swap_allowed returns nothing and its return value is unused, so it removes the call entirely during optimization. The deployed contract accepts swap operations from any address. Bob discovers this by inspecting the compiled bytecode and calls the swap function directly, draining liquidity from the pool without authorization.
Example
The following simplified code shows an access control function that throws if the caller is unauthorized. Without the impure specifier, the compiler may remove the call entirely.
;; Missing impure — compiler may remove this function call
() check_swap_allowed(slice sender_address) {
    (slice admin) = load_data();
    throw_unless(error::unauthorized, equal_slices(sender_address, admin));
}

;; Also missing impure — validation that throws on invalid input
() check_tick_validity(int tick_lower, int tick_upper) {
    throw_unless(error::invalid_tick, tick_lower < tick_upper);
    throw_unless(error::tick_out_of_range, tick_lower >= min_tick);
    throw_unless(error::tick_out_of_range, tick_upper <= max_tick);
}

() recv_internal(int my_balance, int msg_value, cell in_msg_full, slice in_msg_body) impure {
    slice cs = in_msg_full.begin_parse();
    int flags = cs~load_uint(4);
    slice sender_address = cs~load_msg_addr();

    (int op, int query_id) = (in_msg_body~load_uint(32), in_msg_body~load_uint(64));

    if (op == op::swap) {
        check_swap_allowed(sender_address);  ;; May be removed by compiler
        int tick_lower = in_msg_body~load_int(24);
        int tick_upper = in_msg_body~load_int(24);
        check_tick_validity(tick_lower, tick_upper);  ;; May be removed by compiler
        ;; ... execute swap without access control or validation ...
    }
}
Mitigations
- Add the
impurespecifier to all functions that throw exceptions, modify contract state, or send messages. - Thoroughly test access control and validation helper functions to verify that the compiled contract enforces them.
- When migrating from FunC to Tolk, note that Tolk does not require the
impurespecifier — all functions are treated as impure by default. - Use integration tests that specifically test unauthorized access and invalid inputs to confirm that guard functions are not optimized away.
Silent Message Failure
Using SendIgnoreErrors silently drops messages when the contract balance is insufficient, causing fund loss.
Description
TON provides the SendIgnoreErrors (mode 2) flag for sending messages. When this flag is used, if the contract's current balance is insufficient to cover the message value, the message is silently dropped during the action phase — no error is raised and no bounce message is generated. The sending contract's state has already been updated in the compute phase, so any accounting changes (balance decrements, state transitions) persist even though the message was never delivered.
This creates a class of vulnerabilities where funds appear to have been sent but never arrive at the destination. The sender's internal accounting shows a completed transfer, but the recipient's balance is unchanged. Over time, this leads to state desynchronization between contracts and unrecoverable fund loss.
Exploit Scenario
Alice deploys a settlement contract that processes batch withdrawals for users. The contract uses SendIgnoreErrors (mode 2) for all outgoing Jetton transfers. Over time, operational fees deplete the contract's TON balance. Bob requests a withdrawal of 5000 tokens. The contract decrements Bob's internal balance by 5000 and calls send_raw_message with mode 2. Because the contract's TON balance is below the required gas amount, the message is silently dropped during the action phase. Bob's balance in the contract now shows 0, but the Jetton transfer never reached his wallet. The 5000 tokens are permanently lost.
Example
The following simplified code shows a token sending utility that uses SendIgnoreErrors. If the contract's TON balance is insufficient, the Jetton transfer message is silently dropped and the user loses their funds.
;; Message utility — all sends use SendIgnoreErrors
() send_tokens(slice to_address, int token_amount, int gas_amount) impure {
    cell msg = begin_cell()
        .store_uint(0x18, 6)
        .store_slice(to_address)
        .store_coins(gas_amount)
        .store_uint(0, 107)
        .store_uint(op::transfer, 32)
        .store_uint(0, 64)
        .store_coins(token_amount)
        .end_cell();

    ;; If contract balance < gas_amount, message is silently dropped
    send_raw_message(msg, 2);  ;; SendIgnoreErrors
}

;; Settlement contract — processes withdrawal
() handle_withdrawal(slice in_msg_body) impure {
    (slice user, int amount) = parse_withdrawal(in_msg_body);

    ;; User's balance already decremented
    update_user_balance(user, -amount);
    save_data();

    ;; If this message is dropped, user loses funds
    send_tokens(user, amount, 50000000);
}
Mitigations
- Verify that the contract's balance is sufficient to cover the message value before sending. If insufficient, revert the state changes or notify the sender via a bounce message.
- Avoid using
SendIgnoreErrorsfor messages that transfer value or trigger critical state changes. Use mode 0 or mode 1 instead, which will cause the transaction to fail if the message cannot be sent. - Implement balance checks before all TON transfers:
throw_unless(error::insufficient_balance, my_balance > required_amount). - Add tests that verify system behavior when contract balances are low, ensuring that no silent message drops can occur during normal operation.
Race Conditions in Asynchronous Messaging
Concurrent message flows on TON can modify shared contract state, invalidating earlier assumptions.
Description
TON smart contracts process messages asynchronously. A message cascade (A sends to B, B sends to C, C sends back to A) can span multiple blocks. While one message flow is in progress, an attacker can initiate a second, independent message flow that modifies the same contract state. Properties that were validated at the start of the first flow (e.g., a user's balance, a contract's authorization status, or a dictionary entry) may no longer hold when a later message in the same flow arrives.
This is fundamentally different from EVM, where a transaction executes atomically. In TON, any assumption about state consistency across multiple messages is potentially unsafe. A common instance is bounce-handling race conditions: if a contract sends a message, receives an unrelated deposit before the bounce arrives, and then processes the bounce by restoring the original balance, the deposit is overwritten and lost.
Exploit Scenario
Alice deploys a DEX pool contract that tracks LP token balances per user in a dictionary. Bob holds 100 LP tokens and initiates a remove-liquidity operation. The pool sets Bob's LP balance to 0 and sends a bounceable message to transfer Bob's tokens. Before the transfer completes, Bob sends a second transaction adding 50 LP of new liquidity. The pool updates Bob's balance to 50. The original transfer then bounces due to an error at the destination. The pool's bounce handler overwrites Bob's balance with the original 100 LP (the bounced amount) instead of adding it. Bob's 50 LP deposit from the second transaction is silently erased. Expected balance: 150. Actual balance: 100.
Example
The following simplified code shows a DEX pool contract that tracks user LP token balances. A race condition between a liquidity removal bounce and a concurrent deposit causes the deposit to be silently overwritten.
;; DEX pool contract — tracks LP token balances per user
() recv_internal(int my_balance, int msg_value, cell in_msg_full, slice in_msg_body) impure {
    slice cs = in_msg_full.begin_parse();
    int flags = cs~load_uint(4);
    slice sender_address = cs~load_msg_addr();

    if (is_bounced?(flags)) {
        in_msg_body~skip_bits(32);  ;; skip bounce op prefix
        int op = in_msg_body~load_uint(32);

        if (op == op::remove_liquidity) {
            int lp_amount = in_msg_body~load_coins();
            int hash = slice_hash(sender_address);
            ;; Overwrites current LP balance with bounced amount
            ;; Any deposit received between send and bounce is lost
            ctx::lp_balances~udict_replace_builder?(
                256, hash,
                begin_cell().store_coins(lp_amount)
            );
            save_data();
        }
        return ();
    }

    ;; ... normal operations including add_liquidity that updates lp_balances ...
}
The race condition occurs in this sequence:
- Pool has LP balance 100 for User A. It sends a remove-liquidity message to return tokens.
- Pool sets User A's LP balance to 0 (removal pending).
- User A adds liquidity of 10 to the pool. Pool updates LP balance to 10.
- The removal bounces. Pool restores LP balance to 100, overwriting the new deposit.
- Expected LP balance: 110. Actual LP balance: 100. The 10 LP from step 3 is lost.
Mitigations
- When handling bounced messages, add the bounced amount to the current balance rather than overwriting it:
new_balance = current_balance + bounced_amount. - Do not assume that contract state is unchanged between sending a message and receiving a response or bounce.
- Design state updates to be additive and commutative where possible, so that concurrent operations produce correct results regardless of message ordering.
- Test multi-contract flows with interleaved operations to verify that concurrent message processing does not corrupt state.
Program Analysis
We will use three distinctive testing and program analysis techniques:
- Static analysis with Slither. All the paths of the program are approximated and analyzed simultaneously through different program presentations (e.g., control-flow-graph).
- Fuzzing with Echidna. The code is executed with a pseudo-random generation of transactions. The fuzzer attempts to find a sequence of transactions that violates a given property.
- Symbolic execution with Manticore. This formal verification technique translates each execution path into a mathematical formula on which constraints can be checked.
Each technique has its advantages and pitfalls, making them useful in specific cases:
| Technique | Tool | Usage | Speed | Bugs missed | False Alarms |
|---|---|---|---|---|---|
| Static Analysis | Slither | CLI & scripts | seconds | moderate | low |
| Fuzzing | Echidna | Solidity properties | minutes | low | none |
| Symbolic Execution | Manticore | Solidity properties & scripts | hours | none* | none |
* if all paths are explored without timeout
Slither analyzes contracts within seconds. However, static analysis might lead to false alarms and is less suitable for complex checks (e.g., arithmetic checks). Run Slither via the CLI for push-button access to built-in detectors or via the API for user-defined checks.
Echidna needs to run for several minutes and will only produce true positives. Echidna checks user-provided security properties written in Solidity. It might miss bugs since it is based on random exploration.
Manticore performs the "heaviest weight" analysis. Like Echidna, Manticore verifies user-provided properties. It will need more time to run, but it can prove the validity of a property and will not report false alarms.
Suggested Workflow
Start with Slither's built-in detectors to ensure that no simple bugs are present now or will be introduced later. Use Slither to check properties related to inheritance, variable dependencies, and structural issues. As the codebase grows, use Echidna to test more complex properties of the state machine. Revisit Slither to develop custom checks for protections unavailable from Solidity, like protecting against a function being overridden. Finally, use Manticore to perform targeted verification of critical security properties, e.g., arithmetic operations.
- Use Slither's CLI to catch common issues
- Use Echidna to test high-level security properties of your contract
- Use Slither to write custom static checks
- Use Manticore for in-depth assurance of critical security properties
A note on unit tests: Unit tests are necessary for building high-quality software. However, these techniques are not best suited for finding security flaws. They typically test positive behaviors of code (i.e., the code works as expected in normal contexts), while security flaws tend to reside in edge cases that developers did not consider. In our study of dozens of smart contract security reviews, unit test coverage had no effect on the number or severity of security flaws we found in our client's code.
Determining Security Properties
To effectively test and verify your code, you must identify the areas that need attention. As your resources spent on security are limited, scoping the weak or high-value parts of your codebase is important to optimize your effort. Threat modeling can help. Consider reviewing:
- Rapid Risk Assessments (our preferred approach when time is short)
- Guide to Data-Centric System Threat Modeling (aka NIST 800-154)
- Shostack thread modeling
- STRIDE / DREAD
- PASTA
- Use of Assertions
Components
Knowing what you want to check also helps you select the right tool.
The broad areas frequently relevant for smart contracts include:
-
State machine. Most contracts can be represented as a state machine. Consider checking that (1) no invalid state can be reached, (2) if a state is valid, then it can be reached, and (3) no state traps the contract.
- Echidna and Manticore are the tools to favor for testing state-machine specifications.
-
Access controls. If your system has privileged users (e.g., an owner, controllers, ...), you must ensure that (1) each user can only perform the authorized actions and (2) no user can block actions from a more privileged user.
- Slither, Echidna, and Manticore can check for correct access controls. For example, Slither can check that only whitelisted functions lack the onlyOwner modifier. Echidna and Manticore are useful for more complex access control, such as permission being given only if the contract reaches a specific state.
-
Arithmetic operations. Checking the soundness of arithmetic operations is critical. Using
SafeMatheverywhere is a good step to prevent overflow/underflow, but you must still consider other arithmetic flaws, including rounding issues and flaws that trap the contract.- Manticore is the best choice here. Echidna can be used if the arithmetic is out-of-scope of the SMT solver.
-
Inheritance correctness. Solidity contracts rely heavily on multiple inheritance. Mistakes like a shadowing function missing a
supercall and misinterpreted c3 linearization order can easily be introduced.- Slither is the tool for detecting these issues.
-
External interactions. Contracts interact with each other, and some external contracts should not be trusted. For example, if your contract relies on external oracles, will it remain secure if half the available oracles are compromised?
- Manticore and Echidna are the best choices for testing external interactions with your contracts. Manticore has a built-in mechanism to stub external contracts.
-
Standard conformance. Ethereum standards (e.g., ERC20) have a history of design flaws. Be aware of the limitations of the standard you are building on.
- Slither, Echidna, and Manticore will help you detect deviations from a given standard.
Tool Selection Cheatsheet
| Component | Tools | Examples |
|---|---|---|
| State machine | Echidna, Manticore | |
| Access control | Slither, Echidna, Manticore | Slither exercise 2, Echidna exercise 2 |
| Arithmetic operations | Manticore, Echidna | Echidna exercise 1, Manticore exercises 1 - 3 |
| Inheritance correctness | Slither | Slither exercise 1 |
| External interactions | Manticore, Echidna | |
| Standard conformance | Slither, Echidna, Manticore | slither-erc |
Other areas will need to be checked depending on your goals, but these coarse-grained areas of focus are a good start for any smart contract system.
Our public audits contain examples of verified or tested properties. Consider reading the Automated Testing and Verification sections of the following reports to review real-world security properties:
Echidna Tutorial
The objective of this tutorial is to demonstrate how to use Echidna to automatically test smart contracts.
To learn through live coding sessions, watch our Fuzzing workshop.
Table of Contents:
- Introduction: Introductory material on fuzzing and Echidna
- Basic: Learn the first steps for using Echidna
- Advanced: Explore the advanced features of Echidna
- Fuzzing tips: General fuzzing recommendations
- Frequently Asked Questions: Responses to common questions about Echidna
- Configuration options: Description of all Echidna configuration options
- Exercises: Practical exercises to enhance your understanding
Join the team on Slack at: https://slack.empirehacking.nyc/ #ethereum.
If you are looking for help to build fuzzing capabilities for your team, check out our invariant development as a service.
Introduction
Introductory materials for fuzzing and Echidna:
- Installation
- Introduction to fuzzing: A brief introduction to fuzzing
- How to test a property: Testing a property with Echidna
Installation
Echidna can be installed either through Docker or by using the pre-compiled binary.
MacOS
To install Echidna on MacOS, simply run the following command:
brew install echidna.
Echidna via Docker
To install Echidna using Docker, execute the following commands:
docker pull trailofbits/eth-security-toolbox
docker run -it -v "$PWD":/home/training trailofbits/eth-security-toolbox
The last command runs the eth-security-toolbox in a Docker container, which will have access to your current directory. This allows you to modify the files on your host machine and run the tools on those files within the container.
Inside Docker, execute the following commands:
solc-select use 0.8.0
cd /home/training
Binary
You can find the latest released binary here:
https://github.com/crytic/echidna/releases/latest
It's essential to use the correct solc version to ensure that these exercises work as expected. We have tested them using version 0.8.0.
Introduction to Property-Based Fuzzing
Echidna is a property-based fuzzer, which we have described in our previous blog posts (1, 2, 3).
Fuzzing
Fuzzing is a well-known technique in the security community. It involves generating more or less random inputs to find bugs in a program. Fuzzers for traditional software (such as AFL or LibFuzzer) are known to be efficient tools for bug discovery.
Beyond purely random input generation, there are many techniques and strategies used for generating good inputs, including:
- Obtaining feedback from each execution and guiding input generation with it. For example, if a newly generated input leads to the discovery of a new path, it makes sense to generate new inputs closer to it.
- Generating input with respect to a structural constraint. For instance, if your input contains a header with a checksum, it makes sense to let the fuzzer generate input that validates the checksum.
- Using known inputs to generate new inputs. If you have access to a large dataset of valid input, your fuzzer can generate new inputs from them, rather than starting from scratch for each generation. These are usually called seeds.
Property-Based Fuzzing
Echidna belongs to a specific family of fuzzers: property-based fuzzing, which is heavily inspired by QuickCheck. In contrast to a classic fuzzer that tries to find crashes, Echidna aims to break user-defined invariants.
In smart contracts, invariants are Solidity functions that can represent any incorrect or invalid state that the contract can reach, including:
- Incorrect access control: The attacker becomes the owner of the contract.
- Incorrect state machine: Tokens can be transferred while the contract is paused.
- Incorrect arithmetic: The user can underflow their balance and get unlimited free tokens.
Testing a Property with Echidna
Table of Contents:
Introduction
This tutorial demonstrates how to test a smart contract with Echidna. The target is the following smart contract (token.sol):
contract Token {
    mapping(address => uint256) public balances;

    function airdrop() public {
        balances[msg.sender] = 1000;
    }

    function consume() public {
        require(balances[msg.sender] > 0);
        balances[msg.sender] -= 1;
    }

    function backdoor() public {
        balances[msg.sender] += 1;
    }
}
We will assume that this token has the following properties:
-
Anyone can hold a maximum of 1000 tokens.
-
The token cannot be transferred (it is not an ERC20 token).
Write a Property
Echidna properties are Solidity functions. A property must:
-
Have no arguments.
-
Return true if successful.
-
Have its name starting with
echidna.
Echidna will:
-
Automatically generate arbitrary transactions to test the property.
-
Report any transactions that lead a property to return false or throw an error.
-
Discard side-effects when calling a property (i.e., if the property changes a state variable, it is discarded after the test).
The following property checks that the caller can have no more than 1000 tokens:
function echidna_balance_under_1000() public view returns (bool) {
    return balances[msg.sender] <= 1000;
}
Use inheritance to separate your contract from your properties:
contract TestToken is Token {
    function echidna_balance_under_1000() public view returns (bool) {
        return balances[msg.sender] <= 1000;
    }
}
testtoken.sol implements the property and inherits from the token.
Initiate a Contract
Echidna requires a constructor without input arguments. If your contract needs specific initialization, you should do it in the constructor.
There are some specific addresses in Echidna:
-
0x30000calls the constructor. -
0x10000,0x20000, and0x30000randomly call other functions.
We don't need any particular initialization in our current example. As a result, our constructor is empty.
Run Echidna
Launch Echidna with:
echidna contract.sol
If contract.sol contains multiple contracts, you can specify the target:
echidna contract.sol --contract MyContract
Summary: Testing a Property
The following summarizes the Echidna run on our example:
contract TestToken is Token {
    constructor() public {}

    function echidna_balance_under_1000() public view returns (bool) {
        return balances[msg.sender] <= 1000;
    }
}
echidna testtoken.sol --contract TestToken
...

echidna_balance_under_1000: failed!💥
  Call sequence, shrinking (1205/5000):
    airdrop()
    backdoor()

...
Echidna found that the property is violated if the backdoor function is called.
Basic
- How to Choose the Most Suitable Testing Mode: Selecting the Most Appropriate Testing Mode
- How to Determine the Best Testing Approach: Deciding on the Optimal Testing Method
- How to Filter Functions: Filtering the Functions to be Fuzzed
- How to Test Assertions Effectively: Efficiently Testing Assertions with Echidna
- How to write properties that use ether: Fuzzing ether during fuzzing campaigns
- How to Write Good Properties Step by Step: Improving Property Testing through Iteration
How to Select the Most Suitable Testing Mode
Echidna offers several ways to write properties, which often leaves developers and auditors wondering about the most appropriate testing mode to use. In this section, we will review how each mode works, as well as their advantages and disadvantages.
Table of Contents:
Introduction
Echidna offer a variety of different testing modes. These can be selected using the testingMode config option or using the --testing-mode parameter. Each mode will be explained, highlighting the keyword needed for the configuration.
Boolean Properties
By default, the property testing mode is used, which reports failures using special functions called properties:
- Testing functions should be named with a specific prefix (e.g.
echidna_). - Testing functions take no parameters and always return a boolean value.
- Any side effect will be reverted at the end of the execution of the property.
- Properties pass if they return true and fail if they return false or revert. Alternatively, properties that start with "echidnarevert" will fail if they return any value (true or false) and pass if they revert. This pseudo-code summarizes how properties work:
function echidna_property() public returns (bool) { // No arguments are required
  // The following statements can trigger a failure if they revert
  publicFunction(...);
  internalFunction(...);
  contract.function(...);

  // The following statement can trigger a failure depending on the returned value
  return ...;
} // side effects are *not* preserved

function echidna_revert_property() public returns (bool) { // No arguments are required
  // The following statements can *never* trigger a failure
  publicFunction(...);
  internalFunction(...);
  contract.function(...);

  // The following statement will *always* trigger a failure regardless of the value returned
  return ...;
} // side effects are *not* preserved
Advantages:
- Properties can be easier to write and understand compared to other approaches for testing.
- No need to worry about side effects since these are reverted at the end of the property execution.
Disadvantages:
- Since the properties take no parameters, any additional input should be added using a state variable.
- Any revert will be interpreted as a failure, which is not always expected.
- No coverage is collected during its execution so these properties should be used with simple code. For anything complex (e.g., with a non-trivial amount of branches), other types of tests should be used.
Recommendations
This mode can be used when a property can be easily computed from the use of state variables (either internal or public), and there is no need to use extra parameters.
Assertions
Using the assertion testing mode, Echidna will report an assert violation if:
- The execution reverts during a call to
assert. Technically speaking, Echidna will detect an assertion failure if it executes anassertcall that fails in the first call frame of the target contract (so this excludes most internal transactions). - An
AssertionFailedevent (with any number of parameters) is emitted by any contract. This pseudo-code summarizes how assertions work:
function checkInvariant(...) public { // Any number of arguments is supported
  // The following statements can trigger a failure using `assert`
  assert(...);
  publicFunction(...);
  internalFunction(...);

  // The following statement will always trigger a failure even if the execution ends with a revert
  emits AssertionFailed(...);

  // The following statement will *only* trigger a failure using `assert` if using solc 0.8.x or newer
  // To make sure it works in older versions, use the AssertionFailed(...) event
  anotherContract.function(...);

} // side effects are preserved
Functions checking assertions do not require any particular name and are executed like any other function; therefore, their side effects are retained if they do not revert.
Advantages
- Easy to implement, especially if several parameters are required to compute the invariant.
- Coverage is collected during the execution of these tests, so it can help to discover new failures.
- If the code base already contains assertions for checking invariants, they can be reused.
Disadvantages
- If the code to test is already using assertions for data validation, it will not work as expected. For example:
function deposit(uint256 tokens) public {
  assert(tokens > 0); // should be strictly positive
  ...
}
Developers should avoid doing that and use require instead, but if that is not possible because you are calling some contract that is outside your control, you can use the AssertionFailure event.
Recommendation
You should use assertions if your invariant is more naturally expressed using arguments or can only be checked in the middle of a transaction. Another good use case of assertions is complex code that requires checking something as well as changing the state. In the following example, we test staking some ERC20, given that there are at least MINSTAKE tokens in the sender balance.
function testStake(uint256 toStake) public {
    uint256 balance = balanceOf(msg.sender);
    toStake = toStake % (balance + 1);
    if (toStake < MINSTAKE) return; // Pre: minimal stake is required
    stake(msg.sender, toStake); // Action: token staking
    assert(staked(msg.sender) == toStake); // Post: staking amount is toStake
    assert(balanceOf(msg.sender) == balance - toStake); // Post: balance decreased
}
testStake checks some invariants on staking and also ensures that the contract's state is updated properly (e.g., allowing a user to stake at least MINSTAKE).
Dapptest
Using the dapptest testing mode, Echidna will report violations using certain functions following how dapptool and foundry work:
- This mode uses any function name with one or more arguments, which will trigger a failure if they revert, except in one special case. Specifically, if the execution reverts with the special reason “FOUNDRY::ASSUME”, then the test will pass (this emulates how the
assumefoundry cheat code works). This pseudo-code summarizes how dapptests work:
function checkDappTest(..) public { // One or more arguments are required
  // The following statements can trigger a failure if they revert
  publicFunction(..);
  internalFunction(..);
  anotherContract.function(..);

  // The following statement will never trigger a failure
  require(.., “FOUNDRY::ASSUME”);
}
- Functions implementing these tests do not require any particular name and are executed like any other function; therefore, their side effects are retained if they do not revert (typically, this mode is used only in stateless testing).
- The function should NOT be payable (but this can change in the future)
Advantages:
- Easy to implement, particularly for stateless mode.
- Coverage is collected during the execution of these tests, so it can help to discover new failures.
Disadvantages:
- Almost any revert will be interpreted as a failure, which is not always expected. To avoid this, you should use reverts with
FOUNDRY::ASSUMEor use try/catch.
Recommendation
Use dapptest mode if you are testing stateless invariants and the code will never unexpectedly revert. Avoid using it for stateful testing, as it was not designed for that (although Echidna supports it).
Other testing modes
Echidna allows other testing mode, which are less frecuently used:
overflowmode: this mode is similar toassertionbut it will only catch integer overflow (so no need to define any function with assertions). It only works in solc 0.8.x or greater, for code outsideuncheckedblocks.optimizationmode: this mode allows to maximize the value returned by a function. It is explained in detail in its own tutorial.explorationmode: this mode will not use any kind of invariants to check, allowing Echidna to collect coverage.
Stateless vs. Stateful
Any of these testing modes can be used, in either stateful (by default) or stateless mode (using --seqLen 1). In stateful mode, Echidna will maintain the state between each function call and attempt to break the invariants. In stateless mode, Echidna will discard state changes during fuzzing. There are notable differences between these two modes.
- Stateful is more powerful and can allow breaking invariants that exist only if the contract reaches a specific state.
- Stateless tests benefit from simpler input generation and are generally easier to use than stateful tests.
- Stateless tests can hide issues since some of them depend on a sequence of operations that is not reachable in a single transaction.
- Stateless mode forces resetting the EVM after each transaction or test, which is usually slower than resetting the state once every certain amount of transactions (by default, every 100 transactions).
Recommendations
For beginners, we recommend starting with Echidna in stateless mode and switching to stateful once you have a good understanding of the system's invariants.
Common Testing Approaches
Testing smart contracts is not as straightforward as testing normal binaries that you run on your local computer. This is due to the existence of multiple accounts interacting with one or many entry points. While a fuzzer can simulate the Ethereum Virtual Machine and can potentially use any account with any feature (e.g., an unlimited amount of ETH), we take care not to break some essential underlying assumptions of transactions that are impossible in Ethereum (e.g., using msg.sender as the zero address). That is why it is crucial to have a clear view of the system to test and how transactions will be simulated. We can classify the testing approach into several categories. We will start with two of them: internal and external.
Table of contents:
Internal Testing
In this testing approach, properties are defined within the contract to test, giving complete access to the internal state of the system.
contract InternalTest is System {
    function echidna_state_greater_than_X() public returns (bool) {
        return stateVar > X;
    }
}
With this approach, Echidna generates transactions from a simulated account to the target contract. This testing approach is particularly useful for simpler contracts that do not require complex initialization and have a single entry point. Additionally, properties can be easier to write, as they can access the system's internal state.
External Testing
In the external testing approach, properties are tested using external calls from a different contract. Properties are only allowed to access external/public variables or functions.
contract ExternalTest {
    constructor() public {
        addr = address(0x1234);
    }

    function echidna_state_greater_than_X() public returns (bool) {
        return System(addr).stateVar() > X;
    }
}
This testing approach is useful for dealing with contracts requiring external initialization (e.g., using Etheno). However, the method of how Echidna runs the transactions should be handled correctly, as the contract with the properties is no longer the one we want to test. Since ExternalTest defines no additional methods, running Echidna directly on this will not allow any code execution from the contract to test (no functions in ExternalTest to call besides the actual properties). In this case, there are several alternatives:
Contract wrapper: Define specific operations to "wrap" the system for testing. For each operation that we want Echidna to execute in the system to test, we add one or more functions that perform an external call to it.
contract ExternalTest {
    constructor() public {
       // addr = ...;
    }

    function method(...) public returns (...) {
        return System(addr).method();
    }

    function echidna_state_greater_than_X() public returns (bool) {
        return System(addr).stateVar() > X;
    }
}
There are two important points to consider with this approach:
-
The sender of each transaction will be the
ExternalTestcontract, instead of the simulated Echidna senders (e.g.,0x10000, ..). This means that the real address interacting with the system will be theExternalcontract's address, rather than one of the Echidna senders. Please take special care if this contract needs to be provided ETH or tokens. -
This approach is manual and can be time-consuming if there are many function operations. However, it can be useful when Echidna needs help calculating a value that cannot be randomly sampled:
contract ExternalTest {
    // ...

    function methodUsingF(..., uint256 x) public returns (...) {
       return System(addr).method(.., f(x));
    }

    ...
}
allContracts: Echidna can perform direct calls to every contract if the allContracts mode is enabled. This means that using it does not require wrapped calls. However, since every deployed contract can be called, unintended effects may occur. For example, if we have a property to ensure that the amount of tokens is limited:
contract ExternalTest {
    constructor() {
       addr = ...;
       MockERC20(...).mint(...);
    }

    function echidna_limited_supply() public returns (bool) {
       return System(addr).balanceOf(...) <= X;
    }

    ...
}
Using "mock" contracts for tokens (e.g., MockERC20) could be an issue because Echidna could call functions that are public but are only supposed to be used during the initialization, such as mint. This can be easily solved using a blacklist of functions to ignore:
filterBlacklist: true
filterFunctions: [“MockERC20.mint(uint256, address)”]
Another benefit of using this approach is that it forces the developer or auditor to write properties using public data. If an essential property cannot be defined using public data, it could indicate that users or other contracts will not be able to easily interact with the system to perform an operation or verify that the system is in a valid state.
Partial Testing
Ideally, testing a smart contract system uses the complete deployed system, with the same parameters that the developers intend to use. Testing with the real code is always preferred, even if it is slower than other methods (except for cases where it is extremely slow). However, there are many cases where, despite the complete system being deployed, it cannot be simulated because it depends on off-chain components (e.g., a token bridge). In these cases, alternative solutions must be implemented.
With partial testing, we test some of the components, ignoring or abstracting uninteresting parts such as standard ERC20 tokens or oracles. There are several ways to do this.
Isolated testing: If a component is adequately abstracted from the rest of the system, testing it can be easy. This method is particularly useful for testing stateless properties found in components that compute mathematical operations, such as mathematical libraries.
Function override: Solidity allows for function overriding, used to change the functionality of a code segment without affecting the rest of the codebase. We can use this to disable certain functions in our tests to allow testing with Echidna:
contract InternalTestOverridingSignatures is System {
    function verifySignature(...) public override returns (bool) {
        return true; // signatures are always valid
    }

    function echidna_state_greater_than_X() public returns (bool) {
        executeSomethingWithSignature(...);
        return stateVar > X;
    }
}
Model testing: If the system is not modular enough, a different approach is required. Instead of using the code as is, we will create a "model" of the system in Solidity, using mostly the original code. Although there is no defined list of steps to build a model, we can provide a generic example. Suppose we have a complex system that includes this piece of code:
contract System {
    ...

    function calculateSomething() public returns (uint256) {
        if (booleanState) {
            stateSomething = (uint256State1 * uint256State2) / 2 ** 128;
            return stateSomething / uint128State;
        }

        ...
    }
}
Where boolState, uint256State1, uint256State2, and stateSomething are state variables of our system to test. We will create a model (e.g., copy, paste, and modify the original code in a new contract), where each state variable is transformed into a parameter:
contract SystemModel {
    function calculateSomething(bool boolState, uint256 uint256State1, ...) public returns (uint256) {
        if (boolState) {
            stateSomething = (uint256State1 * uint256State2) / 2 ** 128;
            return stateSomething / uint128State;
        }
        ...
    }
}
At this point, we should be able to compile our model without any dependency on the original codebase (everything necessary should be included in the model). We can then insert assertions to detect when the returned value exceeds a certain threshold.
While developers or auditors may be tempted to quickly create tests using this technique, there are certain disadvantages when creating models:
-
The tested code can be very different from what we want to test. This can either introduce unreal issues (false positives) or hide real issues from the original code (false negatives). In the example, it is unclear if the state variables can take arbitrary values.
-
The model will have limited value if the code changes since any modification to the original model will require manually rebuilding the model.
In any case, developers should be warned that their code is difficult to test and should refactor it to avoid this issue in the future.
Filtering Functions for Fuzzing Campaigns
Table of contents:
Introduction
In this tutorial, we'll demonstrate how to filter specific functions to be fuzzed using Echidna. We'll use the following smart contract multi.sol as our target:
contract C {
    bool state1 = false;
    bool state2 = false;
    bool state3 = false;
    bool state4 = false;

    function f(uint256 x) public {
        require(x == 12);
        state1 = true;
    }

    function g(uint256 x) public {
        require(state1);
        require(x == 8);
        state2 = true;
    }

    function h(uint256 x) public {
        require(state2);
        require(x == 42);
        state3 = true;
    }

    function i() public {
        require(state3);
        state4 = true;
    }

    function reset1() public {
        state1 = false;
        state2 = false;
        state3 = false;
        return;
    }

    function reset2() public {
        state1 = false;
        state2 = false;
        state3 = false;
        return;
    }

    function echidna_state4() public returns (bool) {
        return (!state4);
    }
}
The small contract above requires Echidna to find a specific sequence of transactions to modify a certain state variable, which is difficult for a fuzzer. It's recommended to use a symbolic execution tool like Manticore in such cases. Let's run Echidna to verify this:
echidna multi.sol
...
echidna_state4: passed! 🎉
Seed: -3684648582249875403
Filtering Functions
Echidna has difficulty finding the correct sequence to test this contract because the two reset functions (reset1 and reset2) revert all state variables to false. However, we can use a special Echidna feature to either blacklist the reset functions or whitelist only the f, g, h, and i functions.
To blacklist functions, we can use the following configuration file:
filterBlacklist: true
filterFunctions: ["C.reset1()", "C.reset2()"]
Alternatively, we can whitelist specific functions by listing them in the configuration file:
filterBlacklist: false
filterFunctions: ["C.f(uint256)", "C.g(uint256)", "C.h(uint256)", "C.i()"]
filterBlacklististrueby default.- Filtering will be performed based on the full function name (contract name + "." + ABI function signature). If you have
f()andf(uint256), you can specify exactly which function to filter.
Running Echidna
To run Echidna with a configuration file blacklist.yaml:
echidna multi.sol --config blacklist.yaml
...
echidna_state4: failed!💥
  Call sequence:
    f(12)
    g(8)
    h(42)
    i()
Echidna will quickly discover the sequence of transactions required to falsify the property.
Summary: Filtering Functions
Echidna can either blacklist or whitelist functions to call during a fuzzing campaign using:
filterBlacklist: true
filterFunctions: ["C.f1()", "C.f2()", "C.f3()"]
echidna contract.sol --config config.yaml
...
Depending on the value of the filterBlacklist boolean, Echidna will start a fuzzing campaign by either blacklisting C.f1(), C.f2(), and C.f3() or by only calling those functions.
How to Test Assertions with Echidna
Table of contents:
Introduction
In this short tutorial, we will demonstrate how to use Echidna to check assertions in smart contracts.
Write an Assertion
Let's assume we have a contract like this one:
contract Incrementor {
    uint256 private counter = 2 ** 200;

    function inc(uint256 val) public returns (uint256) {
        uint256 tmp = counter;
        unchecked {
            counter += val;
        }
        // tmp <= counter
        return (counter - tmp);
    }
}
We want to ensure that tmp is less than or equal to counter after returning its difference. We could write an Echidna property, but we would need to store the tmp value somewhere. Instead, we can use an assertion like this one (assert.sol):
contract Incrementor {
    uint256 private counter = 2 ** 200;

    function inc(uint256 val) public returns (uint256) {
        uint256 tmp = counter;
        unchecked {
            counter += val;
        }
        assert(tmp <= counter);
        return (counter - tmp);
    }
}
We can also use a special event called AssertionFailed with any number of parameters to inform Echidna about a failed assertion without using assert. This will work in any contract. For example:
contract Incrementor {
    event AssertionFailed(uint256);

    uint256 private counter = 2 ** 200;

    function inc(uint256 val) public returns (uint256) {
        uint256 tmp = counter;
        unchecked {
            counter += val;
        }
        if (tmp > counter) {
            emit AssertionFailed(counter);
        }
        return (counter - tmp);
    }
}
Run Echidna
To enable assertion failure testing in Echidna, you can use --test-mode assertion directly from the command line.
Alternatively, you can create an Echidna configuration file, config.yaml, with testMode set for assertion checking:
testMode: assertion
When we run this contract with Echidna, we receive the expected results:
echidna assert.sol --test-mode assertion
Analyzing contract: assert.sol:Incrementor
assertion in inc: failed!💥
  Call sequence, shrinking (2596/5000):
    inc(21711016731996786641919559689128982722488122124807605757398297001483711807488)
    inc(7237005577332262213973186563042994240829374041602535252466099000494570602496)
    inc(86844066927987146567678238756515930889952488499230423029593188005934847229952)

Seed: 1806480648350826486
As you can see, Echidna reports an assertion failure in the inc function. It is possible to add multiple assertions per function; however, Echidna cannot determine which assertion failed.
When and How to Use Assertions
Assertions can be used as alternatives to explicit properties if the conditions to check are directly related to the correct use of some operation f. Adding assertions after some code will enforce that the check happens immediately after it is executed:
function f(bytes memory args) public {
    // some complex code
    // ...
    assert(condition);
    // ...
}
In contrast, using an explicit Boolean property will randomly execute transactions, and there is no easy way to enforce exactly when it will be checked. It is still possible to use this workaround:
function echidna_assert_after_f() public returns (bool) {
    f(args);
    return (condition);
}
However, there are some issues:
- It does not compile if
fis declared asinternalorexternal - It is unclear which arguments should be used to call
f - The property will fail if
freverts
Assertions can help overcome these potential issues. For instance, they can be easily detected when calling internal or public functions:
function f(bytes memory args) public {
    // some complex code
    // ...
    g(otherArgs) // this contains an assert
    // ...
}
If g is external, then assertion failure can be only detected in Solidity 0.8.x or later.
function f(bytes memory args) public {
    // some complex code
    // ...
    contract.g(otherArgs) // this contains an assert
    // ...
}
In general, we recommend following John Regehr's advice on using assertions:
- Do not force any side effects during the assertion checking. For instance:
assert(ChangeStateAndReturn() == 1) - Do not assert obvious statements. For instance
assert(var >= 0)wherevaris declared asuint256.
Finally, please do not use require instead of assert, since Echidna will not be able to detect it (but the contract will revert anyway).
Summary: Assertion Checking
The following summarizes the run of Echidna on our example (remember to use 0.7.x or older):
contract Incrementor {
    uint256 private counter = 2 ** 200;

    function inc(uint256 val) public returns (uint256) {
        uint256 tmp = counter;
        counter += val;
        assert(tmp <= counter);
        return (counter - tmp);
    }
}
echidna assert.sol --test-mode assertion
Analyzing contract: assert.sol:Incrementor
assertion in inc: failed!💥
  Call sequence, shrinking (2596/5000):
    inc(21711016731996786641919559689128982722488122124807605757398297001483711807488)
    inc(7237005577332262213973186563042994240829374041602535252466099000494570602496)
    inc(86844066927987146567678238756515930889952488499230423029593188005934847229952)

Seed: 1806480648350826486
Echidna discovered that the assertion in inc can fail if this function is called multiple times with large arguments.
How to Write Good Properties Step by Step
Table of contents:
Introduction
In this short tutorial, we will detail some ideas for writing interesting or useful properties using Echidna. At each step, we will iteratively improve our properties.
A First Approach
One of the simplest properties to write using Echidna is to throw an assertion when some function is expected to revert or return.
Let's suppose we have a contract interface like the one below:
interface DeFi {
    ERC20 t;

    function getShares(address user) external returns (uint256);

    function createShares(uint256 val) external returns (uint256);

    function depositShares(uint256 val) external;

    function withdrawShares(uint256 val) external;

    function transferShares(address to) external;
}
In this example, users can deposit tokens using depositShares, mint shares using createShares, withdraw shares using withdrawShares, transfer all shares to another user using transferShares, and get the number of shares for any account using getShares. We will start with very basic properties:
contract Test {
    DeFi defi;
    ERC20 token;

    constructor() {
        defi = DeFi(...);
        token.mint(address(this), ...);
    }

    function getShares_never_reverts() public {
        (bool b,) = defi.call(abi.encodeWithSignature("getShares(address)", address(this)));
        assert(b);
    }

    function depositShares_never_reverts(uint256 val) public {
        if (token.balanceOf(address(this)) >= val) {
            (bool b,) = defi.call(abi.encodeWithSignature("depositShares(uint256)", val));
            assert(b);
        }
    }

    function withdrawShares_never_reverts(uint256 val) public {
        if (defi.getShares(address(this)) >= val) {
            (bool b,) = defi.call(abi.encodeWithSignature("withdrawShares(uint256)", val));
            assert(b);
        }
    }

    function depositShares_can_revert(uint256 val) public {
        if (token.balanceOf(address(this)) < val) {
            (bool b,) = defi.call(abi.encodeWithSignature("depositShares(uint256)", val));
            assert(!b);
        }
    }

    function withdrawShares_can_revert(uint256 val) public {
        if (defi.getShares(address(this)) < val) {
            (bool b,) = defi.call(abi.encodeWithSignature("withdrawShares(uint256)", val));
            assert(!b);
        }
    }
}
After you have written your first version of properties, run Echidna to make sure they work as expected. During this tutorial, we will improve them step by step. It is strongly recommended to run the fuzzer at each step to increase the probability of detecting any potential issues.
Perhaps you think these properties are too low level to be useful, particularly if the code has good coverage in terms of unit tests. But you will be surprised how often an unexpected revert or return uncovers a complex and severe issue. Moreover, we will see how these properties can be improved to cover more complex post-conditions.
Before we continue, we will improve these properties using try/catch. The use of a low-level call forces us to manually encode the data, which can be error-prone (an error will always cause calls to revert). Note, this will only work if the codebase is using solc 0.6.0 or later:
function depositShares_never_reverts(uint256 val) public {
    if (token.balanceOf(address(this)) >= val) {
        try defi.depositShares(val) {
            /* not reverted */
        } catch {
            assert(false);
        }
    }
}

function depositShares_can_revert(uint256 val) public {
    if (token.balanceOf(address(this)) < val) {
        try defi.depositShares(val) {
            assert(false);
        } catch {
            /* reverted */
        }
    }
}
Enhancing Postcondition Checks
If the previous properties are passing, this means that the pre-conditions are good enough, however the post-conditions are not very precise. Avoiding reverts doesn't mean that the contract is in a valid state. Let's add some basic preconditions:
function depositShares_never_reverts(uint256 val) public {
    if (token.balanceOf(address(this)) >= val) {
        try defi.depositShares(val) {
            /* not reverted */
        } catch {
            assert(false);
        }
        assert(defi.getShares(address(this)) > 0);
    }
}

function withdrawShares_never_reverts(uint256 val) public {
    if (defi.getShares(address(this)) >= val) {
        try defi.withdrawShares(val) {
            /* not reverted */
        } catch {
            assert(false);
        }
        assert(token.balanceOf(address(this)) > 0);
    }
}
Hmm, it looks like it is not that easy to specify the value of shares or tokens obtained after each deposit or withdrawal. At least we can say that we must receive something, right?
Combining Properties
In this generic example, it is unclear if there is a way to calculate how many shares or tokens we should receive after executing the deposit or withdraw operations. Of course, if we have that information, we should use it. In any case, what we can do here is to combine these two properties into a single one to be able check more precisely its preconditions.
function deposit_withdraw_shares_never_reverts(uint256 val) public {
    uint256 original_balance = token.balanceOf(address(this));
    if (original_balance >= val) {
        try defi.depositShares(val) {
            /* not reverted */
        } catch {
            assert(false);
        }
        uint256 shares = defi.getShares(address(this));
        assert(shares > 0);
        try defi.withdrawShares(shares) {
            /* not reverted */
        } catch {
            assert(false);
        }
        assert(token.balanceOf(address(this)) == original_balance);
    }
}
The resulting property checks that calls to deposit or withdraw shares will never revert and once they execute, the original number of tokens remains the same. Keep in mind that this property should consider fees and any tolerated loss of precision (e.g. when the computation requires a division).
Final Considerations
Two important considerations for this example:
We want Echidna to spend most of the execution exploring the contract to test. So, in order to make the properties more efficient, we should avoid dead branches where there is nothing to do. That's why we can improve depositShares_never_reverts to use:
function depositShares_never_reverts(uint256 val) public {
    if (token.balanceOf(address(this)) > 0) {
        val = val % (token.balanceOf(address(this)) + 1);
        try defi.depositShares(val) { /* not reverted */ }
        catch {
            assert(false);
        }
        assert(defi.getShares(address(this)) > 0);
    } else {
        ... // code to test depositing zero tokens
    }
}
Additionally, combining properties does not mean that we will have to remove simpler ones. For instance, if we want to write withdraw_deposit_shares_never_reverts, in which we reverse the order of operations (withdraw and then deposit, instead of deposit and then withdraw), we will have to make sure defi.getShares(address(this)) can be positive. An easy way to do it is to keep depositShares_never_reverts, since this code allows Echidna to deposit tokens from address(this) (otherwise, this is impossible).
Summary: How to Write Good Properties
It is usually a good idea to start writing simple properties first and then improving them to make them more precise and easier to read. At each step, you should run a short fuzzing campaign to make sure they work as expected and try to catch issues early during the development of your smart contracts.
Using ether during a fuzzing campaign
Table of contents:
Introduction
We will see how to use ether during a fuzzing campaign. The following smart contract will be used as example:
contract C {
    function pay() public payable {
        require(msg.value == 12000);
    }

    function echidna_has_some_value() public returns (bool) {
        return (address(this).balance != 12000);
    }
}
This code forces Echidna to send a particular amount of ether as value in the pay function.
Echidna will do this for each payable function in the target function (or any contract if allContracts is enabled):
$ echidna balanceSender.sol
...
echidna_has_some_value: failed!💥
  Call sequence:
    pay() Value: 0x2ee0
Echidna will show the value amount in hexadecimal.
Controlling the amount of ether in payable functions
The amount of ether to send in each payable function will be randomly selected, but with a maximum value determined by the maxValue value
with a default of 100 ether per transaction:
maxValue: 100000000000000000000
This means that each transaction will contain, at most, 100 ether in value. However, there is no maximum that will be used in total.
The maximum amount to receive will be determined by the number of transactions. If you are using 100 transactions (--seq-len 100),
then the total amount of ether used for all the transactions will be between 0 and 100 * 100 ethers.
Keep in mind that the balance of the senders (e.g. msg.sender.balance) is a fixed value that will NOT change between transactions.
This value is determined by the following config option:
balanceAddr: 0xffffffff
Controlling the amount of ether in contracts
Another approach to handle ether will be allow the testing contract to receive certain amount and then use it to send it.
contract A {
    C internal c;

    constructor() public payable {
        require(msg.value == 12000);
        c = new C();
    }

    function payToContract(uint256 toPay) public {
        toPay = toPay % (address(this).balance + 1);
        c.pay{ value: toPay }();
    }

    function echidna_C_has_some_value() public returns (bool) {
        return (address(c).balance != 12000);
    }
}

contract C {
    function pay() public payable {
        require(msg.value == 12000);
    }
}
However, if we run this directly with echidna, it will fail:
$ echidna balanceContract.sol
...
echidna: Deploying the contract 0x00a329c0648769A73afAc7F9381E08FB43dBEA72 failed (revert, out-of-gas, sending ether to an non-payable constructor, etc.):
We need to define the amount to send during the contract creation:
balanceContract: 12000
We can re-run echidna, using that config file, to obtain the expected result:
$ echidna balanceContract.sol --config balanceContract.yaml
...
echidna_C_has_some_value: failed!💥
  Call sequence:
    payToContract(12000)
Summary: Working with ether
Echidna has two options for using ether during a fuzzing campaign.
maxValueto set the max amount of ether per transactionbalanceContractto set the initial amount of ether that the testing contract receives in the constructor.
Advanced
- How to Collect a Corpus: Learn how to use Echidna to gather a corpus of transactions.
- How to Use Optimization Mode: Discover how to optimize a function using Echidna.
- How to Perform Large-scale Smart Contract Fuzzing: Explore how to use Echidna for long fuzzing campaigns on complex smart contracts.
- How to Test a Library: Learn about using Echidna to test the Set Protocol library (blog post).
- How to Test Bytecode-only Contracts: Learn how to fuzz contracts without source code or perform differential fuzzing between Solidity and Vyper.
- How and when to use cheat codes: How to use hevm cheat codes in general
- How to Use Hevm Cheats to Test Permit: Find out how to test code that relies on ecrecover signatures by using hevm cheat codes.
- How to Seed Echidna with Unit Tests: Discover how to use existing unit tests to seed Echidna.
- Understanding and Using
allContracts: Learn whatallContractstesting is and how to utilize it effectively. - How to do on-chain fuzzing with state forking: How Echidna can use the state of blockchain during a fuzzing campaign
- Interacting with off-chain data via FFI cheatcode: Using the
fficheatcode as a way of communicating with the operating system
Collecting, Visualizing, and Modifying an Echidna Corpus
Table of contents:
Introduction
In this guide, we will explore how to collect and use a corpus of transactions with Echidna. Our target is the following smart contract, magic.sol:
contract C {
    bool value_found = false;

    function magic(uint256 magic_1, uint256 magic_2, uint256 magic_3, uint256 magic_4) public {
        require(magic_1 == 42);
        require(magic_2 == 129);
        require(magic_3 == magic_4 + 333);
        value_found = true;
        return;
    }

    function echidna_magic_values() public view returns (bool) {
        return !value_found;
    }
}
This small example requires Echidna to find specific values to change a state variable. While this is challenging for a fuzzer (it is advised to use a symbolic execution tool like Manticore), we can still employ Echidna to collect corpus during this fuzzing campaign.
Collecting a corpus
To enable corpus collection, first, create a corpus directory:
mkdir corpus-magic
Next, create an Echidna configuration file called config.yaml:
corpusDir: "corpus-magic"
Now, run the tool and inspect the collected corpus:
echidna magic.sol --config config.yaml
Echidna is still unable to find the correct magic value. To understand where it gets stuck, review the corpus-magic/covered.*.txt file:
  1 | *   | contract C {
  2 |     |     bool value_found = false;
  3 |     |
  4 | *   |     function magic(uint256 magic_1, uint256 magic_2, uint256 magic_3, uint256 magic_4) public {
  5 | *r  |         require(magic_1 == 42);
  6 | *r  |         require(magic_2 == 129);
  7 | *r  |         require(magic_3 == magic_4 + 333);
  8 |     |         value_found = true;
  9 |     |         return;
 10 |     |     }
 11 |     |
 12 |     |     function echidna_magic_values() public returns (bool) {
 13 |     |         return !value_found;
 14 |     |     }
 15 |     | }
The label r on the left of each line indicates that Echidna can reach these lines, but they result in a revert. As you can see, the fuzzer gets stuck at the last require.
To find a workaround, let's examine the collected corpus. For instance, one of these files contains:
[
    {
        "_gas'": "0xffffffff",
        "_delay": ["0x13647", "0xccf6"],
        "_src": "00a329c0648769a73afac7f9381e08fb43dbea70",
        "_dst": "00a329c0648769a73afac7f9381e08fb43dbea72",
        "_value": "0x0",
        "_call": {
            "tag": "SolCall",
            "contents": [
                "magic",
                [
                    {
                        "contents": [
                            256,
                            "93723985220345906694500679277863898678726808528711107336895287282192244575836"
                        ],
                        "tag": "AbiUInt"
                    },
                    {
                        "contents": [256, "334"],
                        "tag": "AbiUInt"
                    },
                    {
                        "contents": [
                            256,
                            "68093943901352437066264791224433559271778087297543421781073458233697135179558"
                        ],
                        "tag": "AbiUInt"
                    },
                    {
                        "tag": "AbiUInt",
                        "contents": [256, "332"]
                    }
                ]
            ]
        },
        "_gasprice'": "0xa904461f1"
    }
]
This input will not trigger the failure in our property. In the next step, we will show how to modify it for that purpose.
Seeding a corpus
To handle the magic function, Echidna needs some assistance. We will copy and modify the input to utilize appropriate parameters:
cp corpus-magic/coverage/2712688662897926208.txt corpus-magic/coverage/new.txt
Modify new.txt to call magic(42,129,333,0). Now, re-run Echidna:
echidna magic.sol --config config.yaml
...
echidna_magic_values: failed!💥
  Call sequence:
    magic(42,129,333,0)

Unique instructions: 142
Unique codehashes: 1
Seed: -7293830866560616537
This time, the property fails immediately. We can verify that another covered.*.txt file is created, showing a different trace (labeled with *) that Echidna executed, which ended with a return at the end of the magic function.
  1 | *   | contract C {
  2 |     |     bool value_found = false;
  3 |     |
  4 | *   |     function magic(uint256 magic_1, uint256 magic_2, uint256 magic_3, uint256 magic_4) public {
  5 | *r  |         require(magic_1 == 42);
  6 | *r  |         require(magic_2 == 129);
  7 | *r  |         require(magic_3 == magic_4 + 333);
  8 | *   |         value_found = true;
  9 |     |         return;
 10 |     |     }
 11 |     |
 12 |     |     function echidna_magic_values() public returns (bool) {
 13 |     |         return !value_found;
 14 |     |     }
 15 |     | }
Finding Local Maximums Using Optimization Mode
Table of Contents:
Introduction
In this tutorial, we will explore how to perform function optimization using Echidna. Please ensure you have updated Echidna to version 2.0.5 or greater before proceeding.
Optimization mode is an experimental feature that enables the definition of a special function, taking no arguments and returning an int256. Echidna will attempt to find a sequence of transactions to maximize the value returned:
function echidna_opt_function() public view returns (int256) {
    // If it reverts, Echidna will assume it returned type(int256).min
    return value;
}
Optimizing with Echidna
In this example, the target is the following smart contract (opt.sol):
contract TestDutchAuctionOptimization {
    int256 maxPriceDifference;

    function setMaxPriceDifference(uint256 startPrice, uint256 endPrice, uint256 startTime, uint256 endTime) public {
        if (endTime < (startTime + 900)) revert();
        if (startPrice <= endPrice) revert();

        uint256 numerator = (startPrice - endPrice) * (block.timestamp - startTime);
        uint256 denominator = endTime - startTime;
        uint256 stepDecrease = numerator / denominator;
        uint256 currentAuctionPrice = startPrice - stepDecrease;

        if (currentAuctionPrice < endPrice) {
            maxPriceDifference = int256(endPrice - currentAuctionPrice);
        }
        if (currentAuctionPrice > startPrice) {
            maxPriceDifference = int256(currentAuctionPrice - startPrice);
        }
    }

    function echidna_opt_price_difference() public view returns (int256) {
        return maxPriceDifference;
    }
}
This small example directs Echidna to maximize a specific price difference given certain preconditions. If the preconditions are not met, the function will revert without changing the actual value.
To run this example:
echidna opt.sol --test-mode optimization --test-limit 100000 --seq-len 1 --corpus-dir corpus --shrink-limit 50000
...
echidna_opt_price_difference: max value: 1076841

  Call sequence, shrinking (42912/50000):
    setMaxPriceDifference(1349752405,1155321,609,1524172858) Time delay: 603902 seconds Block delay: 21
The resulting max value is not unique; running a longer campaign will likely yield a larger value.
Regarding the command line, optimization mode is enabled using --test-mode optimization. Additionally, we included the following tweaks:
- Use only one transaction (as we know the function is stateless).
- Use a large shrink limit to obtain a better value during input complexity minimization.
Each time Echidna is executed using the corpus directory, the last input producing the maximum value should be reused from the reproducers directory:
echidna opt.sol --test-mode optimization --test-limit 100000 --seq-len 1 --corpus-dir corpus --shrink-limit 50000
Loaded total of 1 transactions from corpus/reproducers/
Loaded total of 9 transactions from corpus/coverage/
Analyzing contract: /home/g/Code/echidna/opt.sol:TestDutchAuctionOptimization
echidna_opt_price_difference: max value: 1146878

  Call sequence:
    setMaxPriceDifference(1538793592,1155321,609,1524172858) Time delay: 523701 seconds Block delay: 49387
Fuzzing Smart Contracts at Scale with Echidna
In this tutorial, we will review how to create a dedicated server for fuzzing smart contracts using Echidna.
Workflow:
- Install and set up a dedicated server
- Begin a short fuzzing campaign
- Initiate a continuous fuzzing campaign
- Add properties, check coverage, and modify the code if necessary
- Conclude the campaign
1. Install and set up a dedicated server
First, obtain a dedicated server with at least 32 GB of RAM and as many cores as possible. Start by creating a user for the fuzzing campaign. Only use the root account to create an unprivileged user:
# adduser echidna
# usermod -aG sudo echidna
Then, using the echidna user, install some basic dependencies:
sudo apt install unzip python3-pip
Next, install everything necessary to build your smart contract(s) as well as slither and echidna-parade. For example:
pip3 install solc-select
solc-select install all
pip3 install slither_analyzer
pip3 install echidna_parade
Add $PATH=$PATH:/home/echidna/.local/bin at the end of /home/echidna/.bashrc.
Afterward, install Echidna. The easiest way is to download the latest precompiled Echidna release, uncompress it, and move it to /home/echidna/.local/bin:
wget "https://github.com/crytic/echidna/releases/download/v2.0.0/echidna-test-2.0.0-Ubuntu-18.04.tar.gz"
tar -xf echidna-test-2.0.0-Ubuntu-18.04.tar.gz
mv echidna-test /home/echidna/.local/bin
2. Begin a short fuzzing campaign
Select a contract to test and provide initialization if needed. It does not have to be perfect; begin with some basic items and iterate over the results. Before starting this campaign, modify your Echidna config to define a corpus directory to use. For instance:
corpusDir: "corpus-exploration"
This directory will be automatically created, but since we are starting a new campaign, please remove the corpus directory if it was created by a previous Echidna campaign. If you don't have any properties to test, you can use:
testMode: exploration
to allow Echidna to run without any properties.
We will start a brief Echidna run (5 minutes) to check that everything looks fine. To do that, use the following config:
testLimit: 100000000000
timeout: 300 # 5 minutes
Once it runs, check the coverage file located in corpus-exploration/covered.*.txt. If the initialization is incorrect, clear the corpus-exploration directory and restart the campaign.
3. Initiate a continuous fuzzing campaign
When satisfied with the first iteration of the initialization, we can start a "continuous campaign" for exploration and testing using echidna-parade. Before starting, double-check your config file. For instance, if you added properties, do not forget to remove benchmarkMode.
echidna-parade is a tool used to launch multiple Echidna instances simultaneously while keeping track of each corpus. Each instance will be configured to run for a specific duration, with different parameters, to maximize the chance of reaching new code.
We will demonstrate this with an example, where:
- the initial corpus is empty
- the base config file is
exploration.yaml - the initial instance will run for 3600 seconds (1 hour)
- each "generation" will run for 1800 seconds (30 minutes)
- the campaign will run in continuous mode (if the timeout is -1, it means run indefinitely)
- there will be 8 Echidna instances per generation. Adjust this according to the number of available cores, but avoid using all of your cores if you do not want to overload your server
- the target contract is named
C - the file containing the contract is
test.sol
Finally, we will log the stdout and stderr in parade.log and parade.err and fork the process to let it run indefinitely.
echidna-parade test.sol --config exploration.yaml --initial_time 3600 --gen_time 1800 --timeout -1 --ncores 8 --contract C > parade.log 2> parade.err &
After running this command, exit the shell to avoid accidentally killing it if your connection fails.
4. Add more properties, check coverage, and modify the code if necessary
In this step, we can add more properties while Echidna explores the contracts. Keep in mind that you should avoid changing the contracts' ABI (otherwise, the quality of the corpus will degrade).
Additionally, we can tweak the code to improve coverage, but before starting, we need to know how to monitor our fuzzing campaign. We can use this command:
watch "grep 'COLLECTING NEW COVERAGE' parade.log | tail -n 30"
When new coverage is found, you will see something like this:
COLLECTING NEW COVERAGE: parade.181140/gen.30.10/corpus/coverage/-3538310549422809236.txt
COLLECTING NEW COVERAGE: parade.181140/gen.35.9/corpus/coverage/5960152130200926175.txt
COLLECTING NEW COVERAGE: parade.181140/gen.35.10/corpus/coverage/3416698846701985227.txt
COLLECTING NEW COVERAGE: parade.181140/gen.36.6/corpus/coverage/-3997334938716772896.txt
COLLECTING NEW COVERAGE: parade.181140/gen.37.7/corpus/coverage/323061126212903141.txt
COLLECTING NEW COVERAGE: parade.181140/gen.37.6/corpus/coverage/6733481703877290093.txt
You can verify the corresponding covered file, such as parade.181140/gen.37.6/corpus/covered.1615497368.txt.
For examples on how to help Echidna improve its coverage, please review the improving coverage tutorial.
To monitor failed properties, use this command:
watch "grep 'FAIL' parade.log | tail -n 30"
When failed properties are found, you will see something like this:
NEW FAILURE: assertion in f: failed!💥
parade.181140/gen.179.0 FAILED
parade.181140/gen.179.3 FAILED
parade.181140/gen.180.2 FAILED
parade.181140/gen.180.4 FAILED
parade.181140/gen.180.3 FAILED
...
5. Conclude the campaign
When satisfied with the coverage results, you can terminate the continuous campaign using:
killall echidna-parade echidna
How to Test Bytecode-Only Contracts
Table of contents:
Introduction
In this tutorial, you'll learn how to fuzz a contract without any provided source code. The technique can also be used to perform differential fuzzing (i.e., compare multiple implementations) between a Solidity contract and a Vyper contract.
Consider the following bytecode:
608060405234801561001057600080fd5b506103e86000803373ffffffffffffffffffffffffffffffffffffffff1673ffffffffffffffffffffffffffffffffffffffff168152602001908152602001600020819055506103e86001819055506101fa8061006e6000396000f3fe608060405234801561001057600080fd5b50600436106100415760003560e01c806318160ddd1461004657806370a0823114610064578063a9059cbb146100bc575b600080fd5b61004e61010a565b6040518082815260200191505060405180910390f35b6100a66004803603602081101561007a57600080fd5b81019080803573ffffffffffffffffffffffffffffffffffffffff169060200190929190505050610110565b6040518082815260200191505060405180910390f35b610108600480360360408110156100d257600080fd5b81019080803573ffffffffffffffffffffffffffffffffffffffff16906020019092919080359060200190929190505050610128565b005b60015481565b60006020528060005260406000206000915090505481565b806000803373ffffffffffffffffffffffffffffffffffffffff1673ffffffffffffffffffffffffffffffffffffffff16815260200190815260200160002060008282540392505081905550806000808473ffffffffffffffffffffffffffffffffffffffff1673ffffffffffffffffffffffffffffffffffffffff16815260200190815260200160002060008282540192505081905550505056fe
For which we only know the ABI:
interface Target {
    function totalSupply() external returns (uint256);

    function balanceOf(address) external returns (uint256);

    function transfer(address, uint256) external;
}
We want to test if it is possible to have more tokens than the total supply.
Proxy Pattern
Since we don't have the source code, we can't directly add the property to the contract. Instead, we'll use a proxy contract:
interface Target {
    function totalSupply() external returns (uint256);

    function balanceOf(address) external returns (uint256);

    function transfer(address, uint256) external;
}

contract TestBytecodeOnly {
    Target target;

    constructor() {
        address targetAddress;
        // init bytecode
        bytes
            memory targetCreationBytecode = hex"608060405234801561001057600080fd5b506103e86000803373ffffffffffffffffffffffffffffffffffffffff1673ffffffffffffffffffffffffffffffffffffffff168152602001908152602001600020819055506103e86001819055506101fa8061006e6000396000f3fe608060405234801561001057600080fd5b50600436106100415760003560e01c806318160ddd1461004657806370a0823114610064578063a9059cbb146100bc575b600080fd5b61004e61010a565b6040518082815260200191505060405180910390f35b6100a66004803603602081101561007a57600080fd5b81019080803573ffffffffffffffffffffffffffffffffffffffff169060200190929190505050610110565b6040518082815260200191505060405180910390f35b610108600480360360408110156100d257600080fd5b81019080803573ffffffffffffffffffffffffffffffffffffffff16906020019092919080359060200190929190505050610128565b005b60015481565b60006020528060005260406000206000915090505481565b806000803373ffffffffffffffffffffffffffffffffffffffff1673ffffffffffffffffffffffffffffffffffffffff16815260200190815260200160002060008282540392505081905550806000808473ffffffffffffffffffffffffffffffffffffffff1673ffffffffffffffffffffffffffffffffffffffff16815260200190815260200160002060008282540192505081905550505056fe";

        uint256 size = targetCreationBytecode.length;

        assembly {
            targetAddress := create(0, add(targetCreationBytecode, 0x20), size) // Skip the 32 bytes encoded length.
        }

        target = Target(targetAddress);
    }

    function transfer(address to, uint256 amount) public {
        target.transfer(to, amount);
    }

    function echidna_test_balance() public returns (bool) {
        return target.balanceOf(address(this)) <= target.totalSupply();
    }
}
The proxy:
- Deploys the bytecode in its constructor
- Has one function that calls the target's
transferfunction - Has one Echidna property
target.balanceOf(address(this)) <= target.totalSupply()
Running Echidna
echidna bytecode_only.sol --contract TestBytecodeOnly
echidna_test_balance: failed!💥
  Call sequence:
    transfer(0x0,1002)
Here, Echidna found that by calling transfer(0, 1002) anyone can mint tokens.
Target Source Code
The actual source code of the target is:
contract C {
    mapping(address => uint256) public balanceOf;
    uint256 public totalSupply;

    constructor() public {
        balanceOf[msg.sender] = 1000;
        totalSupply = 1000;
    }

    function transfer(address to, uint256 amount) public {
        balanceOf[msg.sender] -= amount;
        balanceOf[to] += amount;
    }
}
Echidna correctly found the bug: lack of overflow checks in transfer.
Differential Fuzzing
Consider the following Vyper and Solidity contracts:
@view
@external
def my_func(a: uint256, b: uint256, c: uint256) -> uint256:
    return a * b / c
contract SolidityVersion {
    function my_func(uint256 a, uint256 b, uint256 c) public view {
        return (a * b) / c;
    }
}
We can test that they always return the same values using the proxy pattern:
interface Target {
    function my_func(uint256, uint256, uint256) external returns (uint256);
}

contract SolidityVersion {
    Target target;

    constructor() public {
        address targetAddress;

        // vyper bytecode
        bytes
            memory targetCreationBytecode = hex"61007756341561000a57600080fd5b60043610156100185761006d565b600035601c52630ff198a3600051141561006c57600435602435808202821582848304141761004657600080fd5b80905090509050604435808061005b57600080fd5b82049050905060005260206000f350005b5b60006000fd5b61000461007703610004600039610004610077036000f3";

        uint256 size = targetCreationBytecode.length;

        assembly {
            targetAddress := create(0, add(targetCreationBytecode, 0x20), size) // Skip the 32 bytes encoded length.
        }
        target = Target(targetAddress);
    }

    function test(uint256 a, uint256 b, uint256 c) public returns (bool) {
        assert(my_func(a, b, c) == target.my_func(a, b, c));
    }

    function my_func(uint256 a, uint256 b, uint256 c) internal view returns (uint256) {
        return (a * b) / c;
    }
}
Here we run Echidna with the assertion mode:
echidna  vyper.sol --config config.yaml --contract SolidityVersion --test-mode assertion
assertion in test: passed! 🎉
Generic Proxy Code
Adapt the following code to your needs:
interface Target {
    // public/external functions
}

contract TestBytecodeOnly {
    Target target;

    constructor() public {
        address targetAddress;
        // init bytecode
        bytes memory targetCreationBytecode = hex"";

        uint256 size = targetCreationBytecode.length;

        assembly {
            targetAddress := create(0, add(targetCreationBytecode, 0x20), size) // Skip the 32 bytes encoded length.
        }
        target = Target(targetAddress);
    }

    // Add helper functions to call the target's functions from the proxy

    function echidna_test() public returns (bool) {
        // The property to test
    }
}
Summary: Testing Contracts Without Source Code
Echidna can fuzz contracts without source code using a proxy contract. This technique can also be used to compare implementations written in Solidity and Vyper.
How and when to use cheat codes
Table of contents:
Introduction
When testing smart contracts in Solidity itself, it can be helpful to use cheat codes in order to overcome some of the limitations of the EVM/Solidity. Cheat codes are special functions that allow to change the state of the EVM in ways that are not posible in production. These were introduced by Dapptools in hevm and adopted (and expanded) in other projects such as Foundry.
Cheat codes available in Echidna
Echidna supports all cheat codes that are available in hevm. These are documented here: https://hevm.dev/std-test-tutorial.html#supported-cheat-codes. If a new cheat code is added in the future, Echidna only needs to update the hevm version and everything should work out of the box.
As an example, the prank cheat code is able to set the msg.sender address in the context of the next external call:
interface IHevm {
    function prank(address) external;
}

contract TestPrank {
  address constant HEVM_ADDRESS = 0x7109709ECfa91a80626fF3989D68f67F5b1DD12D;
  IHevm hevm = IHevm(HEVM_ADDRESS);
  Contract c = ...

  function prankContract() public payable {
    hevm.prank(address(0x42424242);
    c.f(); // `c` will be called with `msg.sender = 0x42424242`
  }
}
A specific example on the use of sign cheat code is available here in our documentation.
Risks of cheat codes
While we provide support for the use of cheat codes, these should be used responsibly. Consider that:
-
Cheat codes can break certain assumptions in Solidity. For example, the compiler assumes that
block.numberis constant during a transaction. There are reports of the optimizer interfering with (re)computation of theblock.numberorblock.timestamp, which can generate incorrect tests when using cheat codes. -
Cheat codes can introduce false positives on the testing. For instance, using
prankto simulate calls from a contract can allow transactions that are not possible in the blockchain. -
Using too many cheat codes:
- can be confusing or error-prone. Certain cheat code like
prankallow to change caller in the next external call: It can be difficult to follow, in particular if it is used in internal functions or modifiers. - will create a dependency of your code with the particular tool or cheat code implementation: It can cause produce migrations to other tools or reusing the test code to be more difficult than expected.
- can be confusing or error-prone. Certain cheat code like
Using HEVM Cheats To Test Permit
Introduction
EIP 2612 introduces the function permit(address owner, address spender, uint256 value, uint256 deadline, uint8 v, bytes32 r, bytes32 s) to the ERC20 ABI. This function takes in signature parameters generated through ECDSA, combined with the EIP 712 standard for typed data hashing, and recovers the author of the signature through ecrecover(). It then sets allowances[owner][spender] to value.
Uses
This method presents a new way of allocating allowances, as signatures can be computed off-chain and passed to a contract. It allows a relayer to pay the entire gas fee of the permit transaction in exchange for a fee, enabling completely gasless transactions for a user. Furthermore, this removes the typical approve() -> transferFrom() pattern that forces users to send two transactions instead of just one through this new method.
Note that for the permit function to work, a valid signature is needed. This example will demonstrate how we can use hevm's sign cheatcode to sign data with a private key. More generally, you can use this cheatcode to test anything that requires valid signatures.
Example
We use Solmate’s implementation of the ERC20 standard that includes the permit function. Observe that there are also values for the PERMIT_TYPEHASH and a mapping(address -> uint256) public nonces. The former is part of the EIP712 standard, and the latter is used to prevent signature replay attacks.
In our TestDepositWithPermit contract, we need to have the signature signed by an owner for validation. To accomplish this, we can use hevm’s sign cheatcode, which takes in a message and a private key and creates a valid signature. For this example, we use the private key 0x02, and the following signed message representing the permit signature following the EIP 712:
keccak256(
    abi.encodePacked(
        "\x19\x01",
        asset.DOMAIN_SEPARATOR(),
        keccak256(
            abi.encode(
                keccak256("Permit(address owner,address spender,uint256 value,uint256 nonce,uint256 deadline)"),
                owner,
                spender,
                assetAmount,
                asset.nonces(owner),
                block.timestamp
            )
        )
    )
);
The helper function getSignature(address owner, address spender, uint256 assetAmount) returns a valid signature generated via the sign cheatcode. Note that the sign cheatcode exposes the private key, so it is best to use dummy keys when testing. Our keypair data was taken from this site. To test the signature, we will mint a random amount to the OWNER address, the address corresponding to the private key 0x02, which was the signer of the permit signature. We then check whether we can use that signature to transfer the owner’s tokens to ourselves.
First, we call permit() on our Mock ERC20 token with the signature generated in getSignature(), and then call transferFrom(). If our permit request and transfer are successful, our balance of the mock ERC20 should increase by the amount permitted, and the OWNER's balance should decrease as well. For simplicity, we'll transfer all the minted tokens so that the OWNER's balance will be 0, and our balance will be amount.
Code
The complete example code can be found here.
End-to-End Testing with Echidna (Part I)
When smart contracts require complex initialization and the time to do so is short, we want to avoid manually recreating a deployment for a fuzzing campaign with Echidna. That's why we have a new approach for testing using Echidna based on the deployments and execution of tests directly from Ganache.
Requirements:
This approach needs a smart contract project with the following constraints:
- It should use Solidity; Vyper is not supported since Slither/Echidna is not very effective at running these (e.g. no AST is included).
- It should have tests or at least a complete deployment script.
- It should work with Slither. If it fails, please report the issue.
For this tutorial, we used the Drizzle-box example.
Getting Started:
Before starting, make sure you have the latest releases from Echidna and Etheno installed.
Then, install the packages to compile the project:
git clone https://github.com/truffle-box/drizzle-box
cd drizzle-box
npm i truffle
If ganache is not installed, add it manually. In our example, we will run:
npm -g i ganache
Other projects using Yarn will require:
yarn global add ganache
Ensure that $ ganache --version outputs ganache v7.3.2 or greater.
It is also important to select one test script from the available tests. Ideally, this test will deploy all (or most) contracts, including mock/test ones. For this example, we are going to examine the SimpleStorage contract:
contract SimpleStorage {
    event StorageSet(string _message);

    uint256 public storedData;

    function set(uint256 x) public {
        storedData = x;

        emit StorageSet("Data stored successfully!");
    }
}
This small contract allows the storedData state variable to be set. As expected, we have a unit test that deploys and tests this contract (simplestorage.js):
const SimpleStorage = artifacts.require("SimpleStorage");

contract("SimpleStorage", (accounts) => {
    it("...should store the value 89.", async () => {
        const simpleStorageInstance = await SimpleStorage.deployed();

        // Set value of 89
        await simpleStorageInstance.set(89, { from: accounts[0] });

        // Get stored value
        const storedData = await simpleStorageInstance.storedData.call();

        assert.equal(storedData, 89, "The value 89 was not stored.");
    });
});
Capturing Transactions
Before starting to write interesting properties, it is necessary to collect an Etheno trace to replay it inside Echidna:
First, start Etheno:
etheno --ganache --ganache-args="--miner.blockGasLimit 10000000" -x init.json
By default, the following Ganache arguments are set via Etheno:
-d: Ganache will use a pre-defined, deterministic seed to create all accounts.--chain.allowUnlimitedContractSize: Allows unlimited contract sizes while debugging. This is set so that there is no size limitation on the contracts that are going to be deployed.-p <port_num>: Theport_numwill be set to (1) the value of--ganache-portor (2) Etheno will choose the smallest port number higher than the port number on which Etheno’s JSON RPC server is running.
NOTE: If you are using Docker to run Etheno, the commands should be:
docker run -it -p 8545:8545 -v ~/etheno:/home/etheno/ trailofbits/etheno
(you will now be working within the Docker instance)
etheno --ganache --ganache-args="--miner.blockGasLimit 10000000" -x init.json
- The
-pin the first command publishes (i.e., exposes) port 8545 from inside the Docker container out to port 8545 on the host. - The
-vin the first command maps a directory from inside the Docker container to one outside the Docker container. After Etheno exits, theinit.jsonfile will now be in the~/ethenofolder on the host.
Note that if the deployment fails to complete successfully due to a ProviderError: exceeds block gas limit exception, increasing the --miner.blockGasLimit value can help. This is especially helpful for large contract deployments. Learn more about the various Ganache command-line arguments that can be set by clicking here.
Additionally, if Etheno fails to produce any output, it may have failed to execute ganache under-the-hood. Check if ganache (with the associated command-line arguments) can be executed correctly from your terminal without the use of Etheno.
Meanwhile, in another terminal, run one test or the deployment process. How to run it depends on how the project was developed. For instance, for Truffle, use:
truffle test test/test.js
For Buidler:
buidler test test/test.js --network localhost
In the Drizzle example, we will run:
truffle test test/simplestorage.js --network develop.
After Etheno finishes, gently kill it using Ctrl+C (or Command+C on Mac). It will save the init.json file. If your test fails for some reason, or you want to run a different one, restart Etheno and re-run the test.
Writing and Running a Property
Once we have a JSON file with saved transactions, we can verify that the SimpleStorage contract is deployed at 0x871DD7C2B4b25E1Aa18728e9D5f2Af4C4e431f5c. We can easily write a contract in contracts/crytic/E2E.sol with a simple property to test it:
import "../SimpleStorage.sol";

contract E2E {
    SimpleStorage st = SimpleStorage(0x871DD7C2B4b25E1Aa18728e9D5f2Af4C4e431f5c);

    function crytic_const_storage() public returns (bool) {
        return st.storedData() == 89;
    }
}
For large, multi-contract deployments, using console.log to print out the deployed contract addresses can be valuable in quickly setting up the Echidna testing contract.
This simple property checks if the stored data remains constant. To run it, you will need the following Echidna config file (echidna.yaml):
prefix: crytic_
initialize: init.json
allContracts: true
cryticArgs: ["--truffle-build-directory", "app/src/contracts/"] # needed by Drizzle
Then, running Echidna shows the results immediately:
echidna . --contract E2E --config echidna.yaml
...
crytic_const_storage: failed!💥
Call sequence:
(0x871dd7c2b4b25e1aa18728e9d5f2af4c4e431f5c).set(0) from: 0x0000000000000000000000000000000000010000
For this last step, make sure you are using . as a target for echidna. If you use the path to the E2E.sol file instead, Echidna will not be able to get information from all the deployed contracts to call the set(uint256) function, and the property will never fail.
Key Considerations:
When using Etheno with Echidna, note that there are two edge cases that may cause unexpected behavior:
- Function calls that use ether: The accounts created and used for testing in Ganache are not the same as the accounts used to send transactions in Echidna. Thus, the account balances of the Ganache accounts do not carry over to the accounts used by Echidna. If there is a function call logged by Etheno that requires the transfer of some ether from an account that exists in Ganache, this call will fail in Echidna.
- Fuzz tests that rely on
block.timestamp: The concept of time is different between Ganache and Echidna. Echidna always starts with a fixed timestamp, while Etheno will use Ganache's concept of time. This means that assertions or requirements in a fuzz test that rely on timestamp comparisons/evaluations may fail in Echidna.
In the next part of this tutorial, we will explore how to easily find where contracts are deployed with a specific tool based on Slither. This will be useful if the deployment process is complex, and we need to test a particular contract.
Understanding and using allContracts in Echidna
Table of contents:
Introduction
This tutorial is written as a hands-on guide to using allContracts testing in Echidna. You will learn what allContracts testing is, how to use it in your tests, and what to expect from its usage.
This feature used to be called
multi-abibut it was later renamed toallContractsin Echidna 2.1.0. As expected, this version or later is required for this tutorial.
What is allContracts testing?
It is a testing mode that allows Echidna to call functions from any contract not directly under test. The ABI for the contract must be known, and it must have been deployed by the contract under test.
When and how to use allContracts
By default, Echidna calls functions from the contract to be analyzed, sending the transactions randomly from addresses 0x10000, 0x20000 and 0x30000.
In some systems, the user has to interact with other contracts prior to calling a function on the fuzzed contract. A common example is when you want to provide liquidity to a DeFi protocol, you will first need to approve the protocol for spending your tokens. This transaction has to be initiated from your account before actually interacting with the protocol contract.
A fuzzing campaign meant to test this example protocol contract won't be able to modify users allowances, therefore most of the interactions with the protocol won't be tested correctly.
This is where allContracts testing is useful: It allows Echidna to call functions from other contracts (not just from the contract under test), sending the transactions from the same accounts that will interact with the target contract.
Run Echidna
We will use a simple example to show how allContracts works. We will be using two contracts, Flag and EchidnaTest, both available in allContracts.sol.
The Flag contract contains a boolean flag that is only set if flip() is called, and a getter function that returns the value of the flag. For now, ignore test_fail(), we will talk about this function later.
contract Flag {
bool flag = false;
function flip() public {
flag = !flag;
}
function get() public returns (bool) {
return flag;
}
function test_fail() public {
assert(false);
}
}
The test harness will instantiate a new Flag, and the invariant under test will be that f.get() (that is, the boolean value of the flag) is always false.
contract EchidnaTest {
Flag f;
constructor() {
f = new Flag();
}
function test_flag_is_false() public {
assert(f.get() == false);
}
}
In a non allContracts fuzzing campaign, Echidna is not able to break the invariant, because it only interacts with EchidnaTest functions. However, if we use the following configuration file, enabling allContracts testing, the invariant is broken. You can access allContracts.yaml here.
testMode: assertion
testLimit: 50000
allContracts: true
To run the Echidna tests, run echidna allContracts.sol --contract EchidnaTest --config allContracts.yaml from the example directory. Alternatively, you can specify --all-contracts in the command line instead of using a configuration file.
Example run with allContracts set to false
echidna allContracts.sol --contract EchidnaTest --config allContracts.yaml
Analyzing contract: building-secure-contracts/program-analysis/echidna/example/allContracts.sol:EchidnaTest
test_flag_is_false(): passed! 🎉
AssertionFailed(..): passed! 🎉
Unique instructions: 282
Unique codehashes: 2
Corpus size: 2
Seed: -8252538430849362039
Example run with allContracts set to true
echidna allContracts.sol --contract EchidnaTest --config allContracts.yaml
Analyzing contract: building-secure-contracts/program-analysis/echidna/example/allContracts.sol:EchidnaTest
test_flag_is_false(): failed!💥
Call sequence:
flip()
flip()
flip()
test_flag_is_false()
Event sequence: Panic(1)
AssertionFailed(..): passed! 🎉
Unique instructions: 368
Unique codehashes: 2
Corpus size: 6
Seed: -6168343983565830424
Use cases and conclusions
Testing with allContracts is a useful tool for complex systems that require the user to interact with more than one contract, as we mentioned earlier. Another use case is for deployed contracts that require interactions to be initiated by specific addresses: for those, specifying the sender configuration setting allows to send the transactions from the correct account.
A side-effect of using allContracts is that the search space grows with the number of functions that can be called. This, combined with high values of sequence lengths, can make the fuzzing test not so thorough, because the dimension of the search space is simply too big to reasonably explore. Finally, adding more functions as fuzzing candidates makes the campaigns to take up more execution time.
A final remark is that allContracts testing in assertion mode ignores all assert failures from the contracts not under test. This is shown in Flag.test_fail() function: even though it explicitly asserts false, the Echidna test ignores it.
Working with external libraries
Table of contents:
Introduction
Solidity support two types of libraries (see the documentation):
- If all the functions are internal, the library is compiled into bytecode and added into the contracts that use it.
- If there are some external functions, the library should be deployed into some address. Finally, the bytecode calling the library should be linked.
The following is only needed if your codebase uses libraries that need to be linked.
Example code
For this tutorial, we will use the metacoin example. Let's start compiling it:
$ git clone https://github.com/truffle-box/metacoin-box
$ cd metacoin-box
$ npm i
Deploying libraries
Libraries are contracts that need to be deployed first. Fortunately, Echidna allows us to do that easily, using the deployContracts option. In the metacoin example, we can use:
deployContracts: [["0x1f", "ConvertLib"]]
The address where the library should be deployed is arbitrary, but it should be the same as the one in the used during the linking process.
Linking libraries
Before a contract can use a deployed library, its bytecode requires to be linked (e.g set the address that points to the deployed library contract). Normally, a compilation framework (e.g. truffle) will take care of this. However, in our case, we will use crytic-compile, since it is easier to handle all cases from different frameworks just adding one new argument to pass to crytic-compile from Echidna:
cryticArgs: ["--compile-libraries=(ConvertLib,0x1f)"]
Going back to the example, if we have both config options in a single config file (echidna.yaml), we can run the metacoin contract
in exploration mode:
$ echidna . --test-mode exploration --corpus-dir corpus --contract MetaCoin --config echidna.yaml
We can use the coverage report to verify that function using the library (getBalanceInEth) is not reverting:
28 | * | function getBalanceInEth(address addr) public view returns(uint){
29 | * | return ConvertLib.convert(getBalance(addr),2);
30 | | }
Summary
Working with libraries in Echidna is supported. It involves to deploy the library to a particular address using deployContracts and then asking crytic-compile to link the bytecode with the same address using --compile-libraries command line.
On-chain fuzzing with state forking
Table of contents:
Introduction
Echidna recently added support for state network forking, starting from the 2.1.0 release. In a few words, our fuzzer can run a campaign starting with an existing blockchain state provided by an external RPC service (Infura, Alchemy, local node, etc). This enables users to speed up the fuzzing setup when using already deployed contracts.
Example
In the following contract, an assertion will fail if the call to Compound ETH mint function succeeds and the balance of the contract increases.
interface IHevm {
function warp(uint256 newTimestamp) external;
function roll(uint256 newNumber) external;
}
interface Compound {
function mint() external payable;
function balanceOf(address) external view returns (uint256);
}
contract TestCompoundEthMint {
address constant HEVM_ADDRESS = 0x7109709ECfa91a80626fF3989D68f67F5b1DD12D;
IHevm hevm = IHevm(HEVM_ADDRESS);
Compound comp = Compound(0x4Ddc2D193948926D02f9B1fE9e1daa0718270ED5);
constructor() {
hevm.roll(16771449); // sets the correct block number
hevm.warp(1678131671); // sets the expected timestamp for the block number
}
function assertNoBalance() public payable {
require(comp.balanceOf(address(this)) == 0);
comp.mint{ value: msg.value }();
assert(comp.balanceOf(address(this)) == 0);
}
}
In order to use this feature, the user needs to specify the RPC endpoint for Echidna to use before running the fuzzing campaign. This requires using the ECHIDNA_RPC_URL and ECHIDNA_RPC_BLOCK environment variables:
$ ECHIDNA_RPC_URL=http://.. ECHIDNA_RPC_BLOCK=16771449 echidna compound.sol --test-mode assertion --contract TestCompoundEthMint
...
assertNoBalance(): failed!💥
Call sequence, shrinking (885/5000):
assertNoBalance() Value: 0xd0411a5
Echidna will query contract code or storage slots as needed from the provided RPC node. You can press the key f key to see which contracts/slots are fetched.
Please note that only the state specified in the ECHIDNA_RPC_BLOCK will be fetched. If Echidna increases the block number, it is all just simulated locally but its state is still loaded from the initially set RPC block.
Corpus and RPC cache
If a corpus directory is used (e.g. --corpus-dir corpus), Echidna will save the fetched information inside the cache directory.
This will speed up subsequent runs, since the data does not need to be fetched from the RPC. It is recommended to use this feature, in particular if the testing is performed as part of the CI tests.
$ ls corpus/cache/
block_16771449_fetch_cache_contracts.json block_16771449_fetch_cache_slots.json
Coverage and source code fetching
When the fuzzing campaign is over, Echidna attempts to fetch source code for any executed on-chain contracts to generate coverage reports. Starting with version 2.3.1, Echidna will first try Sourcify, and if that fails, fall back to Etherscan.
Sourcify is an open-source source code verification
service for Solidity and Vyper contracts. It doesn't require an API key and
its verified contracts are publicly available for download. Etherscan requires
an API key (via the ETHERSCAN_API_KEY environment variable or
etherscanApiKey config option).
Example output when Sourcify has the contract:
Fetching source for 0x4Ddc2D193948926D02f9B1fE9e1daa0718270ED5 from Sourcify... Success!
If Sourcify fails and Etherscan API key is configured:
Fetching source for 0x4Ddc2D193948926D02f9B1fE9e1daa0718270ED5 from Sourcify... Failed!
Fetching source for 0x4Ddc2D193948926D02f9B1fE9e1daa0718270ED5 from Etherscan... Success!
If Sourcify fails and no Etherscan API key was provided:
Fetching source for 0x4Ddc2D193948926D02f9B1fE9e1daa0718270ED5 from Sourcify... Failed!
Skipping Etherscan (no API key configured)
To disable on-chain source fetching entirely, use --disable-onchain-sources or
set disableOnchainSources: true in your config file.
In order to generate the coverage report for a fetched contract, both source code and source mapping should be available. When using Etherscan, some contracts may have source code available but lack source maps, such as for the cETH contract. When both are available, there will be a new directory inside the corpus directory to show coverage for each contract that was fetched.
In addition to that, the coverage report will always be available for the user-provided contracts, such as this one:
20 | |
21 | *r | function assertNoBalance() public payable {
22 | *r | require(comp.balanceOf(address(this)) == 0);
23 | *r | comp.mint{value: msg.value}();
24 | *r | assert(comp.balanceOf(address(this)) == 0);
25 | | }
Interacting with off-chain data using the ffi cheatcode
Introduction
It is possible for Echidna to interact with off-chain data by means of the ffi cheatcode. This function allows the caller to execute an arbitrary command on the system running Echidna and read its output, enabling the possibility of getting external data into a fuzzing campaign.
A word of caution
In general, the usage of cheatcodes is not encouraged, since manipulating the EVM execution environment can lead to unpredictable results and false positives or negatives in fuzzing tests.
This piece of advice becomes more critical when using ffi. This cheatcode basically allows arbitrary code execution on the host system, so it's not just the EVM execution environment that can be manipulated. Running malicious or untrusted tests with ffi can have disastrous consequences.
The usage of this cheatcode should be extremely limited, well documented, and only reserved for cases where there is not a secure alternative.
Pre-requisites
If reading the previous section didn't scare you enough and you still want to use ffi, you will need to explicitly tell Echidna to allow the cheatcode in the tests. This safety measure makes sure you don't accidentally execute ffi code.
To enable the cheatcode, set the allowFFI flag to true in your Echidna configuration file:
allowFFI: true
Uses
Some of the use cases for ffi are:
- Making prices or other information available on-chain during a fuzzing campaign. For example, you can use
ffito feed an oracle with "live" data. - Get randomness in a test. As you know, there is no randomness source on-chain, so using this cheatcode you can get a random value from the device running the fuzz tests.
- Integrate with algorithms not ported to Solidity language, or perform comparisons between two implementations. Some examples for this item include signing and hashing, or custom calculations algorithms.
Example: Call an off-chain program and read its output
This example will show how to create a simple call to an external executable, passing some values as parameters, and read its output. Keep in mind that the return values of the called program should be an abi-encoded data chunk that can be later decoded via abi.decode(). No newlines are allowed in the return values.
Before digging into the example, there's something else to keep in mind: When interacting with external processes, you will need to convert from Solidity data types to string, to pass values as arguments to the off-chain executable. You can use the crytic/properties toString helpers for converting.
For the example we will be creating a python example script that returns a random uint256 value and a bytes32 hash calculated from an integer input value. This doesn't represent a "useful" use case, but will be enough to show how the ffi cheatcode is used. Finally, we won't perform sanity checks for data types or values, we will just assume the input data will be correct.
This script was tested with Python 3.11, Web3 6.0.0 and eth-abi 4.0.0. Some functions had different names in prior versions of the libraries.
import sys
import secrets
from web3 import Web3
from eth_abi import encode
# Usage: python3 script.py number
number = int(sys.argv[1])
# Generate a 10-byte random number
random = int(secrets.token_hex(10), 16)
# Generate the keccak hash of the input value
hashed = Web3.solidity_keccak(['uint256'], [number])
# ABI-encode the output
abi_encoded = encode(['uint256', 'bytes32'], [random, hashed]).hex()
# Make sure that it doesn't print a newline character
print("0x" + abi_encoded, end="")
You can test this program with various inputs and see what the output is. If it works correctly, the program should output a 512-bit hex string that is the ABI-encoded representation of a 256-bit integer followed by a bytes32.
Now let's create the Solidity contract that will be run by Echidna to interact with the previous script.
pragma solidity ^0.8.0;
// HEVM helper
import "@crytic/properties/contracts/util/Hevm.sol";
// Helpers to convert uint256 to string
import "@crytic/properties/contracts/util/PropertiesHelper.sol";
contract TestFFI {
function test_ffi(uint256 number) public {
// Prepare the array of executable and parameters
string[] memory inp = new string[](3);
inp[0] = "python3";
inp[1] = "script.py";
inp[2] = PropertiesLibString.toString(number);
// Call the program outside the EVM environment
bytes memory res = hevm.ffi(inp);
// Decode the return values
(uint256 random, bytes32 hashed) = abi.decode(res, (uint256, bytes32));
// Make sure the return value is the expected
bytes32 hashed_solidity = keccak256(abi.encodePacked(number));
assert(hashed_solidity == hashed);
}
}
The minimal configuration file for this test is the following:
testMode: "assertion"
allowFFI: true
Fuzzing Tips
The following tips will help enhance the efficiency of Echidna when fuzzing:
- Use
%to filter the range of input values. Refer to Filtering inputs for more information. - Use push/pop when dealing with dynamic arrays. See Handling dynamic arrays for details.
Filtering Inputs
Using % is more efficient for filtering input values than adding require or if statements. For instance, when fuzzing an operation(uint256 index, ..) with index expected to be less than 10**18, use the following:
function operation(uint256 index) public {
index = index % 10 ** 18;
// ...
}
Using require(index <= 10**18) instead would result in many generated transactions reverting, which would slow down the fuzzer.
To define a minimum and maximum range, you can adapt the code like this:
function operation(uint256 balance) public {
balance = MIN_BALANCE + (balance % (MAX_BALANCE - MIN_BALANCE));
// ...
}
This ensures that the balance value stays between MIN_BALANCE and MAX_BALANCE, without discarding any generated transactions. While this speeds up the exploration process, it might prevent some code paths from being tested. To address this issue, you can provide two functions:
function operation(uint256 balance) public {
// ...
}
function safeOperation(uint256 balance) public {
balance = MIN_BALANCE + (balance % (MAX_BALANCE - MIN_BALANCE)); // safe balance
// ...
}
Echidna can then use either of these functions, allowing it to explore both safe and unsafe usage of the input data.
Handling Dynamic Arrays
When using a dynamic array as input, Echidna restricts its size to 32 elements:
function operation(uint256[] calldata data) public {
// ...
}
This is because deserializing dynamic arrays can be slow and may consume a significant amount of memory. Additionally, dynamic arrays can be difficult to mutate. However, Echidna includes specific mutators to remove/repeat elements or truncate elements, which it performs using the collected corpus. Generally, we recommend using push(...) and pop() functions to handle dynamic arrays used as inputs:
contract DataHandler {
uint256[] data;
function push(uint256 x) public {
data.push(x);
}
function pop() public {
data.pop();
}
function operation() public {
// Use of `data`
}
}
This approach works well for testing arrays with a small number of elements. However, it can introduce an exploration bias: since push and pop functions are selected with equal probability, the chances of creating large arrays (e.g., more than 64 elements) are very low. One workaround is to blacklist the pop() function during a brief campaign:
filterFunctions: ["C.pop()"]
This should suffice for small-scale testing. A more comprehensive solution involves swarm testing, a technique that performs long testing campaigns with randomized configurations. In the context of Echidna, swarm testing is executed using different configuration files, which blacklist random contract functions before testing. We offer swarm testing and scalability through echidna-parade, our dedicated tool for fuzzing smart contracts. A tutorial on using echidna-parade can be found here.
Frequently Asked Questions about Echidna
This list provides answers to frequently asked questions related to the usage of Echidna. If you find this information challenging to understand, please ensure you have already reviewed all the other Echidna documentation.
Echidna fails to start or compile my contract; what should I do?
Begin by testing if crytic-compile can compile your contracts. If you are using a compilation framework such as Truffle or Hardhat, use the command:
crytic-compile .
and check for any errors. If there is an unexpected error, please report it in the crytic-compile issue tracker.
If crytic-compile works fine, test slither to see if there are any issues with the information it extracts for running Echidna. Again, if you are using a compilation framework, use the command:
slither . --print echidna
If that command executes correctly, it should print a JSON file containing some information from your contracts; otherwise, report any errors in the slither issue tracker. If everything here works, but Echidna still fails, please open an issue in our issue tracker or ask in the #ethereum channel of the EmpireHacking Slack.
How long should I run Echidna?
Echidna uses fuzzing testing, which runs for a fixed number of transactions (or a global timeout). Users should specify an appropriate number of transactions or a timeout (in seconds) depending on the available resources for a fuzzing campaign and the complexity of the code. Determining the best amount of time to run a fuzzer is still an open research question; however, monitoring the code coverage of your smart contracts can be a good way to determine if the fuzzing campaign should be extended.
Why has Echidna not implemented fuzzing of smart contract constructors with parameters?
Echidna is focused on security testing during audits. When we perform testing, we tailor the fuzzing campaign to test a limited number of possible constructor parameters (normally, the ones that will be used for the actual deployment). We do not focus on issues that depend on alternative deployments that should not occur. Moreover, redeploying contracts during the fuzzing campaign has a performance impact, and the sequences of transactions that we collect in the corpus may be more challenging (or even impossible) to reuse and mutate in different contexts.
How does Echidna determine which sequence of transactions should be added to the corpus?
Echidna begins by generating a sequence with a number of transactions to execute. It executes each transaction one by one, collecting coverage information for every transaction. If a transaction adds new coverage, then the entire sequence (up to that transaction) is added to the corpus.
How is coverage information used?
Coverage information is used to determine if a sequence of transactions has reached a new program state and is added to the internal corpus.
What exactly is coverage information?
Coverage is a combination of the following information:
- Echidna reached a specific program counter in a given contract.
- The execution ended, either with stop, revert, or a variety of errors (e.g., assertion failed, out of gas, insufficient ether balance, etc.)
- The number of EVM frames when the execution ended (in other words, how deep the execution ends in terms of internal transactions)
How is the corpus used?
The corpus is used as the primary source of transactions to replay and mutate during a fuzzing campaign. The probability of using a sequence of transactions to replay and mutate is directly proportional to the number of transactions needed to add it to the corpus. In other words, rarer sequences are replayed and mutated more frequently during a fuzzing campaign.
When a new sequence of transactions is added to the corpus, does this always mean that a new line of code is reached?
Not always. It means we have reached a certain program state given our coverage definition.
Why not use coverage per individual transaction instead of per sequence of transactions?
Coverage per individual transaction is possible, but it provides an incomplete view of the coverage since some code requires previous transactions to reach specific lines.
How do I know which type of testing should be used (boolean properties, assertions, etc.)?
Refer to the tutorial on selecting the right test mode.
Why does Echidna return "Property X failed with no transactions made" when running one or more tests?
Before starting a fuzzing campaign, Echidna tests the properties without any transactions to check for failures. In that case, a property may fail in the initial state (after the contract is deployed). You should check that the property is correct to understand why it fails without any transactions.
How can I determine how a property or assertion failed?
Echidna indicates the cause of a failed test in the UI. For instance, if a boolean property X fails due to a revert, Echidna will display "Property X FAILED! with ErrorRevert"; otherwise, it should show "Property X FAILED! with ErrorReturnFalse". An assertion can only fail with "ErrorUnrecognizedOpcode," which is how Solidity implements assertions in the EVM.
How can I pinpoint where and how a property or assertion failed?
Events are an easy way to output values from the EVM. You can use them to obtain information in the code containing the failed property or assertion. Only the events of the transaction triggering the failure will be shown (this will be improved in the near future). Also, events are collected and displayed, even if the transaction reverted (despite the Yellow Paper stating that the event log should be cleared).
Another way to see where an assertion failed is by using the coverage information. This requires enabling corpus collection (e.g., --corpus-dir X) and checking the coverage in the coverage*.txt file, such as:
*e | function test(int x, address y, address z) public {
*e | require(x > 0 || x <= 0);
*e | assert(z != address(0x0));
* | assert(y != z);
* | state = x;
| }
The e marker indicates that Echidna collected a trace that ended with an assertion failure. As we can see,
the path ends at the assert statement, so it should fail there.
Why does coverage information seem incorrect or incomplete?
Coverage mappings can be imprecise; however, if they fail completely, it could be that you are using the viaIR optimization option, which appears to have some unexpected impact on the solc maps that we are still investigating. As a workaround, disable viaIR.
Echidna crashes, displaying "NonEmpty.fromList: empty list"
Echidna relies on the Solidity metadata to detect where each contract is deployed. Please do not disable it. If this is not the case, please open an issue in our issue tracker.
Echidna stopped working for some reason. How can I debug it?
Use --format text and open an issue with the error you see in your console, or ask in the #ethereum channel at the EmpireHacking Slack.
I am not getting the expected results from Echidna tests. What can I do?
Sometimes, it is useful to create small properties or assertions to test whether the tool executed them correctly. For instance, for property mode:
function echidna_test() public returns (bool) {
return false;
}
And for assertion mode:
function test_assert_false() public {
assert(false);
}
If these do not fail, please open an issue so that we can investigate.
Configuration options
The following is a list of all the options that may be provided in the Echidna configuration file. Whenever an option can also be set via the command line, the CLI equivalent flag is provided as a reference. Some flags are relatively new and only available on recent Echidna builds; in those cases, the minimum Echidna version required to use the feature is indicated in the table.
testMode
| Type | Default | Available in | CLI equivalent |
|---|---|---|---|
| String | "property" | * | --test-mode MODE |
The test mode to run. It should be one of the following items:
"property": Run user-defined property tests."assertion": Detect assertion failures (previouslycheckAsserts)."optimization": Find the maximum value for a function."overflow": Detect integer overflows (only available in Solidity 0.8.0 or greater)."exploration": Run contract code without executing any tests.
Review the testing modes tutorial to select the one most suitable to your project.
testLimit
| Type | Default | Available in | CLI equivalent |
|---|---|---|---|
| Int | 50000 | * | --test-limit N |
Number of transactions to generate during testing. The campaign will stop when
the testLimit is reached or if a timeout is set and the execution time
exceeds it.
seqLen
| Type | Default | Available in | CLI equivalent |
|---|---|---|---|
| Int | 100 | * | --seq-len N |
Number of transactions that a transaction sequence will have during testing, and maximum length of transaction sequences in the corpus. After every N transactions, Echidna will reset the EVM to the initial post-deployment state.
timeout
| Type | Default | Available in | CLI equivalent |
|---|---|---|---|
| Int | null | * | --timeout N |
Campaign timeout, in seconds. By default it is not time-limited. If a value is
set, the campaign will stop when the time is exhausted or the testLimit is
reached, whichever happens first.
seed
| Type | Default | Available in | CLI equivalent |
|---|---|---|---|
| Int | random | * | --seed N |
Seed used for random value generation. By default it is a random integer. The
seed may not guarantee reproducibility if multiple workers are used, as the
operating system thread scheduling may introduce additional randomness into the
process.
shrinkLimit
| Type | Default | Available in | CLI equivalent |
|---|---|---|---|
| Int | 5000 | * | -shrink-limit N |
Number of attempts to shrink a failing sequence of transactions.
contractAddr
| Type | Default | Available in | CLI equivalent |
|---|---|---|---|
| Address | "0x00a329c0648769a73af ac7f9381e08fb43dbea72" | * | --contract-addr ADDR |
Address to deploy the contract to test.
coverage
| Type | Default | Available in |
|---|---|---|
| Bool | true | * |
Enable the use of coverage-guided fuzzing and corpus collection. We recommend keeping this enabled.
corpusDir
| Type | Default | Available in | CLI equivalent |
|---|---|---|---|
| String | null | * | --corpus-dir PATH |
Directory to save the corpus collected (requires coverage enabled).
coverageDir
| Type | Default | Available in | CLI equivalent |
|---|---|---|---|
| String | null | 2.3.0+ | --coverage-dir PATH |
Directory to save coverage reports. If not specified, coverage reports will be
saved to the corpusDir. This allows separating corpus data (reproducers,
coverage transactions) from coverage reports.
deployer
| Type | Default | Available in | CLI equivalent |
|---|---|---|---|
| Address | "0x30000" | * | --deployer |
Address of the deployer of the contract to test.
deployContracts
| Type | Default | Available in |
|---|---|---|
| [[Address, String]] | [] | 2.0.2+ |
Addresses and contract names to deploy using the available source code. The deployer address is the same as the contract to test. Echidna will error if the deployment fails.
deployBytecodes
| Type | Default | Available in |
|---|---|---|
| [[Address, String]] | [] | 2.0.2+ |
Addresses and bytecodes to deploy. The deployer address is the same as the contract to test. Echidna will error if the deployment fails.
sender
| Type | Default | Available in | CLI equivalent |
|---|---|---|---|
| [Address] | ["0x10000", "0x20000", "0x30000"] | * | --sender |
List of addresses to (randomly) use as msg.sender for the transactions sent
during testing. These addresses are used as the sender for all transactions
produced by Echidna, except for property evaluation in property mode (see
psender below).
psender
| Type | Default | Available in |
|---|---|---|
| Address | "0x10000" | * |
Address of msg.sender to use for property evaluation. This address is only
used to evaluate properties (functions with the configured prefix) while
executing Echidna in property mode.
prefix
| Type | Default | Available in |
|---|---|---|
| String | "echidna_" | * |
Prefix of the function names used as properties in the contract to test.
propMaxGas
| Type | Default | Available in |
|---|---|---|
| Int | 12500000 (current max gas per block) | * |
Maximum amount of gas to consume when running function properties. If a property runs out of gas, it will be considered as a failure.
testMaxGas
| Type | Default | Available in |
|---|---|---|
| Int | 12500000 (current max gas per block) | * |
Maximum amount of gas to consume when running random transactions. A non-property transaction that runs out of gas (e.g. a transaction in assertion mode) will not be considered a failure.
maxGasprice
| Type | Default | Available in |
|---|---|---|
| Int | 0 | * |
Maximum amount of gas price to randomly use in transactions. Do not change it unless you absolutely need it.
maxTimeDelay
| Type | Default | Available in |
|---|---|---|
| Int | 604800 (one week) | * |
Maximum amount of seconds of delay between transactions.
maxBlockDelay
| Type | Default | Available in |
|---|---|---|
| Int | 60480 | * |
Maximum amount of block numbers between transactions.
codeSize
| Type | Default | Available in |
|---|---|---|
| Int | 0xffffffff | * |
Maximum code size for deployed contracts.
solcArgs
| Type | Default | Available in | CLI equivalent |
|---|---|---|---|
| String | "" | * | --solc-args ARGS |
Additional arguments to use in solc for compiling the contract to test.
cryticArgs
| Type | Default | Available in | CLI equivalent |
|---|---|---|---|
| [String] | [] | * | --crytic-args ARGS |
Additional arguments to use in crytic-compile for compiling the contract to
test.
quiet
| Type | Default | Available in |
|---|---|---|
| Bool | false | * |
Hide solc stderr output and additional information during the testing.
format
| Type | Default | Available in | CLI equivalent |
|---|---|---|---|
| String | null | * | --format FORMAT |
Select a textual output format. By default, interactive TUI is run or text if a terminal is absent.
"text": simple textual interface."json": JSON output."none": no output.
balanceContract
| Type | Default | Available in |
|---|---|---|
| Int | 0 | * |
Initial Ether balance of contractAddr. See our tutorial on working with
ETH for more details.
balanceAddr
| Type | Default | Available in |
|---|---|---|
| Int | 0xffffffff | * |
Initial Ether balance of deployer and each of the sender accounts. See our
tutorial on working with ETH for more details.
maxValue
| Type | Default | Available in |
|---|---|---|
| Int | 100000000000000000000 (100 ETH) | * |
Max amount of value in each randomly generated transaction. See our tutorial on working with ETH for more details.
testDestruction
| Type | Default | Available in |
|---|---|---|
| Bool | false | * |
Add a special test that fails if a contract is self-destructed.
stopOnFail
| Type | Default | Available in |
|---|---|---|
| Bool | false | * |
Stops the fuzzing campaign when the first test fails.
allContracts
| Type | Default | Available in | CLI equivalent |
|---|---|---|---|
| Bool | false | 2.1.0+ (previously multi-abi) | --all-contracts |
Makes Echidna fuzz the provided test contracts and any other deployed contract whose ABI is known at runtime.
filterBlacklist
| Type | Default | Available in |
|---|---|---|
| Bool | true | * |
Allows Echidna to avoid calling (when set to true) or only call (when set to
false) a set of functions. The function allowlist or denylist should be provided
in filterFunctions.
filterFunctions
| Type | Default | Available in |
|---|---|---|
| [String] | [] | * |
Configures the function allowlist or denylist from filterBlacklist. The list
should contain strings in the format of
"Contract.functionName(uint256,uint256)" following the signature convention.
allowFFI
| Type | Default | Available in |
|---|---|---|
| Bool | false | 2.1.0+ |
Allows the use of the HEVM ffi cheatcode.
rpcUrl
| Type | Default | Available in | CLI equivalent | Env. variable equivalent |
|---|---|---|---|---|
| String | null | 2.1.0+ (env), 2.2.0+ (config), 2.2.3+ (cli) | --rpc-url URL | ECHIDNA_RPC_URL |
URL to fetch contracts over RPC.
rpcBlock
| Type | Default | Available in | CLI equivalent | Env. variable equivalent |
|---|---|---|---|---|
| String | null | 2.1.0+ (env), 2.2.0+ (config), 2.2.3+ (cli) | --rpc-block N | ECHIDNA_RPC_BLOCK |
Block number to use when fetching over RPC.
etherscanApiKey
| Type | Default | Available in | Env. variable equivalent |
|---|---|---|---|
| String | null | 2.1.0+ (env), 2.2.4+ (config) | ETHERSCAN_API_KEY |
Etherscan API key used to fetch contract code.
coverageFormats
| Type | Default | Available in |
|---|---|---|
| [String] | ["txt","html","lcov"] | 2.2.0+ |
List of file formats to save coverage reports in; default is all possible formats.
workers
| Type | Default | Available in | CLI equivalent |
|---|---|---|---|
| Int | 1 | 2.2.0+ | --workers |
Number of workers. Starting on 2.2.4, the default value is equal to the number of cores on the system, with a minimum of 1 and a maximum of 4.
server
| Type | Default | Available in | CLI equivalent |
|---|---|---|---|
| Int | null | 2.2.2+ | --server PORT |
Run events server on the given port.
symExec
| Type | Default | Available in | CLI equivalent |
|---|---|---|---|
| Bool | false | 2.2.4+ | --sym-exec |
Whether to add an additional symbolic execution worker.
symExecNSolvers
| Type | Default | Available in | CLI equivalent |
|---|---|---|---|
| Int | 1 | 2.2.4+ | --sym-exec-n-solvers |
Number of SMT solvers used in symbolic execution. While there is a single
symExec worker, N threads may be used to solve SMT queries. Only relevant if
symExec is true.
symExecTimeout
| Type | Default | Available in | CLI equivalent |
|---|---|---|---|
| Int | 30 | 2.2.4+ | --sym-exec-timeout |
Timeout for symbolic execution SMT solver per formula to solve. Only relevant if symExec is true.
symExecSMTSolver
| Type | Default | Available in |
|---|---|---|
| String | bitwuzla | 2.2.8+ |
The SMT solver used when doing symbolic execution. Valid values are: "cvc5", "z3" and "bitwuzla". Only relevant if symExec is true.
symExecMaxExplore
| Type | Default | Available in |
|---|---|---|
| Int | 10 | 2.2.8+ |
Number of states in exponents of 2 (i.e. 2^10 states) that we may explore using symbolic execution. Only relevant if
symExec is true.
symExecMaxIters
| Type | Default | Available in |
|---|---|---|
| Int | 5 | 2.2.4+ |
Number of times we may revisit a particular branching point. Only relevant if symExec is true.
symExecAskSMTIters
| Type | Default | Available in |
|---|---|---|
| Int | 1 | 2.2.4+ |
Number of times we may revisit a particular branching point before we consult
the smt solver to check reachability. Only relevant if symExec is true.
symExecTargets
| Type | Default | Available in | CLI equivalent |
|---|---|---|---|
| [String] | null | 2.2.4+ | --sym-exec-target |
List of whitelisted functions for using symbolic exploration. When set to null,
all functions are eligible. Can be passed multiple times on the CLI.
Only relevant if symExec is true.
disableSlither
| Type | Default | Available in | CLI equivalent |
|---|---|---|---|
| Bool | false | 2.2.6+ | --disable-slither |
Allows disabling the Slither integration. This is only intended for development, and we do not recommend using this flag as it degrades fuzzing efficiency.
projectName
| Type | Default | Available in |
|---|---|---|
| String | null | 2.2.7+ |
A friendly name to identify what is being fuzzed. It is shown next to the Echidna version in the UI.
disableOnchainSources
| Type | Default | Available in | CLI equivalent |
|---|---|---|---|
| Bool | false | 2.3.1+ | --disable-onchain-sources |
Disable fetching source code from Sourcify and Etherscan for on-chain contracts. When enabled, coverage reports will only include locally compiled contracts. This can be useful to speed up campaigns or when external source fetching is not needed.
Experimental options
There are some options in Echidna that are meant for advanced debugging and experimenting. Those are listed below.
dictfreq
| Type | Default | Available in |
|---|---|---|
| Float | 0.40 | * |
This parameter controls how often Echidna uses its internal dictionary versus a random value when generating a transaction. We do not recommend changing the default value.
mutConsts
| Type | Default | Available in |
|---|---|---|
| [Int] | [1, 1, 1, 1] | * |
Echidna uses weighted probabilities to pick a mutator for a transaction
sequence. This parameter configures the weights for each kind of mutation. The
value consists of four integers, [c1, c2, c3, c4]. Refer to the
implementation
code
for their meaning and impact. We do not recommend changing the default value.
Removed options
There are some options in Echidna that have been removed. Those are listed below.
initialize
| Type | Default | Available in |
|---|---|---|
| String | null | * until 2.2.7 |
This allowed initializing the chain state in Echidna with a series of transactions, typically captured with Etheno. With the introduction of on-chain fuzzing in Echidna, it had become deprecated, and was later removed.
estimateGas
| Type | Default | Available in |
|---|---|---|
| Bool | false | * until 2.2.7 |
Enabled the collection of worst-case gas usage. The information was stored as
part of the corpus on the gas_info field. This functionality was experimental.
symExecConcolic
| Type | Default | Available in |
|---|---|---|
| Bool | true | * until 2.2.7 |
This option controlled whether symbolic execution will be concolic (vs full symbolic execution). It has been removed from the current version of Echidna.
Exercises
- Exercise 1: Test token balances
- Exercise 2: Test access control
- Exercise 3: Test with custom initialization
- Exercise 4: Test using
assert - Exercise 5: Solve Damn Vulnerable DeFi - Naive Receiver
- Exercise 6: Solve Damn Vulnerable DeFi - Unstoppable
- Exercise 7: Solve Damn Vulnerable DeFi - Side Entrance
- Exercise 8: Solve Damn Vulnerable DeFi - The Rewarder
Exercise 1
Table of Contents:
Join the team on Slack at: https://slack.empirehacking.nyc/ #ethereum
Targeted Contract
We will test the following contract token.sol:
pragma solidity ^0.8.0;
contract Ownable {
address public owner = msg.sender;
modifier onlyOwner() {
require(msg.sender == owner, "Ownable: Caller is not the owner.");
_;
}
}
contract Pausable is Ownable {
bool private _paused;
function paused() public view returns (bool) {
return _paused;
}
function pause() public onlyOwner {
_paused = true;
}
function resume() public onlyOwner {
_paused = false;
}
modifier whenNotPaused() {
require(!_paused, "Pausable: Contract is paused.");
_;
}
}
contract Token is Ownable, Pausable {
mapping(address => uint256) public balances;
function transfer(address to, uint256 value) public whenNotPaused {
// unchecked to save gas
unchecked {
balances[msg.sender] -= value;
balances[to] += value;
}
}
}
Testing a Token Balance
Goals
- Add a property to check that the address
echidnacannot have more than an initial balance of 10,000. - After Echidna finds the bug, fix the issue, and re-check your property with Echidna.
The skeleton for this exercise is (template.sol):
pragma solidity ^0.8.0;
import "./token.sol";
/// @dev Run the template with
/// ```
/// solc-select use 0.8.0
/// echidna program-analysis/echidna/exercises/exercise1/template.sol
/// ```
contract TestToken is Token {
address echidna = tx.origin;
constructor() {
balances[echidna] = 10_000;
}
function echidna_test_balance() public view returns (bool) {
// TODO: add the property
}
}
Solution
This solution can be found in solution.sol.
Exercise 2
This exercise requires completing exercise 1.
Table of contents:
Join the team on Slack at: https://slack.empirehacking.nyc/ #ethereum
Targeted contract
We will test the following contract, token.sol:
pragma solidity ^0.8.0;
contract Ownable {
address public owner = msg.sender;
function Owner() public {
owner = msg.sender;
}
modifier onlyOwner() {
require(owner == msg.sender);
_;
}
}
contract Pausable is Ownable {
bool private _paused;
function paused() public view returns (bool) {
return _paused;
}
function pause() public onlyOwner {
_paused = true;
}
function resume() public onlyOwner {
_paused = false;
}
modifier whenNotPaused() {
require(!_paused, "Pausable: Contract is paused.");
_;
}
}
contract Token is Ownable, Pausable {
mapping(address => uint256) public balances;
function transfer(address to, uint256 value) public whenNotPaused {
balances[msg.sender] -= value;
balances[to] += value;
}
}
Testing access control
Goals
- Assume
pause()is called at deployment, and the ownership is removed. - Add a property to check that the contract cannot be unpaused.
- When Echidna finds the bug, fix the issue and retry your property with Echidna.
The skeleton for this exercise is (template.sol):
pragma solidity ^0.8.0;
import "./token.sol";
/// @dev Run the template with
/// ```
/// solc-select use 0.8.0
/// echidna program-analysis/echidna/exercises/exercise2/template.sol
/// ```
contract TestToken is Token {
constructor() {
pause(); // pause the contract
owner = address(0); // lose ownership
}
function echidna_cannot_be_unpause() public view returns (bool) {
// TODO: add the property
}
}
Solution
The solution can be found in solution.sol.
Exercise 3
This exercise requires completing exercise 1 and exercise 2.
Table of contents:
Join the team on Slack at: https://slack.empirehacking.nyc/ #ethereum
Targeted contract
We will test the following contract token.sol:
pragma solidity ^0.8.0;
/// @notice The issues from exercise 1 and 2 are fixed.
contract Ownable {
address public owner = msg.sender;
modifier onlyOwner() {
require(msg.sender == owner, "Ownable: Caller is not the owner.");
_;
}
}
contract Pausable is Ownable {
bool private _paused;
function paused() public view returns (bool) {
return _paused;
}
function pause() public onlyOwner {
_paused = true;
}
function resume() public onlyOwner {
_paused = false;
}
modifier whenNotPaused() {
require(!_paused, "Pausable: Contract is paused.");
_;
}
}
contract Token is Ownable, Pausable {
mapping(address => uint256) public balances;
function transfer(address to, uint256 value) public whenNotPaused {
balances[msg.sender] -= value;
balances[to] += value;
}
}
Testing with custom initialization
Consider the following extension of the token (mintable.sol):
pragma solidity ^0.8.0;
import "./token.sol";
contract MintableToken is Token {
int256 public totalMinted;
int256 public totalMintable;
constructor(int256 totalMintable_) {
totalMintable = totalMintable_;
}
function mint(uint256 value) public onlyOwner {
require(int256(value) + totalMinted < totalMintable);
totalMinted += int256(value);
balances[msg.sender] += value;
}
}
The version of token.sol contains the fixes from the previous exercises.
Goals
- Create a scenario where
echidna (tx.origin)becomes the owner of the contract at construction, andtotalMintableis set to 10,000. Remember that Echidna needs a constructor without arguments. - Add a property to check if
echidnacan mint more than 10,000 tokens. - Once Echidna finds the bug, fix the issue, and re-try your property with Echidna.
The skeleton for this exercise is template.sol:
pragma solidity ^0.8.0;
import "./mintable.sol";
/// @dev Run the template with
/// ```
/// solc-select use 0.8.0
/// echidna program-analysis/echidna/exercises/exercise3/template.sol --contract TestToken
/// ```
contract TestToken is MintableToken {
address echidna = msg.sender;
// TODO: update the constructor
constructor(int256 totalMintable) MintableToken(totalMintable) {}
function echidna_test_balance() public view returns (bool) {
// TODO: add the property
}
}
Solution
This solution can be found in solution.sol.
Exercise 4
Table of contents:
This exercise is based on the tutorial How to test assertions.
Join the team on Slack at: https://slack.empirehacking.nyc/ #ethereum
Targeted contract
We will test the following contract, token.sol:
pragma solidity ^0.8.0;
contract Ownable {
address public owner = msg.sender;
function transferOwnership(address newOwner) public onlyOwner {
owner = newOwner;
}
modifier onlyOwner() {
require(msg.sender == owner, "Ownable: Caller is not the owner.");
_;
}
}
contract Pausable is Ownable {
bool private _paused;
function paused() public view returns (bool) {
return _paused;
}
function pause() public onlyOwner {
_paused = true;
}
function resume() public onlyOwner {
_paused = false;
}
modifier whenNotPaused() {
require(!_paused, "Pausable: Contract is paused.");
_;
}
}
contract Token is Ownable, Pausable {
mapping(address => uint256) public balances;
function transfer(address to, uint256 value) public virtual whenNotPaused {
// unchecked to save gas
unchecked {
balances[msg.sender] -= value;
balances[to] += value;
}
}
}
Exercise
Goals
Add assertions to ensure that after calling transfer:
msg.sendermust have its initial balance or less.tomust have its initial balance or more.
Once Echidna finds the bug, fix the issue, and re-try your assertion with Echidna.
This exercise is similar to the first one, but it uses assertions instead of explicit properties.
The skeleton for this exercise is (template.sol):
pragma solidity ^0.8.0;
import "./token.sol";
/// @dev Run the template with
/// ```
/// solc-select use 0.8.0
/// echidna program-analysis/echidna/exercises/exercise4/template.sol --contract TestToken --test-mode assertion
/// ```
/// or by providing a config
/// ```
/// echidna program-analysis/echidna/exercises/exercise4/template.sol --contract TestToken --config program-analysis/echidna/exercises/exercise4/config.yaml
/// ```
contract TestToken is Token {
function transfer(address to, uint256 value) public {
// TODO: include `assert(condition)` statements that
// detect a breaking invariant on a transfer.
// Hint: you may use the following to wrap the original function.
super.transfer(to, value);
}
}
Solution
This solution can be found in solution.sol
Exercise 5
Table of contents:
Join the team on Slack at: https://slack.empirehacking.nyc/ #ethereum
Setup
- Clone the repo:
git clone https://github.com/crytic/damn-vulnerable-defi-echidna - Install the dependencies by running
yarn install.
Context
The challenge is described here: https://www.damnvulnerabledefi.xyz/challenges/2.html. It is assumed that the reader is familiar with the challenge.
Goals
- Set up the testing environment with the correct contracts and necessary balances.
- Analyze the "before" function in test/naive-receiver/naive-receiver.challenge.js to identify the required initial setup.
- Add a property to check if the balance of the
FlashLoanReceivercontract can change. - Create a
config.yamlwith the necessary configuration option(s). - Once Echidna finds the bug, fix the issue and re-test your property with Echidna.
The following contracts are relevant:
contracts/naive-receiver/FlashLoanReceiver.solcontracts/naive-receiver/NaiveReceiverLenderPool.sol
Hints
It is recommended to first attempt without reading the hints. The hints can be found in the hints branch.
- Remember that you might need to supply the test contract with Ether. Read more in the Echidna wiki and check the default config setup.
- The invariant to look for is that "the balance of the receiver contract cannot decrease."
- Learn about the allContracts optio.
- A template is provided in contracts/naive-receiver/NaiveReceiverEchidna.sol.
- A config file is provided in naivereceiver.yaml.
Solution
The solution can be found in the solutions branch.
Solution Explained (spoilers ahead)
The goal of the naive receiver challenge is to realize that any user can request a flash loan for FlashLoanReceiver, even if the user has no Ether.
Echidna discovers this by calling NaiveReceiverLenderPool.flashLoan() with the address of FlashLoanReceiver and any arbitrary amount.
See the example output from Echidna below:
echidna . --contract NaiveReceiverEchidna --config naivereceiver.yaml
...
echidna_test_contract_balance: failed!💥
Call sequence:
flashLoan(0x62d69f6867a0a084c6d313943dc22023bc263691,353073667)
...
Exercise 6
Table of Contents:
Join the team on Slack at: https://slack.empirehacking.nyc/ #ethereum
Setup
- Clone the repository:
git clone https://github.com/crytic/damn-vulnerable-defi-echidna - Install the dependencies with
yarn install.
Context
The challenge is described here: https://www.damnvulnerabledefi.xyz/challenges/1.html. We assume that the reader is familiar with it.
Goals
- Set up the testing environment with the appropriate contracts and necessary balances.
- Analyze the "before" function in
test/unstoppable/unstoppable.challenge.jsto identify the initial setup required. - Add a property to check whether
UnstoppableLendercan always provide flash loans. - Create a
config.yamlfile with the required configuration option(s). - Once Echidna finds the bug, fix the issue, and retry your property with Echidna.
Only the following contracts are relevant:
contracts/DamnValuableToken.solcontracts/unstoppable/UnstoppableLender.solcontracts/unstoppable/ReceiverUnstoppable.sol
Hints
We recommend trying without reading the following hints first. The hints are in the hints branch.
- The invariant we are looking for is "Flash loans can always be made".
- Read what the allContracts option is.
- The
receiveTokenscallback function must be implemented. - A template is provided in contracts/unstoppable/UnstoppableEchidna.sol.
- A configuration file is provided in unstoppable.yaml.
Solution
This solution can be found in the solutions branch.
Solution Explained (spoilers ahead)
Note: Please ensure that you have placed solution.sol (or UnstoppableEchidna.sol) in contracts/unstoppable.
The goal of the unstoppable challenge is to recognize that UnstoppableLender has two modes of tracking its balance: poolBalance and damnValuableToken.balanceOf(address(this)).
poolBalance is increased when someone calls depositTokens().
However, a user can call damnValuableToken.transfer() directly and increase the balanceOf(address(this)) without increasing poolBalance.
Now, the two balance trackers are out of sync.
When Echidna calls pool.flashLoan(10), the assertion assert(poolBalance == balanceBefore) in UnstoppableLender will fail, and the pool can no longer provide flash loans.
See the example output below from Echidna:
echidna . --contract UnstoppableEchidna --config unstoppable.yaml
...
echidna_testFlashLoan: failed!💥
Call sequence:
transfer(0x62d69f6867a0a084c6d313943dc22023bc263691,1296000)
...
Exercise 7
Table of Contents:
Join the team on Slack at: https://slack.empirehacking.nyc/ #ethereum
Setup
- Clone the repository:
git clone https://github.com/crytic/damn-vulnerable-defi-echidna - Install the dependencies via
yarn install.
Context
The challenge is described here: https://www.damnvulnerabledefi.xyz/challenges/4.html. We assume that the reader is familiar with it.
Goals
- Set up the testing environment with appropriate contracts and necessary balances.
- Analyze the
beforefunction intest/side-entrance/side-entrance.challenge.jsto determine the initial setup requirements. - Add a property to check if the balance of the
SideEntranceLenderPoolcontract has changed. - Create a
config.yamlwith the required configuration option(s). - After Echidna discovers the bug, fix the issue and test your property with Echidna again.
Only the following contracts are relevant:
contracts/side-entrance/SideEntranceLenderPool.sol
Hints
We recommend trying without reading the following hints first. The hints are in the hints branch.
- The invariant you are looking for is "the balance of the pool contract cannot change."
- To become familiar with the workings of the target contract, try manually executing a flash loan.
- Read about the allContracts option.
- A template is provided in contracts/side-entrance/SideEntranceEchidna.sol.
- A config file is provided in side-entrance.yaml.
Solution
This solution can be found in the solutions branch.
Solution Explained (spoilers ahead)
The goal of the side entrance challenge is to realize that the contract's ETH balance accounting is misconfigured. The balanceBefore variable tracks the contract's balance before the flash loan, while address(this).balance tracks the balance after the flash loan. As a result, you can use the deposit function to repay your flash loan while maintaining the notion that the contract's total ETH balance hasn't changed (i.e., address(this).balance >= balanceBefore). However, since you now own the deposited ETH, you can also withdraw it and drain all the funds from the contract.
For Echidna to interact with the SideEntranceLenderPool, it must be deployed first. Deploying and funding the pool from the Echidna property testing contract won't work, as the funding transaction's msg.sender will be the contract itself. This means that the Echidna contract will own the funds, allowing it to remove them by calling withdraw() without exploiting the vulnerability.
To avoid the above issue, create a simple factory contract that deploys the pool without setting the Echidna property testing contract as the owner of the funds. This factory will have a public function that deploys a SideEntranceLenderPool, funds it with the given amount, and returns its address. Since the Echidna testing contract does not own the funds, it cannot call withdraw() to empty the pool.
With the challenge properly set up, instruct Echidna to execute a flash loan. By using the setEnableWithdraw and setEnableDeposit, Echidna will search for functions to call within the flash loan callback to attempt to break the testPoolBalance property.
Echidna will eventually discover that if (1) deposit is used to repay the flash loan and (2) withdraw is called immediately afterward, the testPoolBalance property fails.
Example Echidna output:
echidna . --contract EchidnaSideEntranceLenderPool --config config.yaml
...
testPoolBalance(): failed!💥
Call sequence:
execute() Value: 0x103
setEnableDeposit(true,256)
flashLoan(1)
setEnableWithdraw(true)
setEnableDeposit(false,0)
execute()
testPoolBalance()
...
Exercise 8
Table of Contents:
Join the team on Slack at: https://slack.empirehacking.nyc/ #ethereum
Setup
- Clone the repo:
git clone https://github.com/crytic/damn-vulnerable-defi-echidna. - Install the dependencies via
yarn install.
Context
The challenge is described here: https://www.damnvulnerabledefi.xyz/challenges/5.html. We assume that the reader is familiar with it.
Goals
- Set up the testing environment with the right contracts and necessary balances.
- Analyze the before function in
test/the-rewarder/the-rewarder.challenge.jsto identify what initial setup needs to be done. - Add a property to check whether the attacker can get almost the entire reward (let us say more than 99 %) from the
TheRewarderPoolcontract. - Create a
config.yamlwith the necessary configuration option(s). - Once Echidna finds the bug, you will need to apply a completely different reward logic to fix the issue, as the current solution is a rather naive implementation.
Only the following contracts are relevant:
contracts/the-rewarder/TheRewarderPool.solcontracts/the-rewarder/FlashLoanerPool.sol
Hints
We recommend trying without reading the following hints first. The hints are in the hints branch.
- The invariant you are looking for is "an attacker cannot get almost the entire amount of rewards."
- Read about the allContracts option.
- A config file is provided in the-rewarder.yaml.
Solution
This solution can be found in the solutions branch.
Solution Explained (spoilers ahead)
The goal of the rewarder challenge is to realize that an arbitrary user can request a flash loan from the FlashLoanerPool and borrow the entire amount of Damn Valuable Tokens (DVT) available. Next, this amount of DVT can be deposited into TheRewarderPool. By doing this, the user affects the total proportion of tokens deposited in TheRewarderPool (and thus gets most of the percentage of deposited assets in that particular time on their side). Furthermore, if the user schedules this at the right time (once REWARDS_ROUND_MIN_DURATION is reached), a snapshot of users' deposits is taken. The user then immediately repays the loan (i.e., in the same transaction) and receives almost the entire reward in return.
In fact, this can be done even if the arbitrary user has no DVT.
Echidna reveals this vulnerability by finding the right order of two functions: simply calling (1) TheRewarderPool.deposit() (with prior approval) and (2) TheRewarderPool.withdraw() with the max amount of DVT borrowed through the flash loan in both mentioned functions.
See the example output below from Echidna:
echidna . --contract EchidnaRewarder --config ./the-rewarder.yaml
...
testRewards(): failed!💥
Call sequence:
*wait* Time delay: 441523 seconds Block delay: 9454
setEnableDeposit(true) from: 0x0000000000000000000000000000000000030000
setEnableWithdrawal(true) from: 0x0000000000000000000000000000000000030000
flashLoan(39652220640884191256808) from: 0x0000000000000000000000000000000000030000
testRewards() from: 0x0000000000000000000000000000000000030000
...
![]()
medusa is a cross-platform go-ethereum-based smart contract fuzzer inspired by Echidna. It provides parallelized fuzz
testing of smart contracts through CLI, or its Go API that allows custom user-extended testing methodology.
Table of Contents
- Getting Started: Learn how to install
medusaand how to set it up for your first project. - Project Configuration: Learn how to set up
medusafor your project as well as the vast number of configuration options that can be set up based on your project needs. - Command Line Interface: Learn how to use
medusa's CLI. - Writing Tests: Learn how to write tests with
medusa - API (WIP): Learn about
medusa's Go API that can be used to perform advanced testing methodologies and extendmedusa's capabilities. - Appendices
- Cheatcodes: Learn about the various cheatcodes that are supported by
medusa. - Console Logging: Learn about how to use
console.logwithmedusa. - FAQ
- Cheatcodes: Learn about the various cheatcodes that are supported by
Installation
There are six main ways to install medusa:
- Using Go Install
- Using Homebrew
- Using Nix
- Using Docker
- Building from source
- Using Precompiled binaries
If you have any difficulty with installing medusa, please open an issue on GitHub.
Installing with Go Install
Prerequisites
You need to have Go installed (version 1.20 or later). Installation instructions for Go can be found here.
Install medusa
Run the following command to install the latest version of medusa:
go install github.com/crytic/medusa@latest
This will download, compile, and install the medusa binary to your $GOPATH/bin directory. Make sure this directory is in your PATH environment variable.
Installing with Homebrew
Note that using Homebrew is only viable (and recommended) for macOS and Linux users. For Windows users, you must use one of the other installation methods.
Prerequisites
Installation instructions for Homebrew can be found here.
Install medusa
Run the following command to install the latest stable release of medusa:
brew install medusa
To install the latest development version:
brew install --HEAD medusa
Installing with Nix
Prerequisites
Make sure nix is installed and that nix-command and flake features are enabled. The Determinate Systems nix-installer will automatically enable these features and is the recommended approach. If nix is already installed without these features enabled, run the following commands:
mkdir -p ~/.config/nix
echo 'experimental-features = nix-command flakes' > ~/.config/nix/nix.conf
Build medusa
To build medusa with nix:
# Clone the repository if you haven't already
git clone https://github.com/crytic/medusa
cd medusa
# Build medusa
nix build
The resulting binary can be found at ./result/bin/medusa.
Install medusa
After building, you can add the build result to your PATH using nix profiles by running the following command:
nix profile install ./result
Installing with Docker
Prerequisites
You need to have Docker installed. Installation instructions for Docker can be found here.
Using the Docker image
Pull the latest Docker image:
docker pull crytic/medusa
Run medusa in a container:
docker run -it --rm -v $(pwd):/src crytic/medusa <command>
This will mount your current directory to /src in the container and run the specified medusa command.
Building from source
Prerequisites
Before building medusa from source, you will need:
- Go (version 1.20 or later) - Installation instructions
crytic-compile- Installation instructions- Note that
crytic-compilerequires a Python environment - Python installation instructions
- Note that
slither(Optional) - For improved valuegeneration we recommend also installing Slither
Build medusa
Run the following commands to build medusa (this should work on all OSes):
# Clone the repository
git clone https://github.com/crytic/medusa
# Build medusa
cd medusa
go build -trimpath
You will now need to move the binary (medusa or medusa.exe) to somewhere in your PATH environment variable so that
it is accessible via the command line. Please review the instructions
here (if you are a Windows user, we
recommend using the Windows GUI).
Precompiled binaries
The precompiled binaries can be downloaded on medusa's GitHub releases page.
NOTE: macOS may set the quarantine extended attribute on the downloaded zip file. To remove this attribute, run the following command:
sudo xattr -rd com.apple.quarantine <my_file.tar.gz>.
Once downloaded, you will need to unzip the file and move the binary to somewhere in your $PATH. Please review the instructions
here (if you are a Windows user, we
recommend using the Windows GUI).
First Steps
After installation, you are ready to use medusa on your first codebase. This chapter will walk you through initializing
medusa for a project and then starting to fuzz.
To initialize medusa for a project, cd into your project and run medusa init:
# Change working directory
cd my_project
# Initialize medusa
medusa init
This will create a medusa.json file which holds a large number of configuration options.
medusa will use this configuration file to determine how and what to fuzz.
All there is left to do now is to run medusa on some fuzz tests:
medusa fuzz --target-contracts "TestContract" --test-limit 10_000
The --target-contracts flag tells medusa which contracts to run fuzz tests on. You can specify more than one
contract to fuzz test at once (e.g. --target-contracts "TestContract, TestOtherContract"). The --test-limit flag
tells medusa to execute 10_000 transactions before stopping the fuzzing campaign.
Note: The target contracts and the test limit can also be configured via the project configuration file, which is the recommended route. The
--target-contractsflag is equivalent to thefuzzing.targetContractsconfiguration option and the-test-limitflag is equivalent to thefuzzing.testLimitconfiguration option.
It is recommended to review the Configuration Overview next and learn more about
medusa's CLI.
Configuration Overview
medusa's project configuration provides extensive and granular control over the execution of the fuzzer. The project
configuration is a .json file that is broken down into five core components.
- Fuzzing Configuration: The fuzzing configuration dictates the parameters with which the fuzzer will execute.
- Testing Configuration: The testing configuration dictates how and what
medusashould fuzz test. - Chain Configuration: The chain configuration dictates how
medusa's underlying blockchain should be configured. - Compilation Configuration: The compilation configuration dictates how to compile the fuzzing target.
- Slither Configuration: The Slither configuration dictates whether Slither should be used in
medusaand whether the results from Slither should be cached. - Logging Configuration: The logging configuration dictates when and where to log events.
To generate a project configuration file, run medusa init.
You can also view this example project configuration file for visualization.
Recommended Configuration
A common issue that first-time users face is identifying which configuration options to change. medusa provides an
incredible level of flexibility on how the fuzzer should run but this comes with a tradeoff of understanding the nuances
of what configuration options control what feature. Outlined below is a list of configuration options that we recommend
you become familiar with and change before starting to fuzz test.
Note: Having an example project configuration file open will aid in visualizing which configuration options to change.
fuzzing.targetContracts
Updating this configuration option is required! The targetContracts configuration option tells medusa which contracts
to fuzz test. You can specify one or more contracts for this option which is why it accepts an array
of strings. Let's say you have a fuzz testing contract called TestStakingContract that you want to test.
Then, you would set the value of targetContracts to ["TestStakingContract"].
You can learn more about this option here.
fuzzing.testLimit
Updating test limit is optional but recommended. Test limit determines how many transactions medusa will execute before
stopping the fuzzing campaign. By default, the testLimit is set to 0. This means that medusa will run indefinitely.
While you iterate over your fuzz tests, it is beneficial to have a non-zero value. Thus, it is recommended to update this
value to 10_000 or 100_000 depending on the use case. You can learn more about this option here.
fuzzing.corpusDirectory
Updating the corpus directory is optional but recommended. The corpus directory determines where corpus items should be
stored on disk. A corpus item is a sequence of transactions that increased medusa's coverage of the system. Thus, these
corpus items are valuable to store so that they can be re-used for the next fuzzing campaign. Additionally, the directory
will also hold coverage reports which is a valuable tool for debugging and validation. For most cases, you may set
corpusDirectory's value to "corpus". This will create a corpus/ directory in the same directory as the medusa.json
file.
You can learn more about this option here.
Fuzzing Configuration
The fuzzing configuration defines the parameters for the fuzzing campaign.
workers
- Type: Integer
- Description: The number of worker threads to parallelize fuzzing operations on.
- Default: 10 workers
workerResetLimit
- Type: Integer
- Description: The number of call sequences a worker should process on its underlying chain before being fully reset,
freeing memory. After resetting, the worker will be re-created and continue processing of call sequences.
🚩 This setting, along with
workersinfluence the speed and memory consumption of the fuzzer. Setting this value higher will result in greater memory consumption per worker. Setting it too high will result in the in-memory chain's database growing to a size that is slower to process. Setting it too low may result in frequent worker resets that are computationally expensive for complex contract deployments that need to be replayed during worker reconstruction. - Default: 50 sequences
timeout
- Type: Integer
- Description: The number of seconds before the fuzzing campaign should be terminated. If a zero value is provided, the timeout will not be enforced. The timeout begins after compilation succeeds and the fuzzing campaign has started.
- Default: 0 seconds
testLimit
- Type: Integer
- Description: The number of function calls to make before the fuzzing campaign should be terminated. If a zero value is provided, no test limit will be enforced.
- Default: 0 calls
shrinkLimit
- Type: Integer
- Description: The number of iterations that shrinking will run for before returning the shrunken call sequence.
- Default: 5000 iterations
callSequenceLength
- Type: Integer
- Description: The maximum number of function calls to generate in a single call sequence in the attempt to violate
properties. After every
callSequenceLengthfunction calls, the blockchain is reset for the next sequence of transactions. - Default: 100 calls/sequence
coverageEnabled
- Type: Boolean
- Description: Whether coverage-increasing call sequences should be saved for the fuzzer to mutate/re-use. Enabling coverage allows for improved code exploration.
- Default:
true
corpusDirectory
- Type: String
- Description: The file path where the corpus should be saved. The corpus collects sequences during a fuzzing campaign
that help drive fuzzer features (e.g. a call sequence that increases code coverage is stored in the corpus). These sequences
can then be re-used/mutated by the fuzzer during the next fuzzing campaign. Note that if the
corpusDirectoryis left as an empty string (which it is by default), no corpus will be loaded from disk and stored to disk. - Default: ""
coverageFormats
- Type: [String] (e.g.
["lcov"]) - Description: The coverage reports to generate after the fuzzing campaign has
completed. The coverage reports are saved in the
coveragedirectory withincrytic-export/(by default) orcorpusDirectoryif configured. - Default:
["lcov", "html"]
revertReporterEnabled
- Type: Boolean
- Description: Enables or disables revert reports. Revert reports are saved in the
coveragedirectory withincrytic-export/(by default) orcorpusDirectoryif configured. - Default:
false
targetContracts
- Type: [String] (e.g.
[FirstContract, SecondContract, ThirdContract]) - Description: The list of contracts that will be deployed on the blockchain and then targeted for fuzzing by
medusa. For single-contract compilations, this value can be left as[]. This, however, is rare since most projects are multi-contract compilations.🚩 Note that the order specified in the array is the order in which the contracts are deployed to the blockchain. Thus, if you have a
corpusDirectoryset up, and you change the order of the contracts in the array, the corpus may no longer work since the contract addresses of the target contracts will change. This may render the entire corpus useless. - Default:
[]
predeployedContracts
- Type:
{"contractName": "contractAddress"}(e.g.{"TestContract": "0x1234"}) - Description: This configuration parameter allows you to deterministically deploy contracts at predefined addresses.
🚩 Predeployed contracts do not accept constructor arguments. This may be added in the future.
- Default:
{}
targetContractsBalances
- Type: [Base-10 Strings, Hexadecimal Strings, Scientific notation for base-10 values] (e.g.
["1234", "0x1234", "1.2e18"]) - Description: The starting balance for each contract in
targetContracts. If theconstructorfor a target contract is markedpayable, this configuration option can be used to send ether during contract deployment. Note that this array has a one-to-one mapping totargetContracts. Thus, iftargetContractsis[A, B, C]andtargetContractsBalancesis["1234", "0x1234", "1.2e18"], thenAwill have a starting balance of1,234 wei,Bwill have4,660 wei (0x1234 in decimal), andCwill have1.2 ETH (1.2 × 10^18 wei). - Default:
[]
constructorArgs
- Type:
{"contractName": {"variableName": _value}} - Description: If a contract in the
targetContractshas aconstructorthat takes in variables, these can be specified here. An example can be found here. - Default:
{}
deployerAddress
- Type: Address
- Description: The address used to deploy contracts on startup, represented as a hex string.
🚩 Changing this address may render entries in the corpus invalid since the addresses of the target contracts will change.
- Default:
0x30000
senderAddresses
- Type: [Address]
- Description: Defines the account addresses used to send function calls to deployed contracts in the fuzzing campaign.
🚩 Changing these addresses may render entries in the corpus invalid since the sender(s) of corpus transactions may no longer be valid.
- Default:
[0x10000, 0x20000, 0x30000]
blockNumberDelayMax
- Type: Integer
- Description: Defines the maximum block number jump the fuzzer should make between test transactions. The fuzzer
will use this value to make the next block's
block.numberbetween[1, blockNumberDelayMax]more than that of the previous block. Jumpingblock.numberallowsmedusato enter code paths that require a given number of blocks to pass. - Default:
60_480
blockTimestampDelayMax
- Type: Integer
- Description: The number of the maximum block timestamp jump the fuzzer should make between test transactions.
The fuzzer will use this value to make the next block's
block.timestampbetween[1, blockTimestampDelayMax]more than that of the previous block. Jumpingblock.timestamptime allowsmedusato enter code paths that require a given amount of time to pass. - Default:
604_800
blockGasLimit
- Type: Integer
- Description: The maximum amount of gas a block's transactions can use in total (thus defining max transactions per block).
🚩 It is advised not to change this naively, as a minimum must be set for the chain to operate.
- Default:
125_000_000
transactionGasLimit
- Type: Integer
- Description: Defines the amount of gas sent with each fuzzer-generated transaction.
🚩 It is advised not to change this naively, as a minimum must be set for the chain to operate.
- Default:
12_500_000
Using constructorArgs
There might be use cases where contracts in targetContracts have constructors that accept arguments. The constructorArgs
configuration option allows you to specify those arguments. constructorArgs is a nested dictionary that maps
contract name -> variable name -> variable value. Let's look at an example below:
// This contract is used to test deployment of contracts with constructor arguments.
contract TestContract {
struct Abc {
uint a;
bytes b;
}
uint x;
bytes2 y;
Abc z;
constructor(uint _x, bytes2 _y, Abc memory _z) {
x = _x;
y = _y;
z = _z;
}
}
contract DependentOnTestContract {
address deployed;
constructor(address _deployed) {
deployed = _deployed;
}
}
In the example above, we have two contracts TestContract and DependentOnTestContract. You will note that
DependentOnTestContract requires the deployment of TestContract first so that it can accept the address of where
TestContract was deployed. On the other hand, TestContract requires _x, _y, and _z. Here is what the
constructorArgs value would look like for the above deployment:
Note: The example below has removed all the other project configuration options outside of
targetContractsandconstructorArgs
{
"fuzzing": {
"targetContracts": ["TestContract", "DependentOnTestContract"],
"constructorArgs": {
"TestContract": {
"_x": "123456789",
"_y": "0x5465",
"_z": {
"a": "0x4d2",
"b": "0x54657374206465706c6f796d656e74207769746820617267756d656e7473"
}
},
"DependentOnTestContract": {
"_deployed": "DeployedContract:TestContract"
}
}
}
}
First, let us look at targetContracts. As mentioned in the documentation for targetContracts,
the order of the contracts in the array determine the order of deployment. This means that TestContract will be
deployed first, which is what we want.
Now, let us look at constructorArgs. TestContract's dictionary specifies the exact name of the constructor argument
(e.g. _x or _y) with their associated value. Since _z is of type TestContract.Abc, _z is also a dictionary
that specifies each field in the TestContract.Abc struct.
For DependentOnTestContract, the _deployed key has
a value of DeployedContract:TestContract. This tells medusa to look for a deployed contract that has the name
TestContract and provide its address as the value for _deployed. Thus, whenever you need a deployed contract's
address as an argument for another contract, you must follow the format DeployedContract:<ContractName>.
Testing Configuration
The testing configuration can be broken down into a few subcomponents:
- High-level configuration: Configures global testing parameters, regardless of the type of testing.
- Assertion testing configuration: Configures what kind of EVM panics should be treated as a failing fuzz test.
- Property testing configuration: Configures what kind of function signatures should be treated as property tests.
- Optimization testing configuration: Configures what kind of function signatures should be treated as optimization tests.
We will go over each subcomponent one-by-one:
High-level Configuration
stopOnFailedTest
- Type: Boolean
- Description: Determines whether the fuzzer should stop execution after the first failed test. If
false,medusawill continue fuzzing until either thetestLimitis hit, thetimeoutis hit, or the user manually stops execution. - Default:
true
stopOnFailedContractMatching
- Type: Boolean
- Description: Determines whether the fuzzer should stop execution if it is unable to match the bytecode of a dynamically
deployed contract. A dynamically deployed contract is one that is created during the fuzzing campaign
(versus one that is specified in the
fuzzing.targetContracts). Here is an example of a dynamically deployed contract:
contract MyContract {
OtherContract otherContract;
constructor() {
// This is a dynamically deployed contract
otherContract = new otherContract();
}
}
- Default:
false
stopOnNoTests
- Type: Boolean
- Description: Determines whether the fuzzer should stop execution if no tests are found
(property tests, assertion tests, optimization tests, or custom API-level tests). If
falseand no tests are found,medusawill continue fuzzing until either thetestLimitis hit, thetimeoutis hit, or the user manually stops execution. - Default:
true
testViewMethods
- Type: Boolean
- Description: Whether
pure/viewfunctions should be called and tested. - Default:
true
testAllContracts
- Type: Boolean
- Description: Determines whether all contracts should be tested (including dynamically deployed ones), rather than
just the contracts specified in the project configuration's
fuzzing.targetContracts. - Default:
false
verbosity:
- Type: Enum (VerbosityLevel)
- Description: Controls the level of detail in execution traces:
- Verbose (0): Only shows top-level transactions in the execution trace. Only events in the top-level call frame and return data are included.
- VeryVerbose (1): Shows nested calls with standard detail (default behavior).
- VeryVeryVerbose (2): Shows all call sequence elements with maximum detail, attaching traces to every call in the sequence.
- CLI flags: Use
-v,-vv, or-vvvto set verbosity levels 0, 1, or 2 respectively. - Default:
VeryVerbose (1)
targetFunctionSignatures:
- Type: [String]
- Description: A list of function signatures that the fuzzer should exclusively target by omitting calls to other signatures. The signatures should specify the contract name and signature in the ABI format like
Contract.func(uint256,bytes32).Note: Property and optimization tests will always be called even if they are not explicitly specified in this list.
- Default:
[]
excludeFunctionSignatures:
- Type: [String]
- Description: A list of function signatures that the fuzzer should exclude from the fuzzing campaign. The signatures should specify the contract name and signature in the ABI format like
Contract.func(uint256,bytes32).Note: Property and optimization tests will always be called and cannot be excluded.
- Default:
[]
Assertion Testing Configuration
enabled
- Type: Boolean
- Description: Enable or disable assertion testing
- Default:
true
panicCodeConfig
- Type: Struct
- Description: This struct describes the various types of EVM-level panics that should be considered a "failing case".
By default, only an
assert(false)is considered a failing case. However, these configuration options would allow a user to treat arithmetic overflows or division by zero as failing cases as well.
failOnAssertion
- Type: Boolean
- Description: Triggering an assertion failure (e.g.
assert(false)) should be treated as a failing case. - Default:
true
failOnCompilerInsertedPanic
- Type: Boolean
- Description: Triggering a compiler-inserted panic should be treated as a failing case.
- Default:
false
failOnArithmeticUnderflow
- Type: Boolean
- Description: Arithmetic underflow or overflow should be treated as a failing case
- Default:
false
failOnDivideByZero
- Type: Boolean
- Description: Dividing by zero should be treated as a failing case
- Default:
false
failOnEnumTypeConversionOutOfBounds
- Type: Boolean
- Description: An out-of-bounds enum access should be treated as a failing case
- Default:
false
failOnIncorrectStorageAccess
- Type: Boolean
- Description: An out-of-bounds storage access should be treated as a failing case
- Default:
false
failOnPopEmptyArray
- Type: Boolean
- Description: A
pop()operation on an empty array should be treated as a failing case - Default:
false
failOnOutOfBoundsArrayAccess
- Type: Boolean
- Description: An out-of-bounds array access should be treated as a failing case
- Default:
false
failOnAllocateTooMuchMemory
- Type: Boolean
- Description: Overallocation/excessive memory usage should be treated as a failing case
- Default:
false
failOnCallUninitializedVariable
- Type: Boolean
- Description: Calling an uninitialized variable should be treated as a failing case
- Default:
false
Property Testing Configuration
enabled
- Type: Boolean
- Description: Enable or disable property testing.
- Default:
true
testPrefixes
- Type: [String]
- Description: The list of prefixes that the fuzzer will use to determine whether a given function is a property test or not.
For example, if
property_is a test prefix, then any function name in the formproperty_*may be a property test.Note: If you are moving over from Echidna, you can add
echidna_as a test prefix to quickly port over the property tests from it. - Default:
[property_]
Optimization Testing Configuration
enabled
- Type: Boolean
- Description: Enable or disable optimization testing.
- Default:
true
testPrefixes
- Type: [String]
- Description: The list of prefixes that the fuzzer will use to determine whether a given function is an optimization
test or not. For example, if
optimize_is a test prefix, then any function name in the formoptimize_*may be a property test. - Default:
[optimize_]
Chain Configuration
The chain configuration defines the parameters for setting up medusa's underlying blockchain.
codeSizeCheckDisabled
- Type: Boolean
- Description: If
true, the maximum code size check of 24576 bytes ingo-ethereumis disabled.🚩 Setting
codeSizeCheckDisabledtofalseis not recommended since it complicates the fuzz testing process. - Default:
true
skipAccountChecks
- Type: Boolean
- Description: If
true, account-related checks (nonce validation, transaction origin must be an EOA) are disabled ingo-ethereum.🚩 Setting
codeSizeCheckDisabledtofalseis not recommended since it complicates the fuzz testing process. - Default:
true
Cheatcode Configuration
cheatCodesEnabled
- Type: Boolean
- Description: Determines whether cheatcodes are enabled.
- Default:
true
enableFFI
- Type: Boolean
- Description: Determines whether the
fficheatcode is enabled.🚩 Enabling the
fficheatcode may allow for arbitrary code execution on your machine. - Default:
false
Fork Configuration
forkModeEnabled
- Type: Boolean
- Description: Determines whether fork mode is enabled
- Default:
false
rpcUrl
- Type: String
- Description: Determines the RPC URL that will be queried during fork mode.
- Default: ""
rpcBlock
- Type: Integer
- Description: Determines the block height that fork state will be queried for. Block tags like
LATESTare not supported yet. - Default:
1
poolSize
- Type: Integer
- Description: Determines the size of the client pool used to query the RPC. It is recommended to use a pool size
- that is 2-3x the number of workers used, but smaller pools may be required to avoid exceeding external RPC query limits.
- Default:
20
Compilation Configuration
The compilation configuration defines the parameters to use while compiling a target file or project.
platform
- Type: String
- Description: Refers to the type of platform to be used to compile the underlying target. Currently,
crytic-compileorsolccan be used as the compilation platform. - Default:
crytic-compile
platformConfig
- Type: Struct
- Description: This struct is a platform-dependent structure which offers parameters for compiling the underlying project.
See below for the structure of
platformConfigfor each compilation platform. - Default: The
platformConfigforcrytic-compileis the default value for this struct.
platformConfig for crytic-compile
target
- Type: String
- Description: Refers to the target that is being compiled.
🚩 Note that if you are using a compilation platform, such as Foundry or Hardhat, the default value for
target,., should not be changed. The.is equivalent to tellingcrytic-compilethat the entire project needs to compiled, including any dependencies and remappings. In fact, unless you want to compile a single file, that has no third-party imports from, for example, OpenZeppelin, the default value should not be changed. - Default:
.
solcVersion
- Type: String
- Description: Describes the version of
solcthat will be installed and then used for compilation. Note that if you are using a compilation platform, such as Foundry or Hardhat, this option does not need to be set. - Default: ""
exportDirectory
- Type: String
- Description: Describes the directory where all compilation artifacts should be stored after compilation. Leaving it
empty will lead to the compilation artifacts being stored in
crytic-export/. - Default: ""
args
- Type: [String]
- Description: Refers to any additional args that one may want to provide to
crytic-compile. Runcrytic-compile --helpto view all of its supported flags. For example, if you would like to specify--compile-force-framework foundry, theargsvalue will be"args": ["--compile-force-framework", "foundry"].🚩 The
--export-formatand--export-dirare already used during compilation withcrytic-compile. Re-using these flags inargswill cause the compilation to fail. - Default:
[]
platformConfig for solc
target
- Type: String
- Description: Refers to the target that is being compiled. The target must be a single
.solfile.
Slither Configuration
The Slither configuration defines the parameters for using Slither in medusa.
Currently, we use Slither to extract interesting constants from the target system. These constants are then used in the
fuzzing process to try to increase coverage. Note that if Slither fails to run for some reason, we will still try our
best to mine constants from each contract's AST so don't worry!
-
🚩 We highly recommend using Slither and caching the results. Basically, don't change this configuration unless absolutely necessary. The constants identified by Slither are shown to greatly improve system coverage and caching the results will improve the speed of medusa.
useSlither
- Type: Boolean
- Description: If
true, Slither will be run on the target system and useful constants will be extracted for fuzzing. IfcachePathis a non-empty string (which it is by default), thenmedusawill first check the cache before running Slither. - Default:
true
cachePath
- Type: String
- Description: If
cachePathis non-empty, Slither's results will be cached on disk. Whenmedusais re-run, these cached results will be used. We do this for performance reasons since re-running Slither each timemedusais restarted is computationally intensive for complex projects. We recommend disabling caching (by makingcachePathan empty string) if the target codebase changes. If the code remains constant during the fuzzing campaign, we recommend to use the cache. - Default:
slither_results.json
args
- Type: [String]
- Description: Refers to any additional args that one may want to provide to Slither. Run
slither --helpto view all of its supported flags. For example, if you would like to specify--foundry-out-directory out, theargsvalue will be"args": ["--foundry-out-directory", "out"].🚩 The
--ignore-compile,--print, and--jsonare already used during compilation with Slither. Re-using these flags inargswill cause the compilation to fail. - Default:
[]
Logging Configuration
The logging configuration defines the parameters for logging to console and/or file.
level
- Type: String
- Description: The log level will determine which logs are emitted or discarded. If
levelis "info" then all logs with informational level or higher will be logged. The supported values forlevelare "trace", "debug", "info", "warn", "error", and "panic". - Default: "info"
logDirectory
- Type: String
- Description: Describes what directory log files should be outputted. Have a non-empty
logDirectoryvalue will enable "file logging" which will result in logs to be output to both console and file. Note that the directory path is relative to the directory containing the project configuration file. - Default: ""
noColor
- Type: Boolean
- Description: Disables colored output to console.
- Default:
false
CLI Overview
The medusa CLI is used to perform parallelized fuzz testing of smart contracts. After you have medusa
installed, you can run medusa help in your terminal to view the available commands.
The CLI supports three main commands with each command having a variety of flags:
init
The init command will generate the project configuration file within your current working directory:
medusa init [platform] [flags]
By default, the project configuration file will be named medusa.json. You can learn more about medusa's project
configuration here and also view an example project configuration file.
Invoking this command without a platform argument will result in medusa using crytic-compile as the default compilation platform.
Currently, the only other supported platform is solc. If you are using a compilation platform such as Foundry or Hardhat,
it is best to use crytic-compile.
Supported Flags
--out
The --out flag allows you to specify the output path for the project configuration file. Thus, you can name the file
something different from medusa.json or have the configuration file be placed elsewhere in your filesystem.
# Set config file path
medusa init --out myConfig.json
--compilation-target
The --compilation-target flag allows you to specify the compilation target. If you are using crytic-compile, please review the
warning here about changing the compilation target.
# Set compilation target
medusa init --compilation-target TestMyContract.sol
fuzz
The fuzz command will initiate a fuzzing campaign:
medusa fuzz [flags]
Supported Flags
--config
The --config flag allows you to specify the path for your project configuration
file. If the --config flag is not used, medusa will look for a medusa.json file in the
current working directory.
# Set config file path
medusa fuzz --config myConfig.json
--compilation-target
The --compilation-target flag allows you to specify the compilation target. If you are using crytic-compile, please review the
warning here about changing the compilation target.
# Set compilation target
medusa fuzz --compilation-target TestMyContract.sol
--workers
The --workers flag allows you to update the number of threads that will perform parallelized fuzzing (equivalent to
fuzzing.workers)
# Set workers
medusa fuzz --workers 20
--timeout
The --timeout flag allows you to update the duration of the fuzzing campaign (equivalent to
fuzzing.timeout)
# Set timeout
medusa fuzz --timeout 100
--test-limit
The --test-limit flag allows you to update the number of transactions to run before stopping the fuzzing campaign
(equivalent to fuzzing.testLimit)
# Set test limit
medusa fuzz --test-limit 100000
--seq-len
The --seq-len flag allows you to update the length of a call sequence (equivalent to
fuzzing.callSequenceLength)
# Set sequence length
medusa fuzz --seq-len 50
--target-contracts
The --target-contracts flag allows you to update the target contracts for fuzzing (equivalent to
fuzzing.targetContracts)
# Set target contracts
medusa fuzz --target-contracts "TestMyContract, TestMyOtherContract"
--corpus-dir
The --corpus-dir flag allows you to set the path for the corpus directory (equivalent to
fuzzing.corpusDirectory)
# Set corpus directory
medusa fuzz --corpus-dir corpus
--senders
The --senders flag allows you to update medusa's senders (equivalent to
fuzzing.senderAddresses)
# Set sender addresses
medusa fuzz --senders "0x50000,0x60000,0x70000"
--deployer
The --deployer flag allows you to update medusa's contract deployer (equivalent to
fuzzing.deployerAddress)
# Set deployer address
medusa fuzz --deployer "0x40000"
--use-slither
The --use-slither flag allows you to run Slither on the codebase to extract valuable constants for mutation testing.
Equivalent to slither.useSlither. Note
that if there are cached results (via slither.CachePath) then
the cache will be used.
# Run slither and attempt to use cache, if available
medusa fuzz --use-slither
--use-slither-force
The --use-slither-force flag is similar to --use-slither except the cache at slither.CachePath will be
overwritten.
# Run slither and overwrite the cache
medusa fuzz --use-slither-force
--fail-fast
The --fail-fast flag enables fast failure (equivalent to
testing.StopOnFailedTest)
# Enable fast failure
medusa fuzz --fail-fast
-v, -vv, -vvv
The verbosity flags control the level of detail shown in execution traces (equivalent to testing.verbosity):
-v: Shows only top-level transactions in the execution trace. Only events in the top-level call frame and return data are included (Verbose level).-vv: Shows nested calls with standard detail - this is the default behavior (VeryVerbose level).-vvv: Shows all call sequence elements with maximum detail, attaching traces to every call in the sequence (VeryVeryVerbose level).
# Set verbosity to top-level only
medusa fuzz -v
# Set verbosity to nested calls (default)
medusa fuzz -vv
# Set verbosity to maximum detail
medusa fuzz -vvv
--no-color
The --no-color flag disables colored console output (equivalent to
logging.NoColor)
# Disable colored output
medusa fuzz --no-color
--explore
The --explore flag enables exploration mode. This sets the StopOnFailedTest and StopOnNoTests
fields to false and turns off assertion, property, and optimization testing.
# Enable exploration mode
medusa fuzz --explore
completion
medusa provides the ability to generate autocompletion scripts for a given shell.
Once the autocompletion script is ran for a given shell, medusa's commands and flags can be tab-autocompleted.
The following shells are supported:
bashzshPowershell
To understand how to run the autocompletion script for a given shell, run the following command:
medusa completion --help
Once you know how to run the autocompletion script, retrieve the script for that given shell using the following command:
medusa completion <shell>
Testing Overview
This chapter discusses the overarching goal of smart contract fuzzing.
Traditional fuzz testing (e.g. with AFL) aims to generally explore a binary by providing
random inputs in an effort to identify new system states or crash the program (please note that this is a pretty crude generalization).
This model, however, does not translate to the smart contract ecosystem since you cannot cause a smart contract to "crash".
A transaction that reverts, for example, is not equivalent to a binary crashing or panicking.
Thus, with smart contracts, we have to change the fuzzing paradigm. When you hear of "fuzzing smart contracts", you are not trying to crash the program but, instead, you are trying to validate the invariants of the program.
Definition: An invariant is a property that remains unchanged after one or more operations are applied to it.
More generally, an invariant is a "truth" about some system. For smart contracts, this can take many faces.
- Mathematical invariants:
a + b = b + a. The commutative property is an invariant and any Solidity math library should uphold this property. - ERC20 tokens: The sum of all user balances should never exceed the total supply of the token.
- Automated market maker (e.g. Uniswap):
xy = k. The constant-product formula is an invariant that maintains the economic guarantees of AMMs such as Uniswap.
Definition: Smart contract fuzzing uses random sequences of transactions to test the invariants of the smart contract system.
Before we explore how to identify, write, and test invariants, it is beneficial to understand how smart contract fuzzing works under-the-hood.
The Fuzzing Lifecycle
Understanding what medusa is doing under-the-hood significantly aids in understanding how to fuzz smart contracts
and also in writing fuzz tests. This chapter will walk you through the process of deploying the target contracts,
generating and executing call sequences, using the corpus, updating coverage, and resetting the blockchain.
Contract deployment
The contract deployment process will deploy each contract specified in the
fuzzing.targetContracts one-by-one. Any contracts that
are dynamically deployed during the construction of a target contract are also deployed. The deployment of these
contracts are done by the configurable
fuzzing.deployerAddress address.
We will call the state of the blockchain after all the target contracts are deployed as the "initial deployment state".
This is the state of the blockchain before any transactions have been executed by the fuzzer. Here is what the underlying
blockchain would look like after the deployment of contracts A, B, C (assuming no other dynamic deployments).
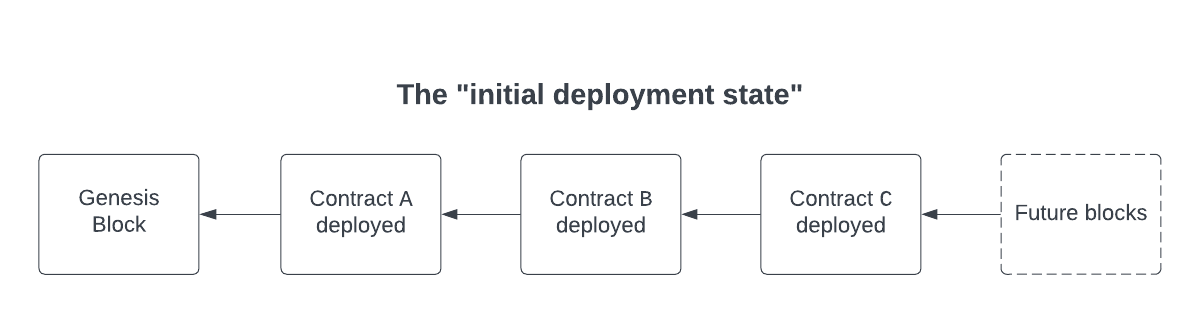
Now that we have our target contracts deployed, we can start executing call sequences!
Call sequence execution
Call sequence execution is the crux of the fuzzing lifecycle. At a high-level, call sequence execution is the iterative process of executing fuzzed transactions on the initial deployment state in hopes of violating (or validating) an invariant. Before continuing, it is important to understand what a call sequence is.
Defining a call sequence
A call sequence is an array of individual transactions. The length of the array is governed by the
fuzzing.callSequenceLength configuration parameter.
The fuzzer will maintain EVM state for the duration of a call sequence before resetting the state.
Thus, if you have a call sequence length of 10, medusa will execute 10 transactions, maintain state throughout that
process, and then wipe the EVM state. Having a call sequence length of 1 means that medusa will wipe the state after
each transaction. This is useful for fuzz testing arithmetic libraries or isolated functions.
Now that you know what a call sequence is, let's discuss how to generate a call sequence.
Generating a call sequence
Call sequence generation can happen in two main ways:
- Generate a completely random call sequence
- Mutate an existing call sequence from the corpus
Let's talk about each possibility. Generating a completely random call sequence is straightforward. If we have a
fuzzing.callSequenceLength of 50, we will generate 50 random transactions.
Definition: A random transaction is a call to a random method in one of the target contracts. Any input arguments to the method are fuzzed values.
The second possibility is more nuanced. To understand how to mutate an existing call sequence from the corpus, we need to first discuss the idea of coverage and what a corpus is.
Coverage and the corpus
Tracking coverage is one of the most powerful features of medusa.
Definition: Coverage is a measure of what parts of the code have been executed by the fuzzer
Coverage is tracked in a rather simple fashion. For each target contract, we maintain a byte array where the length of the byte array is equal to the length of that contract's bytecode. If a certain transaction caused us to execute an opcode that we had not executed before, we increased coverage of that contract.
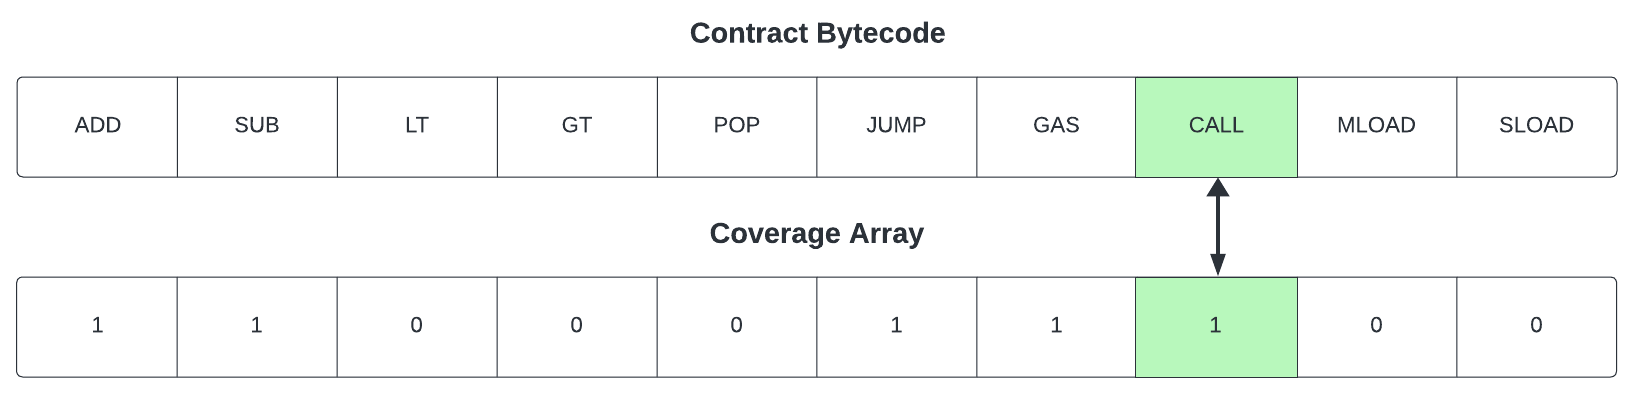
As shown in the figure above, the CALL opcode was just executed causing the coverage array's value to be updated at that
index. The next natural question is, how do we harness this information to improve the fuzzer?
This is where the idea of a corpus comes in.
Definition: The corpus is a structure that holds "interesting" or "coverage-increasing" call sequences.
Thus, when medusa runs, if it finds a call sequence that increased its coverage of the system, it will add it to the corpus.
These call sequences are invaluable to medusa because they allowed it to explore a larger portion of the system. This is
what makes medusa a coverage-guided fuzzer.
Definition: A coverage-guided fuzzer is one that aims to maximize its coverage of the system.
Tracking coverage and storing coverage-increasing sequences in the corpus also allows medusa to re-use these sequences.
This takes us back to the second possibility when generating call sequences: mutating an existing sequence from the corpus.
The reason we re-use call sequences is that we know that the call sequence in question improved our coverage. So, we
might as well re-use it, mutate it, and then execute that mutated call sequence in hopes of further increasing our coverage.
There are a variety of mutational strategies that medusa employs. For example, medusa can take a call sequence from the corpus and append a new random
transaction at the end of it. This is called mutational fuzzing.
Definition: Mutational fuzzing is the practice of taking existing data samples and generating new variants of them (mutants).
Now that we know what a call sequence is, how to generate them, and how to track coverage, we can finally discuss how these call sequences are executed.
Executing the call sequence
Call sequence execution happens in an iterative fashion. Here is some pseudocode on how it happens:
# Generate a new call sequence or mutate one from the corpus
sequence = generator.NewCallSequence()
# Iteratively execute each call in the call sequence
for i < len(sequence) {
# Retrieve the i-th element in the sequence
tx = sequence[i]
# Run the transaction on the blockchain and retrieve the result
result = blockchain.executeTransaction(tx)
# Update coverage
increasedCoverage = coverageTracker.updateCoverage()
# If coverage increased, add sequence[:i+1] to the corpus
if increasedCoveraged {
corpus.addCallSequence(tx[:i+1])
}
# Check for invariant failures
encounteredFailure = tester.checkForInvariantFailures(result)
# Let user know we had a failing test case
if encounteredFailure {
reportFailedTestCase()
}
}
The one portion of the above pseudocode that we did not discuss is checking for invariant failures. We will discuss the different types of invariants and what an invariant failure means in the next chapter.
Resetting the blockchain
The final step in the fuzzing lifecycle is resetting the blockchain. Resetting the blockchain is as simple as reverting to the "initial deployment state" of the blockchain. Once we reset back to the "initial deployment state", we can now generate and execute another call sequence!
Types of Invariants
As discussed in the testing overview chapter, invariants describe the "truths" of your system. These are unchanging properties that arise from the design of a codebase.
Note: We will interchange the use of the word property and invariant often. For all intents and purposes, they mean the same thing.
Defining and testing your invariants is critical to assessing the expected system behavior.
We like to break down invariants into two general categories: function-level invariants and system-level invariants. Note that there are other ways of defining and scoping invariants, but this distinction is generally sufficient to start fuzz testing even the most complex systems.
Function-level invariants
A function-level invariant can be defined as follows:
Definition: A function-level invariant is a property that arises from the execution of a specific function.
Let's take the following function from a smart contract:
function deposit() public payable {
// Make sure that the total deposited amount does not exceed the limit
uint256 amount = msg.value;
require(totalDeposited + amount <= MAX_DEPOSIT_AMOUNT);
// Update the user balance and total deposited
balances[msg.sender] += amount;
totalDeposited += amount;
emit Deposit(msg.sender, amount, totalDeposited);
}
The deposit function has the following function-level invariants:
- The ETH balance of
msg.sendermust decrease byamount. - The ETH of
address(this)must increase byamount. balances[msg.sender]should increase byamount.- The
totalDepositedvalue should increase byamount.
Note that there other properties that can also be tested for but the above should highlight what a function-level
invariant is. In general, function-level invariants can be identified by assessing what must be true before the execution
of a function and what must be true after the execution of that same function. In the next chapter, we will write a
fuzz test to test the deposit function and how to use medusa to run that test.
Let's now look at system-level invariants.
System-level invariants
A system-level invariant can be defined as follows:
Definition: A system-level invariant is a property that holds true across the entire execution of a system
Thus, a system-level invariant is a lot more generalized than a function-level invariant. Here are two common examples of a function-level invariant:
- The
xy=kconstant product formula should always hold for Uniswap pools - No user's balance should ever exceed the total supply for an ERC20 token.
In the deposit function above, we also see the presence of a system-level invariant:
The totalDeposited amount should always be less than or equal to the MAX_DEPOSIT_AMOUNT.
Since the totalDeposited value can be affected by the presence of other functions in the system
(e.g. withdraw or stake), it is best tested at the system level instead of the function level. We will look at how
to write system-level invariants in the Writing System-Level Invariants chapter.
Writing Function-Level Invariants
This chapter will walk you through writing function-level fuzz tests for the deposit function that we saw in the previous chapter.
Before we write the fuzz tests, let's look into how we would write a unit test for the deposit function:
function testDeposit() public {
// The amount of tokens to deposit
uint256 amount = 10 ether;
// Retrieve balance of user before deposit
preBalance = depositContract.balances(address(this));
// Call the deposit contract (let's assume this contract has 10 ether)
depositContract.deposit{value: amount}();
// Assert post-conditions
assert(depositContract.balances(msg.sender) == preBalance + amount);
// Add other assertions here
}
What we will notice about the test above is that it fixes the value that is being sent. It is unable to test how the
deposit function behaves across a variety of input spaces. Thus, a function-level fuzz test can be thought of as a
"unit test on steroids". Instead of fixing the amount, we let the fuzzer control the amount value to any number between
[0, type(uint256).max] and see how the system behaves to that.
Note: One of the core differences between a traditional unit test versus a fuzz test is that a fuzz test accepts input arguments that the fuzzer can control.
Writing a Fuzz Test for the deposit Function
Here is what a fuzz test for the deposit function would look like:
function testDeposit(uint256 _amount) public {
// Let's bound the input to be _at most_ the ETH balance of this contract
// The amount value will now in between [0, address(this).balance]
uint256 amount = clampLte(_amount, address(this).balance);
// Retrieve balance of user before deposit
uint256 preBalance = depositContract.balances(address(this));
// Call the deposit contract with a variable amount
depositContract.deposit{value: _amount}();
// Assert post-conditions
assert(depositContract.balances(address(this)) == preBalance + amount);
// Add other assertions here
}
Notice that we bounded the _amount variable to be less than or equal to the test contract's ETH balance.
This type of bounding is very common when writing fuzz tests. Bounding allows you to only test values that are reasonable.
If address(this) doesn't have enough ETH, it does not make sense to try and call the deposit function. Additionally,
although we only tested one of the function-level invariants from the previous chapter, writing the remaining
would follow a similar pattern as the one written above.
Running a function-level test with medusa
Let's now run the above example with medusa. Here is the test code:
contract DepositContract {
// @notice MAX_DEPOSIT_AMOUNT is the maximum amount that can be deposited into this contract
uint256 public constant MAX_DEPOSIT_AMOUNT = 1_000_000e18;
// @notice balances holds user balances
mapping(address => uint256) public balances;
// @notice totalDeposited represents the current deposited amount across all users
uint256 public totalDeposited;
// @notice Deposit event is emitted after a deposit occurs
event Deposit(address depositor, uint256 amount, uint256 totalDeposited);
// @notice deposit allows user to deposit into the system
function deposit() public payable {
// Make sure that the total deposited amount does not exceed the limit
uint256 amount = msg.value;
require(totalDeposited + amount <= MAX_DEPOSIT_AMOUNT);
// Update the user balance and total deposited
balances[msg.sender] += amount;
totalDeposited += amount;
emit Deposit(msg.sender, amount, totalDeposited);
}
}
contract TestDepositContract {
// @notice depositContract is an instance of DepositContract
DepositContract depositContract;
constructor() payable {
// Deploy the deposit contract
depositContract = new DepositContract();
}
// @notice testDeposit tests the DepositContract.deposit function
function testDeposit(uint256 _amount) public {
// Let's bound the input to be _at most_ the ETH balance of this contract
// The amount value will now in between [0, address(this).balance]
uint256 amount = clampLte(_amount, address(this).balance);
// Retrieve balance of user before deposit
uint256 preBalance = depositContract.balances(address(this));
// Call the deposit contract with a variable amount
depositContract.deposit{value: _amount}();
// Assert post-conditions
assert(depositContract.balances(address(this)) == preBalance + amount);
// Add other assertions here
}
// @notice clampLte returns a value between [a, b]
function clampLte(uint256 a, uint256 b) internal returns (uint256) {
if (!(a <= b)) {
uint256 value = a % (b + 1);
return value;
}
return a;
}
}
To run this test contract, download the project configuration file here,
rename it to medusa.json, and run:
medusa fuzz --config medusa.json
The following changes were made to the default project configuration file to allow this test to run:
fuzzing.targetContracts: Thefuzzing.targetContractsvalue was updated to["TestDepositContract"].fuzzing.targetContractsBalances: Thefuzzing.targetContractsBalanceswas updated to["21267647932558653966460912964485513215"]to allow theTestDepositContractcontract to have an ETH balance allowing the fuzzer to correctly deposit funds into theDepositContract.fuzzing.testLimit: Thefuzzing.testLimitwas set to1_000to shorten the duration of the fuzzing campign.fuzzing.callSequenceLength: Thefuzzing.callSequenceLengthwas set to1so that theTestDepositContractcan be reset with its full ETH balance after each transaction.
Writing System-Level Invariants with Medusa
WIP
Medusa Reports
Medusa provides two types of reports to help you analyze the results of your fuzzing campaigns:
- Coverage Reports: Show which parts of your contracts were executed during fuzzing
- Revert Reports: Help you understand which functions are reverting and why (experimental)
Coverage Reports
Coverage reports help you understand which parts of your contract code have been executed during fuzzing. This is valuable for:
- Identifying code paths that haven't been tested
- Focusing your fuzzing efforts on uncovered areas
- Measuring the effectiveness of your fuzzing campaign
Medusa supports two types of coverage report formats:
HTML Coverage Reports
HTML reports provide a visual representation of code coverage with highlighted source code. This is the most user-friendly format for quickly understanding coverage.
LCOV Coverage Reports
LCOV reports are machine-readable and useful for integrating with other tools or continuous integration systems.
Enabling Coverage Reports
Enable coverage reporting by setting the corpusDirectory and coverageReports options in your configuration file:
{
"corpusDirectory": "corpus",
"coverageReports": ["lcov", "html"]
}
If a corpusDirectory is not provided, the report(s) will be saved at crytic-export/coverage.
Viewing HTML Coverage Reports
The HTML report is automatically generated at corpus/coverage/coverage_report.html. Open this file in any web browser to view your coverage.
Using LCOV Reports
LCOV files can be used with various tools:
Generate HTML from LCOV
First, install the LCOV tools:
Linux:
apt-get install lcov
MacOS:
brew install lcov
Then generate HTML from the LCOV data:
genhtml corpus/coverage/lcov.info --output-dir corpus --rc derive_function_end_line=0
🚩WARNING The
derive_function_end_lineflag is required to prevent thegenhtmltool from crashing when processing Solidity source code.
Open the corpus/index.html file in your browser to view the report.
View Coverage in VSCode
- Install the Coverage Gutters extension
- Right-click in a project file and select
Coverage Gutters: Display Coverage
Revert Reports
Revert reports are an experimental feature that helps you understand which functions in your contract frequently revert during fuzzing and why. This is particularly useful for:
- Debugging your fuzzing harness
- Identifying input validation issues
- Understanding constraints that are limiting your fuzzer's exploration
- Improving your test cases and assertions
Enabling Revert Reports
To enable revert reports, you need to set the revertReporterEnabled parameter to true in your configuration file:
{
"fuzzing": {
"revertReporterEnabled": true,
"corpusDirectory": "corpus"
}
}
If a corpusDirectory is not provided, the reports will be saved at crytic-export/coverage.
Viewing Revert Reports
Two report files are generated:
corpus/coverage/revert_report.html- HTML visualization of revert metricscorpus/coverage/revert_report.json- Machine-readable JSON format
The HTML report provides detailed statistics on:
- Which functions revert most frequently
- Common revert reasons for each function
- Comparison with previous fuzzing runs (when available)
Benefits of Revert Reports
Revert reports are especially helpful during the early stages of fuzzing development:
- Harness Development: Identify issues in your fuzzing setup that prevent effective testing
- Input Improvement: Determine which inputs cause frequent reverts and refine your value generation
- Contract Constraints: Understand logical constraints in your contract that may be limiting fuzzing effectiveness
API Overview (WIP)
medusa offers a lower level API to hook into various parts of the fuzzer, its workers, and underlying chains. Although assertion and property testing are two built-in testing providers, they are implemented using events and hooks offered throughout the Fuzzer, FuzzerWorker(s), and underlying TestChain. These same hooks can be used by external developers wishing to implement their own custom testing methodology. In the sections below, we explore some of the relevant components throughout medusa, their events/hooks, an example of creating custom testing methodology with it.
Component overview
A rudimentary description of the objects/providers and their roles are explained below.
Data types
-
ProjectConfig: This defines the configuration for the Fuzzer, including the targets to compile, deploy, and how to fuzz or test them. -
ValueSet: This is an object that acts as a dictionary of values, used in mutation operations. It is populated at compilation time with some rudimentary static analysis. -
Contract: Can be thought of as a "contract definition", it is a data type which stores the name of the contract, and a reference to the underlyingCompiledContract, a definition derived from compilation, containing the bytecode, source maps, ABI, etc. -
CallSequence: This represents a list ofCallSequenceElements, which define a transaction to send, the suggested block number and timestamp delay to use, and stores a reference to the block/transaction/results when it is executed (for later querying in tests). They are used to generate and execute transaction sequences in the fuzzer. -
CoverageMapsdefine a list ofCoverageMapobjects, which record all instruction offsets executed for a given contract address and code hash. -
TestCasedefines the interface for a test that theFuzzerwill track. It simply defines a name, ID, status (not started, running, passed, failed) and message for theFuzzer.
Providers
-
ValueGenerator: This is an object that provides methods to generate values of different kinds for transactions. Examples include theRandomValueGeneratorand supercedingMutationalValueGenerator. They are provided aValueSetby their worker, which they may use in generation operations. -
TestChain: This is a fake chain that operates on fake block structures created for the purpose of testing. Rather than operating ontypes.Transaction(which requires signing), it operates oncore.Messages, which are derived from transactions and simply allow you to set thesenderfield. It is responsible for:- Maintaining state of the chain (blocks, transactions in them, results/receipts)
- Providing methods to create blocks, add transactions to them, commit them to chain, revert to previous block numbers.
- Allowing spoofing of block number and timestamp (committing block number 1, then 50, jumping 49 blocks ahead), while simulating the existence of intermediate blocks.
- Provides methods to add tracers such as
evm.Logger(standard go-ethereum tracers) or extend them with an additional interface (TestChainTracer) to also store any captured traced information in the execution results. This allows you to trace EVM execution for certain conditions, store results, and query them at a later time for testing.
-
Fuzzer: This is the main provider for the fuzzing process. It takes aProjectConfigand is responsible for:- Housing data shared between the
FuzzerWorkers such as contract definitions, aValueSetderived from compilation to use in value generation, the reference toCorpus, theCoverageMapsrepresenting all coverage achieved, as well as maintainingTestCases registered to it and printing their results. - Compiling the targets defined by the project config and setting up state.
- Provides methods to start/stop the fuzzing process, add additional compilation targets, access the initial value set prior to fuzzing start, access corpus, config, register new test cases and report them finished.
- Starts the fuzzing process by creating a "base"
TestChain, deploys compiled contracts, replays all corpus sequences to measure existing coverage from previous fuzzing campaign, then spawns as manyFuzzerWorkers as configured on their own goroutines ("threads") and passes them the "base"TestChain(which they clone) to begin the fuzzing operation.- Respawns
FuzzerWorkers when they hit a config-defined reset limit for the amount of transaction sequences they should process before destroying themselves and freeing memory. - Maintains the context for when fuzzing should stop, which all workers track.
- Respawns
- Housing data shared between the
-
FuzzerWorker: This describes an object spawned by theFuzzerwith a given "base"TestChainwith target contracts already deployed, ready to be fuzzed. It clones this chain, then is called upon to begin creating fuzz transactions. It is responsible for:- Maintaining a reference to the parent
Fuzzerfor any shared information between it and other workers (Corpus, totalCoverageMaps, contract definitions to match deployment's bytecode, etc) - Maintaining its own
TestChainto run fuzzed transaction sequences. - Maintaining its own
ValueSetwhich derives from theFuzzer'sValueSet(populated by compilation or user-provided values through API), as eachFuzzerWorkermay populate itsValueSetwith different runtime values depending on their own chain state. - Spawning a
ValueGeneratorwhich uses theValueSet, to generate values used to construct fuzzed transaction sequences. - Most importantly, it continuously:
- Generates
CallSequences (a series of transactions), plays them on itsTestChain, records the results of in eachCallSequenceElement, and calls abstract/hookable "test functions" to indicate they should perform post-tx tests (for which they can return requests for a shrunk test sequence). - Updates the total
CoverageMapsandCorpuswith the currentCallSequenceif the most recent call increased coverage. - Processes any shrink requests from the previous step (shrink requests can define arbitrary criteria for shrinking).
- Generates
- Eventually, hits the config-defined reset limit for how many sequences it should process, and destroys itself to free all memory, expecting the
Fuzzerto respawn another in its place.
- Maintaining a reference to the parent
Creating a project configuration
medusa is config-driven. To begin a fuzzing campaign on an API level, you must first define a project configuration so the fuzzer knows what contracts to compile, deploy, and how it should operate.
When using medusa over command-line, it operates a project config similarly (see docs or example). Similarly, interfacing with a Fuzzer requires a ProjectConfig object. After importing medusa into your Go project, you can create one like this:
// Initialize a default project config with using crytic-compile as a compilation platform, and set the target it should compile.
projectConfig := config.GetDefaultProjectConfig("crytic-compile")
err := projectConfig.Compilation.SetTarget("contract.sol")
if err != nil {
return err
}
// You can edit any of the values as you please.
projectConfig.Fuzzing.Workers = 20
projectConfig.Fuzzing.DeploymentOrder = []string{"TestContract1", "TestContract2"}
You may also instantiate the whole config in-line with all the fields you'd like, setting the underlying platform config yourself.
NOTE: The
CompilationConfigandPlatformConfigWILL BE deprecated and replaced with something more intuitive in the future, as thecompilationpackage has not been updated since the project's inception, prior to the release of generics in go 1.18.
Creating and starting the fuzzer
After you have created a ProjectConfig, you can create a new Fuzzer with it, and tell it to start:
// Create our fuzzer
fuzzer, err := fuzzing.NewFuzzer(*projectConfig)
if err != nil {
return err
}
// Start the fuzzer
err = fuzzer.Start()
if err != nil {
return err
}
// Fetch test cases results
testCases := fuzzer.TestCases()
[...]
Note:
Fuzzer.Start()is a blocking operation. If you wish to stop, you must define a TestLimit or Timeout in your config. Otherwise start it on another goroutine and callFuzzer.Stop()to stop it.
Events/Hooks
Events
Now it may be the case that you wish to hook the Fuzzer, FuzzerWorker, or TestChain to provide your own functionality. You can add your own testing methodology, and even power it with your own low-level EVM execution tracers to store and query results about each call.
There are a few events/hooks that may be useful off the bat:
The Fuzzer maintains event emitters for the following events under Fuzzer.Events.*:
-
FuzzerStartingEvent: Indicates aFuzzeris starting and provides a reference to it. -
FuzzerStoppingEvent: Indicates aFuzzerhas just stopped all workers and is about to print results and exit. -
FuzzerWorkerCreatedEvent: Indicates aFuzzerWorkerwas created by aFuzzer. It provides a reference to theFuzzerWorkerspawned. The parentFuzzercan be accessed throughFuzzerWorker.Fuzzer(). -
FuzzerWorkerDestroyedEvent: Indicates aFuzzerWorkerwas destroyed. This can happen either due to hitting the config-defined worker reset limit or the fuzzing operation stopping. It provides a reference to the destroyed worker (for reference, though this should not be stored, to allow memory to free).
The FuzzerWorker maintains event emiters for the following events under FuzzerWorker.Events.*:
-
FuzzerWorkerChainCreatedEvent: This indicates theFuzzerWorkeris about to begin working and has created its chain (but not yet copied data from the "base"TestChaintheFuzzerprovided). This offers an opportunity to attach tracers for calls made during chain setup. It provides a reference to theFuzzerWorkerand its underlyingTestChain. -
FuzzerWorkerChainSetupEvent: This indicates theFuzzerWorkeris about to begin working and has both created its chain, and copied data from the "base"TestChain, so the initial deployment of contracts is complete and fuzzing is ready to begin. It provides a reference to theFuzzerWorkerand its underlyingTestChain. -
CallSequenceTesting: This indicates a newCallSequenceis about to be generated and tested by theFuzzerWorker. It provides a reference to theFuzzerWorker. -
CallSequenceTested: This indicates aCallSequencewas just tested by theFuzzerWorker. It provides a reference to theFuzzerWorker. -
FuzzerWorkerContractAddedEvent: This indicates a contract was added on theFuzzerWorker's underlyingTestChain. This event is emitted when the contract byte code is resolved to aContractdefinition known by theFuzzer. It may be emitted due to a contract deployment, or the reverting of a block which caused a SELFDESTRUCT. It provides a reference to theFuzzerWorker, the deployed contract address, and theContractdefinition that it was matched to. -
FuzzerWorkerContractDeletedEvent: This indicates a contract was removed on theFuzzerWorker's underlyingTestChain. It may be emitted due to a contract deployment which was reverted, or a SELFDESTRUCT operation. It provides a reference to theFuzzerWorker, the deployed contract address, and theContractdefinition that it was matched to.
The TestChain maintains event emitters for the following events under TestChain.Events.*:
-
PendingBlockCreatedEvent: This indicates a new block is being created but has not yet been committed to the chain. The block is empty at this point but will likely be populated. It provides a reference to theBlockandTestChain. -
PendingBlockAddedTxEvent: This indicates a pending block which has not yet been commited to chain has added a transaction to it, as it is being constructed. It provides a reference to theBlock,TestChain, and index of the transaction in theBlock. -
PendingBlockCommittedEvent: This indicates a pending block was committed to chain as the new head. It provides a reference to theBlockandTestChain. -
PendingBlockDiscardedEvent: This indicates a pending block was not committed to chain and was instead discarded. -
BlocksRemovedEvent: This indicates blocks were removed from the chain. This happens when a chain revert to a previous block number is invoked. It provides a reference to theBlockandTestChain. -
ContractDeploymentsAddedEvent: This indicates a new contract deployment was detected on chain. It provides a reference to theTestChain, as well as information captured about the bytecode. This may be triggered on contract deployment, or the reverting of a SELFDESTRUCT operation. -
ContractDeploymentsRemovedEvent: This indicates a previously deployed contract deployment was removed from chain. It provides a reference to theTestChain, as well as information captured about the bytecode. This may be triggered on revert of a contract deployment, or a SELFDESTRUCT operation.
Hooks
The Fuzzer maintains hooks for some of its functionality under Fuzzer.Hooks.*:
-
NewValueGeneratorFunc: This method is used to create aValueGeneratorfor eachFuzzerWorker. By default, this uses aMutationalValueGeneratorconstructed with the providedValueSet. It can be replaced to provide a customValueGenerator. -
TestChainSetupFunc: This method is used to set up a chain's initial state before fuzzing. By default, this method deploys all contracts compiled and marked for deployment in theProjectConfigprovided to theFuzzer. It only deploys contracts if they have no constructor arguments. This can be replaced with your own method to do custom deployments.- Note: We do not recommend replacing this for now, as the
Contractdefinitions may not be known to theFuzzer. Additionally,SenderAddressesandDeployerAddressare the only addresses funded at genesis. This will be updated at a later time.
- Note: We do not recommend replacing this for now, as the
-
CallSequenceTestFuncs: This is a list of functions which are called after eachFuzzerWorkerexecuted another call in its currentCallSequence. It takes theFuzzerWorkerandCallSequenceas input, and is expected to return a list ofShinkRequests if some interesting result was found and we wish for theFuzzerWorkerto shrink the sequence. You can add a function here as part of custom post-call testing methodology to check if some property was violated, then request a shrunken sequence for it with arbitrary criteria to verify the shrunk sequence satisfies your requirements (e.g. violating the same property again).
Extending testing methodology
Although we will build out guidance on how you can solve different challenges or employ different tests with this lower level API, we intend to wrap some of this into a higher level API that allows testing complex post-call/event conditions with just a few lines of code externally. The lower level API will serve for more granular control across the system, and fine tuned optimizations.
To ensure testing methodology was agnostic and extensible in medusa, we note that both assertion and property testing is implemented through the abovementioned events and hooks. When a higher level API is introduced, we intend to migrate these test case providers to that API.
For now, the built-in AssertionTestCaseProvider (found here) and its test cases (found here) are an example of code that could exist externally outside of medusa, but plug into it to offer extended testing methodology. Although it makes use of some private variables, they can be replaced with public getter functions that are available. As such, if assertion testing didn't exist in medusa natively, you could've implemented it yourself externally!
In the end, using it would look something like this:
// Create our fuzzer
fuzzer, err := fuzzing.NewFuzzer(*projectConfig)
if err != nil {
return err
}
// Attach our custom test case provider
attachAssertionTestCaseProvider(fuzzer)
// Start the fuzzer
err = fuzzer.Start()
if err != nil {
return err
}
Cheatcodes Overview
Cheatcodes allow users to manipulate EVM state, blockchain behavior, provide easy ways to manipulate data, and much more.
The cheatcode contract is deployed at 0x7109709ECfa91a80626fF3989D68f67F5b1DD12D.
Cheatcode Interface
The following interface must be added to your Solidity project if you wish to use cheatcodes. Note that if you use Foundry as your compilation platform that the cheatcode interface is already provided here. However, it is important to note that medusa does not support all the cheatcodes provided out-of-box by Foundry (see below for supported cheatcodes).
interface StdCheats {
// Set block.timestamp
function warp(uint256) external;
// Set block.number
function roll(uint256) external;
// Set block.basefee
function fee(uint256) external;
// Set block.difficulty (deprecated in `medusa`)
function difficulty(uint256) external;
// Set block.prevrandao
function prevrandao(bytes32) external;
// Set block.chainid
function chainId(uint256) external;
// Sets the block.coinbase
function coinbase(address) external;
// Loads a storage slot from an address
function load(address account, bytes32 slot) external returns (bytes32);
// Stores a value to an address' storage slot
function store(address account, bytes32 slot, bytes32 value) external;
// Sets the *next* call's msg.sender to be the input address
function prank(address) external;
// Sets all subsequent call's msg.sender (until stopPrank is called) to be the input address
function startPrank(address) external;
// Stops a previously called startPrank
function stopPrank() external;
// Set msg.sender to the input address until the current call exits
function prankHere(address) external;
// Sets an address' balance
function deal(address who, uint256 newBalance) external;
// Sets an address' code
function etch(address who, bytes calldata code) external;
// Signs data
function sign(uint256 privateKey, bytes32 digest)
external
returns (uint8 v, bytes32 r, bytes32 s);
// Computes address for a given private key
function addr(uint256 privateKey) external returns (address);
// Gets the creation bytecode of a contract
function getCode(string calldata) external returns (bytes memory);
// Gets the nonce of an account
function getNonce(address account) external returns (uint64);
// Sets the nonce of an account
// The new nonce must be higher than the current nonce of the account
function setNonce(address account, uint64 nonce) external;
// Performs a foreign function call via terminal
function ffi(string[] calldata) external returns (bytes memory);
// Take a snapshot of the current state of the EVM
function snapshot() external returns (uint256);
// Revert state back to a snapshot
function revertTo(uint256) external returns (bool);
// Convert Solidity types to strings
function toString(address) external returns(string memory);
function toString(bytes calldata) external returns(string memory);
function toString(bytes32) external returns(string memory);
function toString(bool) external returns(string memory);
function toString(uint256) external returns(string memory);
function toString(int256) external returns(string memory);
// Convert strings into Solidity types
function parseBytes(string memory) external returns(bytes memory);
function parseBytes32(string memory) external returns(bytes32);
function parseAddress(string memory) external returns(address);
function parseUint(string memory)external returns(uint256);
function parseInt(string memory) external returns(int256);
function parseBool(string memory) external returns(bool);
}
Using cheatcodes
Below is an example snippet of how you would import the cheatcode interface into your project and use it.
// Assuming cheatcode interface is in the same directory
import "./IStdCheats.sol";
// MyContract will utilize the cheatcode interface
contract MyContract {
// Set up reference to cheatcode contract
IStdCheats cheats = IStdCheats(0x7109709ECfa91a80626fF3989D68f67F5b1DD12D);
// This is a test function that will set the msg.sender's nonce to the provided input argument
function testFunc(uint256 _x) public {
// Ensure that the input argument is greater than msg.sender's current nonce
require(_x > cheats.getNonce(msg.sender));
// Set sender's nonce
cheats.setNonce(msg.sender, x);
// Assert that the nonce has been correctly updated
assert(cheats.getNonce(msg.sender) == x);
}
}
warp
Description
The warp cheatcode sets the block.timestamp
Example
// Obtain our cheat code contract reference.
IStdCheats cheats = CheatCodes(0x7109709ECfa91a80626fF3989D68f67F5b1DD12D);
// Change value and verify.
cheats.warp(7);
assert(block.timestamp == 7);
cheats.warp(9);
assert(block.timestamp == 9);
Function Signature
function warp(uint256) external;
roll
Description
The roll cheatcode sets the block.number
Example
// Obtain our cheat code contract reference.
IStdCheats cheats = CheatCodes(0x7109709ECfa91a80626fF3989D68f67F5b1DD12D);
// Change value and verify.
cheats.roll(7);
assert(block.number == 7);
cheats.roll(9);
assert(block.number == 9);
Function Signature
function roll(uint256) external;
fee
Description
The fee cheatcode will set the block.basefee.
Example
// Obtain our cheat code contract reference.
IStdCheats cheats = CheatCodes(0x7109709ECfa91a80626fF3989D68f67F5b1DD12D);
// Change value and verify.
cheats.fee(7);
assert(block.basefee == 7);
Function Signature
function fee(uint256) external;
difficulty
Description
The difficulty cheatcode has been deprecated in medusa. Since medusa uses a post-Paris EVM version, the cheatcode
will not update the block.difficulty and instead calling it will be a no-op.
Function Signature
function difficulty(uint256) external;
prevrandao
Description
The prevrandao cheatcode updates the block.prevrandao.
Example
// Obtain our cheat code contract reference.
IStdCheats cheats = CheatCodes(0x7109709ECfa91a80626fF3989D68f67F5b1DD12D);
// Change value and verify.
cheats.prevrandao(bytes32(uint256(42)));
assert(block.prevrandao == 42);
Function Signature
function prevrandao(bytes32) external;
chainId
Description
The chainId cheatcode will set the block.chainid
Example
// Obtain our cheat code contract reference.
IStdCheats cheats = CheatCodes(0x7109709ECfa91a80626fF3989D68f67F5b1DD12D);
// Change value and verify.
cheats.chainId(777123);
assert(block.chainid == 777123);
Function Signature
function chainId(uint256) external;
store
Description
The store cheatcode will store value in storage slot slot for account
Example
contract TestContract {
uint x = 123;
function test() public {
// Obtain our cheat code contract reference.
IStdCheats cheats = CheatCodes(0x7109709ECfa91a80626fF3989D68f67F5b1DD12D);
// Store into x, verify it.
cheats.store(address(this), bytes32(uint(0)), bytes32(uint(456)));
assert(y == 456);
}
}
Function Signature
function store(address account, bytes32 slot, bytes32 value) external;
load
Description
The load cheatcode will load storage slot slot for account
Example
contract TestContract {
uint x = 123;
function test() public {
// Obtain our cheat code contract reference.
IStdCheats cheats = CheatCodes(0x7109709ECfa91a80626fF3989D68f67F5b1DD12D);
// Load and verify x
bytes32 value = cheats.load(address(this), bytes32(uint(0)));
assert(value == bytes32(uint(123)));
}
}
Function Signature
function load(address account, bytes32 slot) external returns (bytes32);
etch
Description
The etch cheatcode will set the who address's bytecode to code.
Example
// Obtain our cheat code contract reference.
IStdCheats cheats = CheatCodes(0x7109709ECfa91a80626fF3989D68f67F5b1DD12D);
// Obtain our original code hash for an account.
address acc = address(777);
bytes32 originalCodeHash;
assembly { originalCodeHash := extcodehash(acc) }
// Change value and verify.
cheats.etch(acc, address(someContract).code);
bytes32 updatedCodeHash;
assembly { updatedCodeHash := extcodehash(acc) }
assert(originalCodeHash != updatedCodeHash);
Function Signature
function etch(address who, bytes calldata code) external;
deal
Description
The deal cheatcode will set the ETH balance of address who to newBalance
Example
// Obtain our cheat code contract reference.
IStdCheats cheats = CheatCodes(0x7109709ECfa91a80626fF3989D68f67F5b1DD12D);
// Change value and verify.
address acc = address(777);
cheats.deal(acc, x);
assert(acc.balance == x);
Function Signature
function deal(address who, uint256 newBalance) external;
snapshot and revertTo
Description
The snapshot cheatcode will take a snapshot of the current state of the blockchain and return an identifier for the
snapshot.
On the flipside, the revertTo cheatcode will revert the EVM state back based on the provided identifier.
Example
interface CheatCodes {
function warp(uint256) external;
function deal(address, uint256) external;
function snapshot() external returns (uint256);
function revertTo(uint256) external returns (bool);
}
struct Storage {
uint slot0;
uint slot1;
}
contract TestContract {
Storage store;
uint256 timestamp;
function test() public {
// Obtain our cheat code contract reference.
CheatCodes cheats = CheatCodes(
0x7109709ECfa91a80626fF3989D68f67F5b1DD12D
);
store.slot0 = 10;
store.slot1 = 20;
timestamp = block.timestamp;
cheats.deal(address(this), 5 ether);
// Save state
uint256 snapshot = cheats.snapshot();
// Change state
store.slot0 = 300;
store.slot1 = 400;
cheats.deal(address(this), 500 ether);
cheats.warp(12345);
// Assert that state has been changed
assert(store.slot0 == 300);
assert(store.slot1 == 400);
assert(address(this).balance == 500 ether);
assert(block.timestamp == 12345);
// Revert to snapshot
cheats.revertTo(snapshot);
// Ensure state has been reset
assert(store.slot0 == 10);
assert(store.slot1 == 20);
assert(address(this).balance == 5 ether);
assert(block.timestamp == timestamp);
}
}
getCode
Description
The getCode cheatcode returns the creation bytecode for a contract in the project given the path to the contract.
Example
contract TestContract {
function test() public {
// Obtain cheat code contract reference
IStdCheats cheats = CheatCodes(0x7109709ECfa91a80626fF3989D68f67F5b1DD12D);
// Get the creation bytecode for a contract
bytes memory bytecode = cheats.getCode("MyContract.sol");
// Deploy the contract using the bytecode
address deployed;
assembly {
deployed := create(0, add(bytecode, 0x20), mload(bytecode))
}
// Verify the contract was deployed successfully
require(deployed != address(0), "Deployment failed");
}
}
Function Signature
function getCode(string calldata) external returns (bytes memory);
getNonce
Description
The getNonce cheatcode will get the current nonce of account.
Example
// Obtain our cheat code contract reference.
IStdCheats cheats = CheatCodes(0x7109709ECfa91a80626fF3989D68f67F5b1DD12D);
// Get nonce and verify that the sender has sent at least one transaction
address acc = address(msg.sender);
assert(cheats.getNonce(acc) > 0);
Function Signature
function getNonce(address account) external returns (uint64);
setNonce
Description
The setNonce cheatcode will set the nonce of account to nonce. Note that the nonce must be strictly greater than
the current nonce
Example
// Obtain our cheat code contract reference.
IStdCheats cheats = CheatCodes(0x7109709ECfa91a80626fF3989D68f67F5b1DD12D);
// Set nonce and verify (assume nonce before `setNonce` was less than 7)
address acc = address(msg.sender);
cheats.setNonce(acc, 7);
assert(cheats.getNonce(acc) == 7);
Function Signature
function setNonce(address account, uint64 nonce) external;
coinbase
Description
The coinbase cheatcode will set the block.coinbase
Example
// Obtain our cheat code contract reference.
IStdCheats cheats = CheatCodes(0x7109709ECfa91a80626fF3989D68f67F5b1DD12D);
// Change value and verify.
cheats.coinbase(address(7));
assert(block.coinbase == address(7));
Function Signature
function coinbase(address) external;
prank
Description
The prank cheatcode will set the msg.sender for only the next call to the specified input address. Note that,
contrary to prank in Foundry, calling the cheatcode contract will count as a
valid "next call"
Example
contract TestContract {
address owner = address(123);
function transferOwnership(address _newOwner) public {
require(msg.sender == owner);
// Change ownership
owner = _newOwner;
}
function test() public {
// Obtain our cheat code contract reference.
IStdCheats cheats = CheatCodes(0x7109709ECfa91a80626fF3989D68f67F5b1DD12D);
// Prank, change ownership, and verify
address newOwner = address(456);
cheats.prank(owner);
transferOwnership(newOwner);
assert(owner == newOwner);
}
}
Function Signature
function prank(address) external;
startPrank
Description
The startPrank cheatcode will set the msg.sender for all subsequent calls until stopPrank is called. This is in
contrast to prank where prank only applies to the next message call.
Example
contract TestContract {
address owner = address(123);
ImportantContract ic;
AnotherImportantContract aic;
function deployImportantContract() public {
require(msg.sender == owner);
// Deploy important contract
ic = new ImportantContract(msg.sender);
}
function deployAnotherImportantContract() public {
require(msg.sender == owner);
// Deploy important contract
ic = new AnotherImportantContract(msg.sender);
}
function test() public {
// Obtain our cheat code contract reference.
IStdCheats cheats = CheatCodes(0x7109709ECfa91a80626fF3989D68f67F5b1DD12D);
// Prank and deploy important contracts
cheats.startPrank(owner);
deployImportantContract();
deployAnotherImportantContract();
cheats.stopPrank();
assert(ic.owner() == owner);
assert(aic.owner() == owner);
}
}
Function Signature
function startPrank(address) external;
stopPrank
Description
Stops an active prank started by startPrank, resetting msg.sender
Function Signature
function stopPrank() external;
prankHere
Description
The prankHere cheatcode will set the msg.sender to the specified input address until the current call exits. Compared
to prank, prankHere can persist for multiple calls.
Example
contract TestContract {
address owner = address(123);
uint256 x = 0;
uint256 y = 0;
function updateX() public {
require(msg.sender == owner);
// Update x
x = 1;
}
function updateY() public {
require(msg.sender == owner);
// Update y
y = 1;
}
function test() public {
// Obtain our cheat code contract reference.
IStdCheats cheats = CheatCodes(0x7109709ECfa91a80626fF3989D68f67F5b1DD12D);
// Prank, update variables, and verify
cheats.prank(owner);
updateX();
updateY();
assert((x == 1) && (y == 1));
// Once this function returns, the `msg.sender` is reset
}
}
Function Signature
function prankHere(address) external;
ffi
Description
The ffi cheatcode is used to call an arbitrary command on your host OS. Note that ffi must be enabled via the project
configuration file by setting fuzzing.chainConfig.cheatCodes.enableFFI to true.
Note that enabling ffi allows anyone to execute arbitrary commands on devices that run the fuzz tests which may
become a security risk.
Please review Foundry's documentation on the ffi cheatcode for general tips.
Example with ABI-encoded hex
// Obtain our cheat code contract reference.
IStdCheats cheats = CheatCodes(0x7109709ECfa91a80626fF3989D68f67F5b1DD12D);
// Create command
string[] memory inputs = new string[](3);
inputs[0] = "echo";
inputs[1] = "-n";
// Encoded "hello"
inputs[2] = "0x0000000000000000000000000000000000000000000000000000000000000020000000000000000000000000000000000000000000000000000000000000000568656C6C6F000000000000000000000000000000000000000000000000000000";
// Call cheats.ffi
bytes memory res = cheats.ffi(inputs);
// ABI decode
string memory output = abi.decode(res, (string));
assert(keccak256(abi.encodePacked(output)) == keccak256(abi.encodePacked("hello")));
Example with UTF8 encoding
// Obtain our cheat code contract reference.
IStdCheats cheats = CheatCodes(0x7109709ECfa91a80626fF3989D68f67F5b1DD12D);
// Create command
string[] memory inputs = new string[](3);
inputs[0] = "echo";
inputs[1] = "-n";
inputs[2] = "hello";
// Call cheats.ffi
bytes memory res = cheats.ffi(inputs);
// Convert to UTF-8 string
string memory output = string(res);
assert(keccak256(abi.encodePacked(output)) == keccak256(abi.encodePacked("hello")));
Function Signature
function ffi(string[] calldata) external returns (bytes memory);
addr
Description
The addr cheatcode will compute the address for a given private key.
Example
// Obtain our cheat code contract reference.
IStdCheats cheats = CheatCodes(0x7109709ECfa91a80626fF3989D68f67F5b1DD12D);
// Test with random private key
uint256 pkOne = 0x6df21769a2082e03f7e21f6395561279e9a7feb846b2bf740798c794ad196e00;
address addrOne = 0xdf8Ef652AdE0FA4790843a726164df8cf8649339;
address result = cheats.addr(pkOne);
assert(result == addrOne);
Function Signature
function addr(uint256 privateKey) external returns (address);
sign
Description
The sign cheatcode will take in a private key privateKey and a hash digest digest to generate a (v, r, s)
signature
Example
// Obtain our cheat code contract reference.
IStdCheats cheats = CheatCodes(0x7109709ECfa91a80626fF3989D68f67F5b1DD12D);
bytes32 digest = keccak256("Data To Sign");
// Call cheats.sign
(uint8 v, bytes32 r, bytes32 s) = cheats.sign(0x6df21769a2082e03f7e21f6395561279e9a7feb846b2bf740798c794ad196e00, digest);
address signer = ecrecover(digest, v, r, s);
assert(signer == 0xdf8Ef652AdE0FA4790843a726164df8cf8649339);
Function Signature
function sign(uint256 privateKey, bytes32 digest)
external
returns (uint8 v, bytes32 r, bytes32 s);
toString
Description
The toString cheatcodes aid in converting primitive Solidity types into strings. Similar to
Foundry's behavior, bytes are converted
to a hex-encoded string with 0x prefixed.
Example
contract TestContract {
IStdCheats cheats;
constructor() {
cheats = IStdCheats(0x7109709ECfa91a80626fF3989D68f67F5b1DD12D);
}
function testAddress() public {
address test = 0x7109709ECfa91a80626fF3989D68f67F5b1DD12D;
string memory expectedString = "0x7109709ECfa91a80626fF3989D68f67F5b1DD12D";
// Call cheats.toString
string memory result = cheats.toString(test);
assert(keccak256(abi.encodePacked(result)) == keccak256(abi.encodePacked(expectedString)));
}
function testBool() public {
bool test = true;
string memory expectedString = "true";
// Call cheats.toString
string memory result = cheats.toString(test);
assert(keccak256(abi.encodePacked(result)) == keccak256(abi.encodePacked(expectedString)));
}
function testUint256() public {
uint256 test = 12345;
string memory expectedString = "12345";
// Call cheats.toString
string memory result = cheats.toString(test);
assert(keccak256(abi.encodePacked(result)) == keccak256(abi.encodePacked(expectedString)));
}
function testInt256() public {
int256 test = -12345;
string memory expectedString = "-12345";
// Call cheats.toString
string memory result = cheats.toString(test);
assert(keccak256(abi.encodePacked(result)) == keccak256(abi.encodePacked(expectedString)));
}
function testBytes32() public {
bytes32 test = "medusa";
string memory expectedString = "0x6d65647573610000000000000000000000000000000000000000000000000000";
// Call cheats.toString
string memory result = cheats.toString(test);
assert(keccak256(abi.encodePacked(result)) == keccak256(abi.encodePacked(expectedString)));
}
function testBytes() public {
bytes memory test = "medusa";
string memory expectedString = "0x6d6564757361";
// Call cheats.toString
string memory result = cheats.toString(test);
assert(keccak256(abi.encodePacked(result)) == keccak256(abi.encodePacked(expectedString)));
}
}
Function Signatures
function toString(address) external returns (string memory);
function toString(bool) external returns (string memory);
function toString(uint256) external returns (string memory);
function toString(int256) external returns (string memory);
function toString(bytes32) external returns (string memory);
function toString(bytes) external returns (string memory);
parseBytes
Description
The parseBytes cheatcode will parse the input string into bytes
Example
contract TestContract {
uint x = 123;
function test() public {
// Obtain our cheat code contract reference.
IStdCheats cheats = CheatCodes(0x7109709ECfa91a80626fF3989D68f67F5b1DD12D);
bytes memory expectedBytes = "medusa";
string memory test = "medusa";
// Call cheats.parseBytes
bytes memory result = cheats.parseBytes(test);
assert(keccak256(expectedBytes) == keccak256(result));
}
}
Function Signature
function parseBytes(string calldata) external returns (bytes memory);
parseBytes32
Description
The parseBytes32 cheatcode will parse the input string into bytes32
Example
contract TestContract {
uint x = 123;
function test() public {
// Obtain our cheat code contract reference.
IStdCheats cheats = CheatCodes(0x7109709ECfa91a80626fF3989D68f67F5b1DD12D);
int256 expectedInt = -12345;
string memory test = "-12345";
// Call cheats.parseInt
int256 result = cheats.parseInt(test);
assert(expectedInt == result);
}
}
Function Signature
function parseBytes32(string calldata) external returns (bytes32);
parseInt
Description
The parseInt cheatcode will parse the input string into a int256
Example
contract TestContract {
uint x = 123;
function test() public {
// Obtain our cheat code contract reference.
IStdCheats cheats = CheatCodes(0x7109709ECfa91a80626fF3989D68f67F5b1DD12D);
address expectedAddress = 0x7109709ECfa91a80626fF3989D68f67F5b1DD12D;
string memory test = "0x7109709ECfa91a80626fF3989D68f67F5b1DD12D";
// Call cheats.parseAddress
address result = cheats.parseAddress(test);
assert(expectedAddress == result);
}
}
Function Signature
function parseInt(string calldata) external returns (int256);
parseUint
Description
The parseUint cheatcode will parse the input string into a uint256
Example
contract TestContract {
uint x = 123;
function test() public {
// Obtain our cheat code contract reference.
IStdCheats cheats = CheatCodes(0x7109709ECfa91a80626fF3989D68f67F5b1DD12D);
uint256 expectedUint = 12345;
string memory test = "12345";
// Call cheats.parseUint
uint256 result = cheats.parseUint(test);
assert(expectedUint == result);
}
}
Function Signature
function parseUint(string calldata) external returns (uint256);
parseBool
Description
The parseBool cheatcode will parse the input string into a boolean
Example
contract TestContract {
uint x = 123;
function test() public {
// Obtain our cheat code contract reference.
IStdCheats cheats = CheatCodes(0x7109709ECfa91a80626fF3989D68f67F5b1DD12D);
bool expectedBool = true;
string memory test = "true";
// Call cheats.parseBool
bool result = cheats.parseBool(test);
assert(expectedBool == result);
}
}
Function Signature
function parseBool(string calldata) external returns (bool);
parseAddress
Description
The parseAddress cheatcode will parse the input string into an address
Example
contract TestContract {
uint x = 123;
function test() public {
// Obtain our cheat code contract reference.
IStdCheats cheats = CheatCodes(0x7109709ECfa91a80626fF3989D68f67F5b1DD12D);
address expectedAddress = 0x7109709ECfa91a80626fF3989D68f67F5b1DD12D;
string memory test = "0x7109709ECfa91a80626fF3989D68f67F5b1DD12D";
// Call cheats.parseAddress
address result = cheats.parseAddress(test);
assert(expectedAddress == result);
}
}
Function Signature
function parseAddress(string calldata) external returns (address);
Console Logging
Console logging in medusa is similar to the functionality found in Foundry or Hardhat (except for string formatting,
see below). Note that if you are not using
Foundry or Hardhat as your compilation platform, you can retrieve the necessary console.sol library
here.
For more information on the available function signatures and general tips on console logging, please review Foundry's documentation.
Differences in console.log(format[,...args])
The core functionality of string formatting is the same. If you want to string format an int256, the only supported function signature is:
function log(string memory, int256) external;. Otherwise, the supported argument types are string, bool, address,
and uint256. This capability is the same as in Foundry.
The core difference in medusa's string formatting is the specifiers that are allowed for the formatted string. The supported specifiers are as follows:
%v: The value will be printed in its default format. This will work foruint256,int256,address,bool, andstring. Using%vis the recommended specifier for all argument types.%s: The values will be converted into a human-readable string. This will work foruint256,int256,address, andstring. Contrary to Foundry or Hardhat,%swill not work forbool. Additionally,uint256andint256will not be provided in their hex-encoded format. This is the recommended specifier for projects that wish to maintain compatibility with an existing fuzz test suite from Foundry. Special exceptions will need to be made forboolarguments. For example, you could use theconsole.logBool(bool)function to separately log thebool.%d: This can be used foruint256andint256.%i: This specifier is not supported by medusa forint256anduint256%e: This specifier is not supported by medusa forint256anduint256.%x: This provides the hexadecimal representation ofint256anduint256.%o: This specifier is not supported by medusa.%oin medusa will provide the base-8 representation ofint256anduint256.%t: This can be used forbool.%%: This will print out "%" and not consume an argument.
If a specifier does not have a corresponding argument, the following is returned:
console.log("My name is %s %s", "medusa");
// Returns: "My name is medusa %!s(MISSING)"
If there are more arguments than specifiers, the following is returned:
console.log("My name is %s", "medusa", "fuzzer");
// Returns: "My name is medusa%!(EXTRA string=fuzzer)"
If only a format string with no arguments is provided, the string is returned with no formatting:
console.log("%% %s");
// Returns: "%% %s"
Frequently Asked Questions
Why create a new fuzzer if Echidna is already a great fuzzer?
With medusa, we are exploring a different EVM implementation and language for our smart contract fuzzer. While Echidna is already doing an amazing job, medusa offers the following advantages:
- It is written in Go, easing the maintenance and allowing the creation of a native API for future integration into other projects.
- It uses geth as a base, ensuring the EVM equivalence.
Should I switch to medusa right away?
We do not recommend switching to medusa until it is extensively tested. However we encourage you to try it, and let us know your experience. In that sense, Echidna is our robust and well tested fuzzer, while medusa is our new exploratory fuzzer. Follow us to hear updates about medusa as it grows in maturity.
Will all the previous available documentation from secure-contracts.com will apply to medusa?
In general, yes. All the information on testing approaches and techniques will apply for medusa. There are, however, different configuration options names and a few missing or different features in medusa from Echidna that we will be updating over time.
Manticore Tutorial
The aim of this tutorial is to show how to use Manticore to automatically find bugs in smart contracts.
The first part introduces a set of the basic features of Manticore: running under Manticore and manipulating smart contracts through API, getting throwing path, adding constraints. The second part is exercise to solve.
Table of contents:
- Installation
- Introduction to symbolic execution: Brief introduction to symbolic execution
- Running under Manticore: How to use Manticore's API to run a contract
- Getting throwing paths: How to use Manticore's API to get specific paths
- Adding constraints: How to use Manticore's API to add paths' constraints
- Exercises
Join the team on Slack at: https://slack.empirehacking.nyc/ #ethereum, #manticore
Installation
Manticore requires >= python 3.6. It can be installed through pip or using docker.
Manticore through docker
docker pull trailofbits/eth-security-toolbox
docker run -it -v "$PWD":/home/training trailofbits/eth-security-toolbox
The last command runs eth-security-toolbox in a docker that has access to your current directory. You can change the files from your host, and run the tools on the files from the docker
Inside docker, run:
solc-select 0.5.11
cd /home/trufflecon/
Manticore through pip
pip3 install --user manticore
solc 0.5.11 is recommended.
Running a script
To run a python script with python 3:
python3 script.py
Introduction to dynamic symbolic execution
Manticore is a dynamic symbolic execution tool, we described in our previous blogposts (1, 2,3).
Dynamic Symbolic Execution in a Nutshell
Dynamic symbolic execution (DSE) is a program analysis technique that explores a state space with a high degree of semantic awareness. This technique is based on the discovery of "program paths", represented as mathematical formulas called path predicates. Conceptually, this technique operates on path predicates in two steps:
- They are constructed using constraints on the program's input.
- They are used to generate program inputs that will cause the associated paths to execute.
This approach produces no false positives in the sense that all identified program states can be triggered during concrete execution. For example, if the analysis finds an integer overflow, it is guaranteed to be reproducible.
Path Predicate Example
To get an insigh of how DSE works, consider the following example:
function f(uint256 a) {
if (a == 65) {
// A bug is present
}
}
As f() contains two paths, a DSE will construct two differents path predicates:
- Path 1:
a == 65 - Path 2:
Not (a == 65)
Each path predicate is a mathematical formula that can be given to a so-called SMT solver, which will try to solve the equation. For Path 1, the solver will say that the path can be explored with a = 65. For Path 2, the solver can give a any value other than 65, for example a = 0.
Verifying properties
Manticore allows a full control over all the execution of each path. As a result, it allows to add arbirtray contraints to almost anything. This control allows for the creation of properties on the contract.
Consider the following example:
function unsafe_add(uint256 a, uint256 b) returns (uint256 c) {
c = a + b; // no overflow protection
return c;
}
Here there is only one path to explore in the function:
- Path 1:
c = a + b
Using Manticore, you can check for overflow, and add constraitns to the path predicate:
c = a + b AND (c < a OR c < b)
If it is possible to find a valuation of a and b for which the path predicate above is feasible, it means that you have found an overflow. For example the solver can generate the input a = 10 , b = MAXUINT256.
If you consider a fixed version:
function safe_add(uint256 a, uint256 b) returns (uint256 c) {
c = a + b;
require(c >= a);
require(c >= b);
return c;
}
The associated formula with overflow check would be:
c = a + b AND (c >= a) AND (c=>b) AND (c < a OR c < b)
This formula cannot be solved; in other words this is a proof that in safe_add, c will always increase.
DSE is thereby a powerful tool, that can verify arbitrary constraints on your code.
Running under Manticore
Table of contents:
- Introduction
- Run a standalone exploration
- Manipulate a smart contract through the API
- Summary: Running under Manticore
Introduction
We will see how to explore a smart contract with the Manticore API. The target is the following smart contract (example.sol):
pragma solidity >=0.4.24 <0.6.0;
contract Simple {
function f(uint256 a) public payable {
if (a == 65) {
revert();
}
}
}
Run a standalone exploration
You can run Manticore directly on the smart contract by the following command (project can be a Solidity File, or a project directory):
manticore project
You will get the output of testcases like this one (the order may change):
...
... m.c.manticore:INFO: Generated testcase No. 0 - STOP
... m.c.manticore:INFO: Generated testcase No. 1 - REVERT
... m.c.manticore:INFO: Generated testcase No. 2 - RETURN
... m.c.manticore:INFO: Generated testcase No. 3 - REVERT
... m.c.manticore:INFO: Generated testcase No. 4 - STOP
... m.c.manticore:INFO: Generated testcase No. 5 - REVERT
... m.c.manticore:INFO: Generated testcase No. 6 - REVERT
... m.c.manticore:INFO: Results in /home/ethsec/workshops/Automated Smart Contracts Audit - TruffleCon 2018/manticore/examples/mcore_t6vi6ij3
...
Without additional information, Manticore will explore the contract with new symbolic transactions until it does not explore new paths on the contract. Manticore does not run new transactions after a failing one (e.g: after a revert).
Manticore will output the information in a mcore_* directory. Among other, you will find in this directory:
global.summary: coverage and compiler warningstest_XXXXX.summary: coverage, last instruction, account balances per test casetest_XXXXX.tx: detailed list of transactions per test case
Here Manticore founds 7 test cases, which correspond to (the filename order may change):
| Transaction 0 | Transaction 1 | Transaction 2 | Result | |
|---|---|---|---|---|
| test_00000000.tx | Contract creation | f(!=65) | f(!=65) | STOP |
| test_00000001.tx | Contract creation | fallback function | REVERT | |
| test_00000002.tx | Contract creation | RETURN | ||
| test_00000003.tx | Contract creation | f(65) | REVERT | |
| test_00000004.tx | Contract creation | f(!=65) | STOP | |
| test_00000005.tx | Contract creation | f(!=65) | f(65) | REVERT |
| test_00000006.tx | Contract creation | f(!=65) | fallback function | REVERT |
Exploration summary f(!=65) denotes f called with any value different than 65.
As you can notice, Manticore generates an unique test case for every successful or reverted transaction.
Use the --quick-mode flag if you want fast code exploration (it disable bug detectors, gas computation, ...)
Manipulate a smart contract through the API
This section describes details how to manipulate a smart contract through the Manticore Python API. You can create new file with python extension *.py and write the necessary code by adding the API commands (basics of which will be described below) into this file and then run it with the command $ python3 *.py. Also you can execute the commands below directly into the python console, to run the console use the command $ python3.
Creating Accounts
The first thing you should do is to initiate a new blockchain with the following commands:
from manticore.ethereum import ManticoreEVM
m = ManticoreEVM()
A non-contract account is created using m.create_account:
user_account = m.create_account(balance=1 * 10**18)
A Solidity contract can be deployed using m.solidity_create_contract:
source_code = '''
pragma solidity >=0.4.24 <0.6.0;
contract Simple {
function f(uint256 a) payable public {
if (a == 65) {
revert();
}
}
}
'''
# Initiate the contract
contract_account = m.solidity_create_contract(source_code, owner=user_account)
Summary
- You can create user and contract accounts with m.create_account and m.solidity_create_contract.
Executing transactions
Manticore supports two types of transaction:
- Raw transaction: all the functions are explored
- Named transaction: only one function is explored
Raw transaction
A raw transaction is executed using m.transaction:
m.transaction(caller=user_account,
address=contract_account,
data=data,
value=value)
The caller, the address, the data, or the value of the transaction can be either concrete or symbolic:
- m.make_symbolic_value creates a symbolic value.
- m.make_symbolic_buffer(size) creates a symbolic byte array.
For example:
symbolic_value = m.make_symbolic_value()
symbolic_data = m.make_symbolic_buffer(320)
m.transaction(caller=user_account,
address=contract_address,
data=symbolic_data,
value=symbolic_value)
If the data is symbolic, Manticore will explore all the functions of the contract during the transaction execution. It will be helpful to see the Fallback Function explanation in the Hands on the Ethernaut CTF article for understanding how the function selection works.
Named transaction
Functions can be executed through their name.
To execute f(uint256 var) with a symbolic value, from user_account, and with 0 ether, use:
symbolic_var = m.make_symbolic_value()
contract_account.f(symbolic_var, caller=user_account, value=0)
If value of the transaction is not specified, it is 0 by default.
Summary
- Arguments of a transaction can be concrete or symbolic
- A raw transaction will explore all the functions
- Function can be called by their name
Workspace
m.workspace is the directory used as output directory for all the files generated:
print("Results are in {}".format(m.workspace))
Terminate the Exploration
To stop the exploration use m.finalize(). No further transactions should be sent once this method is called and Manticore generates test cases for each of the path explored.
Summary: Running under Manticore
Putting all the previous steps together, we obtain:
from manticore.ethereum import ManticoreEVM
m = ManticoreEVM()
with open('example.sol') as f:
source_code = f.read()
user_account = m.create_account(balance=1*10**18)
contract_account = m.solidity_create_contract(source_code, owner=user_account)
symbolic_var = m.make_symbolic_value()
contract_account.f(symbolic_var)
print("Results are in {}".format(m.workspace))
m.finalize() # stop the exploration
All the code above you can find into the example_run.py
The next step is to accessing the paths.
Getting Throwing Path
Table of contents:
Introduction
We will now improve the previous example and generate specific inputs for the paths raising an exception in f(). The target is still the following smart contract (example.sol):
pragma solidity >=0.4.24 <0.6.0;
contract Simple {
function f(uint256 a) public payable {
if (a == 65) {
revert();
}
}
}
Using state information
Each path executed has its state of the blockchain. A state is either ready or it is killed, meaning that it reaches a THROW or REVERT instruction:
- m.ready_states: the list of states that are ready (they did not execute a REVERT/INVALID)
- m.killed_states: the list of states that are ready (they did not execute a REVERT/INVALID)
- m.all_states: all the states
for state in m.all_states:
# do something with state
You can access state information. For example:
state.platform.get_balance(account.address): the balance of the accountstate.platform.transactions: the list of transactionsstate.platform.transactions[-1].return_data: the data returned by the last transaction
The data returned by the last transaction is an array, which can be converted to a value with ABI.deserialize, for example:
data = state.platform.transactions[0].return_data
data = ABI.deserialize("uint256", data)
How to generate testcase
Use m.generate_testcase(state, name) to generate testcase:
m.generate_testcase(state, 'BugFound')
Summary
- You can iterate over the state with m.all_states
state.platform.get_balance(account.address)returns the account’s balancestate.platform.transactionsreturns the list of transactionstransaction.return_datais the data returnedm.generate_testcase(state, name)generate inputs for the state
Summary: Getting Throwing Path
from manticore.ethereum import ManticoreEVM
m = ManticoreEVM()
with open('example.sol') as f:
source_code = f.read()
user_account = m.create_account(balance=1*10**18)
contract_account = m.solidity_create_contract(source_code, owner=user_account)
symbolic_var = m.make_symbolic_value()
contract_account.f(symbolic_var)
## Check if an execution ends with a REVERT or INVALID
for state in m.terminated_states:
last_tx = state.platform.transactions[-1]
if last_tx.result in ['REVERT', 'INVALID']:
print('Throw found {}'.format(m.workspace))
m.generate_testcase(state, 'ThrowFound')
All the code above you can find into the example_throw.py
The next step is to add constraints to the state.
Note we could have generated a much simpler script, as all the states returned by terminated_state have REVERT or INVALID in their result: this example was only meant to demonstrate how to manipulate the API.
Adding Constraints
Table of contents:
Introduction
We will see how to constrain the exploration. We will make the assumption that the
documentation of f() states that the function is never called with a == 65, so any bug with a == 65 is not a real bug. The target is still the following smart contract (example.sol):
pragma solidity >=0.4.24 <0.6.0;
contract Simple {
function f(uint256 a) public payable {
if (a == 65) {
revert();
}
}
}
Operators
The Operators module facilitates the manipulation of constraints, among other it provides:
- Operators.AND,
- Operators.OR,
- Operators.UGT (unsigned greater than),
- Operators.UGE (unsigned greater than or equal to),
- Operators.ULT (unsigned lower than),
- Operators.ULE (unsigned lower than or equal to).
To import the module use the following:
from manticore.core.smtlib import Operators
Operators.CONCAT is used to concatenate an array to a value. For example, the return_data of a transaction needs to be changed to a value to be checked against another value:
last_return = Operators.CONCAT(256, *last_return)
Constraints
You can use constraints globally or for a specific state.
Global constraint
Use m.constrain(constraint) to add a global cosntraint.
For example, you can call a contract from a symbolic address, and restraint this address to be specific values:
symbolic_address = m.make_symbolic_value()
m.constraint(Operators.OR(symbolic == 0x41, symbolic_address == 0x42))
m.transaction(caller=user_account,
address=contract_account,
data=m.make_symbolic_buffer(320),
value=0)
State constraint
Use state.constrain(constraint) to add a constraint to a specific state It can be used to constrain the state after its exploration to check some property on it.
Checking Constraint
Use solver.check(state.constraints) to know if a constraint is still feasible.
For example, the following will constraint symbolic_value to be different from 65 and check if the state is still feasible:
state.constrain(symbolic_var != 65)
if solver.check(state.constraints):
# state is feasible
Summary: Adding Constraints
Adding constraint to the previous code, we obtain:
from manticore.ethereum import ManticoreEVM
from manticore.core.smtlib.solver import Z3Solver
solver = Z3Solver.instance()
m = ManticoreEVM()
with open("example.sol") as f:
source_code = f.read()
user_account = m.create_account(balance=1*10**18)
contract_account = m.solidity_create_contract(source_code, owner=user_account)
symbolic_var = m.make_symbolic_value()
contract_account.f(symbolic_var)
no_bug_found = True
## Check if an execution ends with a REVERT or INVALID
for state in m.terminated_states:
last_tx = state.platform.transactions[-1]
if last_tx.result in ['REVERT', 'INVALID']:
# we do not consider the path were a == 65
condition = symbolic_var != 65
if m.generate_testcase(state, name="BugFound", only_if=condition):
print(f'Bug found, results are in {m.workspace}')
no_bug_found = False
if no_bug_found:
print(f'No bug found')
All the code above you can find into the example_constraint.py
The next step is to follow the exercises.
Manticore Exercises
- Example: Arithmetic overflow
- Exercise 1: Arithmetic rounding
- Exercise 2: Arithmetic overflow through multiple transactions
Example: Arithmetic overflow
This scenario is given as an example. You can follow its structure to solve the exercises.
my_token.py uses Manticore to find for an attacker to generate tokens during a transfer on Token (my_token.sol).
Proposed scenario
We use the pattern initialization, exploration and property for our scripts.
Initialization
- Create one user account
- Create the contract account
Exploration
- Call balances on the user account
- Call transfer with symbolic destination and value
- Call balances on the user account
Property
- Check if the user can have more token after the transfer than before.
Exercise 1 : Arithmetic rounding
Use Manticore to find an input allowing an attacker to generate free tokens in token.sol. Propose a fix of the contract, and test your fix using your Manticore script.
Proposed scenario
Follow the pattern initialization, exploration and property for the script.
Initialization
- Create one account
- Create the contract account
Exploration
- Call
is_valid_buywith two symbolic values for tokens_amount and wei_amount
Property
- An attack is found if on a state alive
wei_amount == 0 and tokens_amount >= 1
Hints
m.ready_statesreturns the list of state aliveOperators.AND(a, b)allows to create and AND condition- You can use the template proposed in template.py
Solution
Exercise 2 : Arithmetic overflow through multiple transactions
Use Manticore to find if an overflow is possible in Overflow.add. Propose a fix of the contract, and test your fix using your Manticore script.
Proposed scenario
Follow the pattern initialization, exploration and property for the script.
Initialization
- Create one user account
- Create the contract account
Exploration
- Call two times
addwith two symbolic values - Call
sellerBalance()
Property
- Check if it is possible for the value returned by sellerBalance() to be lower than the first input.
Hints
- The value returned by the last transaction can be accessed through:
state.platform.transactions[-1].return_data
- The data returned needs to be deserialized:
data = ABI.deserialize("uint256", data)
- You can use the template proposed in template.py
Solution
Slither, the smart contract static analyzer
Slither is a Solidity & Vyper static analysis framework written in Python3. It runs a suite of vulnerability detectors, prints visual information about contract details, and provides an API to easily write custom analyses. Slither enables developers to find vulnerabilities, enhance their code comprehension, and quickly prototype custom analyses.
If you are looking to use Slither's cli:
- Usage the most common flags
If you are looking to leverage Slither inbuilt features:
If you are looking to learn how to extend Slither's capabilities:
Usage
How to run Slither
All the crytic-compile options are available through Slither.
Foundry/hardhat
To run Slither on a Foundry/hardhat directory:
slither .
solc
To run Slither from a Solidity file:
slither file.sol
Etherscan
To run Slither from a contract hosted on Etherscan, run
slither 0x7F37f78cBD74481E593F9C737776F7113d76B315
We recommend installing solc-select so Slither can switch to the expected solc version automatically.
Detector selection
Slither runs all its detectors by default.
To run only selected detectors, use --detect detector1,detector2. For example:
slither file.sol --detect arbitrary-send,pragma
To exclude detectors, use --exclude detector1,detector2. For example:
slither file.sol --exclude naming-convention,unused-state,suicidal
To exclude detectors with an informational or low severity, use --exclude-informational or --exclude-low.
--list-detectors lists available detectors.
Printer selection
By default, no printers are run.
To run selected printers, use --print printer1,printer2. For example:
slither file.sol --print inheritance-graph
--list-printers lists available printers.
Path filtering
--filter-paths path1 will exclude all the results that are only related to path1. The path specified can be a path directory or a filename. Direct string comparison and Python regular expression are used.
Examples:
slither . --filter-paths "openzepellin"
Filter all the results only related to openzepellin.
slither . --filter-paths "Migrations.sol|ConvertLib.sol"
Filter all the results only related to the file SafeMath.sol or ConvertLib.sol.
Triage mode
Slither offers two ways to remove results:
- By adding
//slither-disable-next-line DETECTOR_NAMEbefore the issue - By adding
// slither-disable-start [detector] ... // slither-disable-end [detector]around the code to disable the detector on a large section - By adding
@custom:security non-reentrantbefore the variable declaration will indicate to Slither that the external calls from this variable are non-reentrant - By running the triage mode (see below)
Triage mode
--triage-mode runs Slither in its triage mode. For every finding, Slither will ask if the result should be shown for the next run. Results are saved in slither.db.json.
Examples:
slither . --triage-mode
[...]
0: C.destination (test.sol#3) is never initialized. It is used in:
- f (test.sol#5-7)
Reference: https://github.com/trailofbits/slither/wiki/Vulnerabilities-Description#uninitialized-state-variables
Results to hide during next runs: "0,1,..." or "All" (enter to not hide results): 0
[...]
The second run of Slither will hide the above result.
To show the hidden results again, delete slither.db.json.
Configuration File
Some options can be set through a json configuration file. By default, slither.config.json is used if present (it can be changed through --config-file file.config.json).
Options passed via the CLI have priority over options set in the configuration file.
The following flags are supported:
{
"detectors_to_run": "all",
"printers_to_run": None,
"detectors_to_exclude": None,
"detectors_to_include": None,
"exclude_dependencies": False,
"exclude_informational": False,
"exclude_optimization": False,
"exclude_low": False,
"exclude_medium": False,
"exclude_high": False,
"fail_on": FailOnLevel.PEDANTIC,
"json": None,
"sarif": None,
"disable_color": False,
"filter_paths": None,
"include_paths": None,
"generate_patches": False,
"skip_assembly": False,
"legacy_ast": False,
"zip": None,
"zip_type": "lzma",
"show_ignored_findings": False,
"sarif_input": "export.sarif",
"sarif_triage": "export.sarif.sarifexplorer",
"triage_database": "slither.db.json",
# codex
"codex": False,
"codex_contracts": "all",
"codex_model": "text-davinci-003",
"codex_temperature": 0,
"codex_max_tokens": 300,
"codex_log": False,
}
For flags related to the compilation, see the crytic-compile configuration
Slither is fully customizable:
- Static Analysis: learn about the basics of static analysis
- API
- SlithIR
- SSA
- Data dependency
- JSON output
Static analysis
The capabilities and design of the Slither static analysis framework have been described in blog posts (1, 2) and an academic paper.
Static analysis comes in different flavors. You may already know that compilers like clang and gcc rely on these research techniques, as do tools like Infer, CodeClimate, FindBugs, and tools based on formal methods like Frama-C and Polyspace.
In this article, we will not provide an exhaustive review of static analysis techniques and research. Instead, we'll focus on what you need to understand about how Slither works, so you can more effectively use it to find bugs and understand code.
Code representation
Unlike dynamic analysis, which reasons about a single execution path, static analysis reasons about all paths at once. To do so, it relies on a different code representation. The two most common ones are the abstract syntax tree (AST) and the control flow graph (CFG).
Abstract Syntax Trees (AST)
ASTs are used every time a compiler parses code. They are arguably the most basic structure upon which static analysis can be performed.
In a nutshell, an AST is a structured tree where, usually, each leaf contains a variable or a constant, and internal nodes are operands or control flow operations. Consider the following code:
function safeAdd(uint256 a, uint256 b) internal pure returns (uint256) {
if (a + b <= a) {
revert();
}
return a + b;
}
The corresponding AST is shown in the following illustration:
Slither uses the AST exported by solc.
While simple to build, the AST is a nested structure that's not always straightforward to analyze. For example, to identify the operations used by the expression a + b <= a, you must first analyze <= and then +. A common approach is to use the so-called visitor pattern, which navigates through the tree recursively. Slither contains a generic visitor in ExpressionVisitor.
The following code uses ExpressionVisitor to detect if an expression contains an addition:
from slither.visitors.expression.expression import ExpressionVisitor
from slither.core.expressions.binary_operation import BinaryOperationType
class HasAddition(ExpressionVisitor):
def result(self):
return self._result
def _post_binary_operation(self, expression):
if expression.type == BinaryOperationType.ADDITION:
self._result = True
visitor = HasAddition(expression) # expression is the expression to be tested
print(f'The expression {expression} has an addition: {visitor.result()}')
Control Flow Graph (CFG)
The second most common code representation is the control flow graph (CFG). As its name suggests, it is a graph-based representation that reveals all the execution paths. Each node contains one or multiple instructions, and edges in the graph represent control flow operations (if/then/else, loop, etc). The CFG of our previous example is as follows:
Most analyses are built on top of the CFG representation.
There are many other code representations, each with its advantages and drawbacks depending on the desired analysis.
Analysis
The simplest types of analyses that can be performed with Slither are syntactic analyses.
Syntax analysis
Slither can navigate through the different components of the code and their representation to find inconsistencies and flaws using a pattern matching-like approach.
For example, the following detectors look for syntax-related issues:
-
State variable shadowing: iterates over all state variables and checks if any shadow a variable from an inherited contract (state.py#L51-L62)
-
Incorrect ERC20 interface: searches for incorrect ERC20 function signatures (incorrect_erc20_interface.py#L34-L55)
Semantic analysis
In contrast to syntax analysis, semantic analysis delves deeper and analyzes the "meaning" of the code. This category includes a broad range of analyses that yield more powerful and useful results but are more complex to write.
Semantic analyses are used for advanced vulnerability detection.
Data dependency analysis
A variable variable_a is said to be data-dependent on variable_b if there is a path for which the value of variable_a is influenced by variable_b.
In the following code, variable_a is dependent on variable_b:
// ...
variable_a = variable_b + 1;
Slither comes with built-in data dependency capabilities, thanks to its intermediate representation (discussed later).
An example of data dependency usage can be found in the dangerous strict equality detector. Slither looks for strict equality comparisons to dangerous values (incorrect_strict_equality.py#L86-L87) and informs the user that they should use >= or <= instead of == to prevent attackers from trapping the contract. Among other things, the detector considers the return value of a call to balanceOf(address) to be dangerous (incorrect_strict_equality.py#L63-L64) and uses the data dependency engine to track its usage.
Fixed-point computation
If your analysis navigates through the CFG and follows the edges, you're likely to encounter already visited nodes. For example, if a loop is presented as shown below:
for(uint256 i; i < range; ++) {
variable_a += 1;
}
Your analysis will need to know when to stop. There are two main strategies: (1) iterate on each node a finite number of times, (2) compute a so-called fixpoint. A fixpoint essentially means that analyzing the node doesn't provide any meaningful information.
An example of a fixpoint used can be found in the reentrancy detectors: Slither explores the nodes and looks for external calls, reads, and writes to storage. Once it has reached a fixpoint (reentrancy.py#L125-L131), it stops the exploration and analyzes the results to see if a reentrancy is present, through different reentrancy patterns (reentrancy_benign.py, reentrancy_read_before_write.py, reentrancy_eth.py).
Writing analyses using efficient fixed-point computation requires a good understanding of how the analysis propagates its information.
Intermediate representation
An intermediate representation (IR) is a language designed to be more amenable to static analysis than the original one. Slither translates Solidity to its own IR: SlithIR.
Understanding SlithIR is not necessary if you only want to write basic checks. However, it becomes essential if you plan to write advanced semantic analyses. The SlithIR and SSA printers can help you understand how the code is translated.
API Basics
Slither has an API that allows you to explore basic attributes of contracts and their functions.
On a high level there are 6 layers:
Slither- main slither objectSlitherCompilationUnit- group of files used by one call to solcContract- contract levelFunction- function levelNode- control flow graphSlithrIR- intermediate representation
Watch our API walkthrough for more details
Slither object
To load a codebase:
from slither import Slither
slither = Slither('/path/to/project')
To load a contract deployed:
from slither import Slither
slither = Slither('0x..') # assuming the code is verified on etherscan
Use etherscan_api_key to provide an Etherscan API KEY
slither = Slither('0x..', etherscan_api_key='..')
You can retrieve the list of compilation units with:
sl.compilation_units # array of SlitherCompilationUnit
SlitherCompilationUnit object
- ~ group of files used by one call to solc
- Most targets have 1 compilation, but not always true
- Partial compilation for optimization
- Multiple solc version used
- Etc..
- Why compilation unit matters?
- Some APIs might be not intuitive
- Ex: looking for a contract based on the name?
- Can have multiple contracts
- For hacking you can (probably) use the first compilation unit
compilation_unit = sl.compilation_units[0]
A SlitherCompilationUnit has:
contracts (list(Contract)): A list of contractscontracts_derived (list(Contract)): A list of contracts that are not inherited by another contract (a subset of contracts)get_contract_from_name (str): Returns a list of contracts matching the name[structures | enums | events | variables | functions]_top_level: Top level object
Example
from slither import Slither
sl = Slither("0xdac17f958d2ee523a2206206994597c13d831ec7")
compilation_unit = sl.compilation_units[0]
# Print all the contracts from the USDT address
print([str(c) for c in compilation_unit.contracts])
# Print the most derived contracts from the USDT address
print([str(c) for c in compilation_unit.contracts_derived])
% python test.py
['SafeMath', 'Ownable', 'ERC20Basic', 'ERC20', 'BasicToken', 'StandardToken', 'Pausable', 'BlackList', 'UpgradedStandardToken', 'TetherToken']
['SafeMath', 'UpgradedStandardToken', 'TetherToken']
Contract Object
A Contract object has:
name: str: The name of the contractfunctions: list[Function]: A list of functionsmodifiers: list[Modifier]: A list of modifiersall_functions_called: list[Function/Modifier]: A list of all internal functions reachable by the contractinheritance: list[Contract]: A list of inherited contracts (c3 linearization order)derived_contracts: list[Contract]: contracts derived from itget_function_from_signature(str): Function: Returns a Function from its signatureget_modifier_from_signature(str): Modifier: Returns a Modifier from its signatureget_state_variable_from_name(str): StateVariable: Returns a StateVariable from its namestate_variables: List[StateVariable]: list of accessible variablesstate_variables_ordered: List[StateVariable]: all variable ordered by declaration
Example
from slither import Slither
sl = Slither("0xdac17f958d2ee523a2206206994597c13d831ec7")
compilation_unit = sl.compilation_units[0]
# Print all the state variables of the USDT token
contract = compilation_unit.get_contract_from_name("TetherToken")[0]
print([str(v) for v in contract.state_variables])
% python test.py
['owner', 'paused', '_totalSupply', 'balances', 'basisPointsRate', 'maximumFee', 'allowed', 'MAX_UINT', 'isBlackListed', 'name', 'symbol', 'decimals', 'upgradedAddress', 'deprecated']
Function object
A Function or a Modifier object has:
name: str: The name of the functioncontract: Contract: The contract where the function is declarednodes: list[Node]: A list of nodes composing the CFG of the function/modifierentry_point: Node: The entry point of the CFG[state |local]_variable_[read |write]: list[StateVariable]: A list of local/state variables read/write- All can be prefixed by “all_” for recursive lookup
- Ex:
all_state_variable_read: return all the state variables read in internal calls
slithir_operations: List[Operation]: list of IR operations
from slither import Slither
sl = Slither("0xdac17f958d2ee523a2206206994597c13d831ec7")
compilation_unit = sl.compilation_units[0]
contract = compilation_unit.get_contract_from_name("TetherToken")[0]
transfer = contract.get_function_from_signature("transfer(address,uint256)")
# Print all the state variables read by the transfer function
print([str(v) for v in transfer.state_variables_read])
# Print all the state variables read by the transfer function and its internal calls
print([str(v) for v in transfer.all_state_variables_read])
% python test.py
['deprecated', 'isBlackListed', 'upgradedAddress']
['owner', 'basisPointsRate', 'deprecated', 'paused', 'isBlackListed', 'maximumFee', 'upgradedAddress', 'balances']
Node object
To explore the nodes:
- If order does not matter
for node in function.nodes
- If order matters, walk through the nodes
def visit_node(node: Node, visited: List[Node]):
if node in visited:
return
visited += [node]
# custom action
for son in node.sons:
visit_node(son, visited)
- If need to iterate more than once (advanced usages)
- Bound the iteration X times
- Create a fix-point - abstract interpretation style analysis
SlithIR
- slither/slithir
- Every IR operation has its own methods
- Check if an operation is of a type:
isinstance(ir, TYPE)- Ex:
isinstance(ir, Call)
- Check if the operation is an addition
isinstance(ir, Binary) & ir.type == BinaryType.ADDITION- Check if the operation is a call to MyContract
isinstance(ir, HighLevelCall) & ir.destination == MyContract
from slither import Slither
sl = Slither("0xdac17f958d2ee523a2206206994597c13d831ec7")
compilation_unit = sl.compilation_units[0]
contract = compilation_unit.get_contract_from_name("TetherToken")[0]
totalSupply = contract.get_function_from_signature("totalSupply()")
# Print the external call made in the totalSupply function
for ir in totalSupply.slithir_operations:
if isinstance(ir, HighLevelCall):
print(f"External call found {ir} ({ir.node.source_mapping})")
% python test.py
External call found HIGH_LEVEL_CALL, […] (...TetherToken.sol#339)
Example: Print Basic Information
print_basic_information.py demonstrates how to print basic information about a project.
SlithIR
Slither translates Solidity an intermediate representation, SlithIR, to enable high-precision analysis via a simple API. It supports taint and value tracking to enable detection of complex patterns.
SlithIR is a work in progress, although it is usable today. New developments in SlithIR are driven by needs identified by new detector modules. Please help us bugtest and enhance SlithIR!
What is an IR?
In language design, compilers often operate on an “intermediate representation” (IR) of a language that carries extra details about the program as it is parsed. For example, a compiler creates a parse tree of a program that represents a program as written. However, the compiler can continue to enrich this tree with information, such as taint information, source location, and other items that could have impacted an item from control flow. Additionally, languages such as Solidity have inheritance, meaning that functions and methods may be defined outside the scope of a given contract. An IR could linearize these methods, allowing additional transformations and processing of the contract’s source code.
A demonstrative example would be LLVM’s IR vs C or x86 code. While C will clearly demonstrate a function call, it may be missing details about the underlying system, the path to a location, and so on. Likewise, while an analog to the same call would be clear in x86, this would lose all transient details of which variables and which path an application had taken to arrive at a specific call. LLVM’s IR solves this by abstracting away the specific details of a call instruction, while still capturing the variables, environmental state, and other values that lead to this position. In this way, LLVM can perform additional introspection of the resulting code, and use these analyses to drive other optimizations or information to other passes of the compiler.
Why does Slither translate to an IR?
Solidity is a quirky language with a number of edge cases, both in terms of syntax and semantics. By translating to an IR, Slither normalizes many of these quirks to better analyze the contract. For example, Solidity’s grammar defines an array push as a function call to the array. A straightforward representation of this semantic would be indistinguishable from a normal function call. Slither, in contrast, treats array pushes as a specific operation, allowing further analysis of the accesses to arrays and their impact to the security of a program. Moreover, the operators in SlithIR have a hierarchy, so, for example in a few lines of code you can track all the operators that write to a variable, which makes it trivial to write precise taint analysis.
Additionally, Slither can include non-trivial variable tracking by default by translating to an IR. This can build richer representations of contracts and allow for deeper analysis of potential vulnerabilities. For example, answering the question “can a user control a variable” is central to uncovering more complex vulnerabilities from a static position. Slither will propagate information from function parameters to program state in an iterative fashion, which captures the control flow of information across potentially multiple transactions. In this way, Slither can enrich information and statically provide a large amount of assurance to contracts that standard vulnerabilities exist and are reachable under certain conditions.
Example
$ slither file.sol --print slithir will output the IR for every function.
$ slither examples/printers/slihtir.sol --printers slithir
Contract UnsafeMath
Function add(uint256,uint256)
Expression: a + b
IRs:
TMP_0(uint256) = a + b
RETURN TMP_0
Function min(uint256,uint256)
Expression: a - b
IRs:
TMP_0(uint256) = a - b
RETURN TMP_0
Contract MyContract
Function transfer(address,uint256)
Expression: balances[msg.sender] = balances[msg.sender].min(val)
IRs:
REF_3(uint256) -> balances[msg.sender]
REF_1(uint256) -> balances[msg.sender]
TMP_1(uint256) = LIBRARY_CALL, dest:UnsafeMath, function:min, arguments:['REF_1', 'val']
REF_3 := TMP_1
Expression: balances[to] = balances[to].add(val)
IRs:
REF_3(uint256) -> balances[to]
REF_1(uint256) -> balances[to]
TMP_1(uint256) = LIBRARY_CALL, dest:UnsafeMath, function:add, arguments:['REF_1', 'val']
REF_3 := TMP_1
SlithIR Specification
Variables
StateVariableLocalVariableConstant(stringorint)SolidityVariableTupleVariableTemporaryVariable(variables added by SlithIR)ReferenceVariable(variables added by SlithIR, for mapping/index accesses)
In the following we use:
LVALUEcan be:StateVariable,LocalVariable,TemporaryVariable,ReferenceVariableorTupleVariableRVALUEcan be:StateVariable,LocalVariable,Constant,SolidityVariable,TemporaryVariableorReferenceVariable
Operators
- All the operators inherit from
Operationand have areadattribute returning the list of variables read (see slither/slithir/operations/operation.py). - All the operators writing to a
LVALUEinherit fromOperationWithLValueand have thelvalueattribute (see slither/slithir/operations/lvalue.py).
Assignment
LVALUE := RVALUELVALUE := TupleLVALUE := Function(for dynamic function)
Binary Operation
LVALUE = RVALUE ** RVALUELVALUE = RVALUE * RVALUELVALUE = RVALUE / RVALUELVALUE = RVALUE % RVALUELVALUE = RVALUE + RVALUELVALUE = RVALUE - RVALUELVALUE = RVALUE << RVALUELVALUE = RVALUE >> RVALUELVALUE = RVALUE & RVALUELVALUE = RVALUE ^ RVALUELVALUE = RVALUE | RVALUELVALUE = RVALUE < RVALUELVALUE = RVALUE > RVALUELVALUE = RVALUE <= RVALUELVALUE = RVALUE >= RVALUELVALUE = RVALUE == RVALUELVALUE = RVALUE != RVALUELVALUE = RVALUE && RVALUELVALUE = RVALUE -- RVALUE
Unary Operation
LVALUE = ! RVALUELVALUE = ~ RVALUE
Index
REFERENCE -> LVALUE [ RVALUE ]
Note: The reference points to the memory location
Member
REFERENCE -> LVALUE . RVALUEREFERENCE -> CONTRACT . RVALUEREFERENCE -> ENUM . RVALUE
Note: The reference points to the memory location
New Operators
LVALUE = NEW_ARRAY ARRAY_TYPE DEPTH(:int)
ARRAY_TYPE is a solidity_types
DEPTH is used for arrays of multiple dimensions.
LVALUE = NEW_CONTRACT CONSTANTLVALUE = NEW_STRUCTURE STRUCTURELVALUE = NEW_ELEMENTARY_TYPE ELEMENTARY_TYPE
ELEMENTARY_TYPE is defined in slither/core/solidity_types/elementary_type.py
Push Operator
PUSH LVALUE RVALUEPUSH LVALUE Function(for dynamic function)
Delete Operator
DELETE LVALUE
Conversion
CONVERT LVALUE RVALUE TYPE
TYPE is a solidity_types
Unpack
LVALUE = UNPACK TUPLEVARIABLE INDEX(:int)
Array Initialization
LVALUE = INIT_VALUES
INIT_VALUES is a list of RVALUE, or a list of lists in case of a multidimensional array.
Calls Operators
In the following, ARG is a variable as defined in SlithIR#variables
LVALUE = HIGH_LEVEL_CALL DESTINATION FUNCTION [ARG, ..]LVALUE = LOW_LEVEL_CALL DESTINATION FUNCTION_NAME [ARG, ..]
FUNCTION_NAME can only be call/delegatecall/codecall
LVALUE = SOLIDITY_CALL SOLIDITY_FUNCTION [ARG, ..]
SOLIDITY_FUNCTION is defined in slither/core/declarations/solidity_variables.py
LVALUE = INTERNAL_CALL FUNCTION [ARG, ..]LVALUE = INTERNAL_DYNAMIC_CALL FUNCTION_TYPE [ARG, ..]
INTERNAL_DYNAMIC_CALL represents the pointer of function.
FUNCTION_TYPE is defined in slither/core/solidity_types/function_type.py
LVALUE = LIBRARY_CALL DESTINATION FUNCTION_NAME [ARG, ..]LVALUE = EVENT_CALL EVENT_NAME [ARG, ..]LVALUE = SEND DESTINATION VALUETRANSFER DESTINATION VALUE
Optional arguments:
GASandVALUEforHIGH_LEVEL_CALL/LOW_LEVEL_CALL.
Return
RETURN RVALUERETURN TUPLERETURN None
Return None represents an empty return statement.
Condition
CONDITION RVALUE
CONDITION holds the condition in a conditional node.
SSA
Slither possess a Static Single Assignment (SSA) form representation of SlithIR. SSA is a commonly used representation in compilation and static analysis in general. It requires that each variable is assigned at least one time. SSA is a key component for building an efficient data-dependency analysis.
The SSA printer allows to visualize this representation.
Data dependency
Data dependency allows knowing if the value of a given variable is influenced by another variable's value.
Because smart contracts have a state machine based architecture, the results of the data dependency depend on the context (function/contract) of the analysis. Consider the following example:
contract MyContract{
uint a = 0;
uint b = 0;
function setA(uint input_a) public{
a = input_a;
}
function setB() public{
b = a;
}
}
In this example, if we consider only setA, we have the following dependency:
ais dependent oninput_a
If we consider only setB, we have:
bis dependent ona
If we consider the contract entirely (with all the functions), we have:
ais dependent oninput_abis dependent onaandinput_a(by transitivity)
slither.analyses.is_dependent(variable, variable_source, context) allows to know if variable is dependent on variable_source on the given context.
As a result, in our previous example, is_dependent(b, a, funcA) will return False, while is_dependent(b, a, myContract) will return True:
from slither import Slither
from slither.analyses import is_dependent
slither = Slither('data_dependency_simple_example.sol')
myContract = slither.get_contract_from_name('MyContract')
funcA = myContract.get_function_from_signature('setA(uint256)')
input_a = funcA.parameters[0]
a = myContract.get_state_variable_from_name('a')
b = myContract.get_state_variable_from_name('b')
print(f'{b.name} is dependant from {input_a.name}?: {is_dependent(b, a, funcA)}')
print(f'{b.name} is dependant from {input_a.name}?: {is_dependent(b, a, myContract)}')
- Top-level Command Output: Standard top-level (for detectors, printers and tools)
- Detectors output
- Upgradeability output
Top-level Command Output
At the top level, the JSON output provided by slither will appear in the following format:
{
"success": true,
"error": null,
"results": {}
}
success(boolean):trueifresultswere output successfully,falseif anerroroccurred.error(string | null): Ifsuccessisfalse, this will be a string with relevant error information. Otherwise, it will benull.results(command-results, see below): Ifsuccessistrue, this will be an object populated with different types of results, depending on the JSON arguments specified.
Command Results
The underlying results item above will appear in the following format:
{
"detectors": [],
"upgradeability-check": {}
}
detectors(OPTIONAL, vulnerability-results, see below): The results of any detector analysis.upgradeability-check(OPTIONAL, upgradeability-results, see below): The results ofslither-check-upgradeability.
Detector Results
A detector result found in the detectors array above will be of the following format:
{
"check": "...",
"impact": "...",
"confidence": "...",
"description": "...",
"elements": []
}
check(string): The detector identifier (see the list of detectors)impact(string): representation of the impact (High/Medium/Low/Informational)confidence(string): representation of the confidence (High/Medium/Low)description(string): output of the slitherelements: (element array, see below): an array of relevant items for this finding which map to some source code.- NOTE: When writing a detector, the first element should be carefully chosen to represent the most significant portion of mapped code for the finding (the area of source on which external tooling should primarily focus for the issue).
additional_fields: (OPTIONAL, any): Offers additional detector-specific information, does not always exist.
Detector Result Elements
Each element found in elements above is of the form:
{
"type": "...",
"name": "...",
"source_mapping": {},
"type_specific_fields": {},
"additional_fields": {}
}
type(string): Refers to the type of element, this can be either: (contract,function,variable,node,pragma,enum,struct,event).name(string): Refers to the name of the element.- For
contract/function/variable/enum/struct/eventtypes, this refers to the definition name. - For
nodetypes, this refers to a string representation of any underlying expression. A blank string is used if there is no underlying expression. - For
pragmatypes, this refers to a string representation of theversionportion of the pragma (ie:^0.5.0).
- For
source_mapping(source mapping, see below): Refers to a source mapping object which defines the source range which represents this element.type_specific_fields(OPTIONAL, any):- For
function/eventtype elements:parent(result-element): Refers to the parent contract of this definition.signature(string): Refers to the full signature of this function
- For
enum/structtype elements:parent(result-element): Refers to the parent contract of this definition.
- For
variabletype elements:parent(result-element): Refers to the parent contract if this variable is a state variable. Refers to the parent function if this variable is a local variable.
- For
nodetype elements:parent(result-element): Refers to the parent function of this node.
- For
pragmatype elements:directive(string array): Fully serialized pragma directive (ie:["solidity", "^", "0.4", ".9"])
- For
additional_fields(OPTIONAL, any): Offers additional detector-specific element information, does not always exist.
Source Mapping
Each source_mapping object is used to map an element to some portion of source. It is of the form:
"source_mapping": {
"start": 45
"length": 58,
"filename_relative": "contracts/tests/constant.sol",
"filename_absolute": "/tmp/contracts/tests/constant.sol",
"filename_short": "tests/constant.sol",
"filename_used": "contracts/tests/constant.sol",
"lines": [
5,
6,
7
],
"starting_column": 1,
"ending_column": 24,
}
start(integer): Refers to the starting byte position of the mapped source.length(integer): Refers to the byte-length of the mapped source.filename_relative(string): A relative file path from the analysis directory.filename_absolute(string): An absolute file path to the file.filename_short(string): A short version of the filename used for display purposes. Hides platform-specific directories (ex:node_modules).filename_used(string): The path used by the platform for analysis (non-standard).lines(integer array): An array of line numbers which the mapped source spans. Line numbers begin from 1.starting_column(integer): The starting column/character position for the first mapped source line. Begins from 1.ending_column(integer): The ending column/character position for the last mapped source line. Begins from 1.
Detector-specific additional fields
Some detectors have custom elements output via the additional_fields field of their result, or result elements. Annotations here will specify result or result-element to specify the location of the additional fields.
-
constant-function:contain_assembly(result, boolean): Specifies if the result is due to the function containing assembly.
-
naming-convention:convention(result-element, string): Used to denote the convention used to find the result element/issue. Valid conventions are:CapWordsmixedCasel_O_I_should_not_be_usedUPPER_CASE_WITH_UNDERSCORES
target(result-element, string): Used to denote the type of finding (constant, parameter, etc). Valid targets are:contractstructureeventfunctionvariablevariable_constantparameterenummodifier
-
reentrancy(all variants):underlying_type(result-element, string): Specifies the type of result element. Is one ofexternal_calls,external_calls_sending_eth, orvariables_written.
Slither Check Upgradeability
The slither-check-upgradeability tool also produces JSON output (with the use of the --json option). At the top level, this JSON output will appear in the format similar to that of Slither above:
{
"success": true,
"error": null,
"results": {
"upgradeability-check": {}
}
}
success(boolean):trueifresultswere output successfully,falseif anerroroccurred.error(string | null): Ifsuccessisfalse, this will be a string with relevant error information. Otherwise, it will benull.results(upgradeability-check-results, see below): Ifsuccessistrue, this will contain anupgradeability-checkobject populated with the different upgradeability checks. Ifsuccessisfalse,upgradeability-checkobject will be empty.
Command Results
The underlying upgradeability-check item above will appear in the following format:
{
"check-initialization": {},
"check-initialization-v2": {},
"compare-function-ids": {},
"compare-variables-order-proxy": {},
"compare-variables-order-implementation": {}
}
Public Detectors
List of public detectors
Storage ABIEncoderV2 Array
Configuration
- Check:
abiencoderv2-array - Severity:
High - Confidence:
High
Description
solc versions 0.4.7-0.5.9 contain a compiler bug leading to incorrect ABI encoder usage.
Exploit Scenario:
contract A {
uint[2][3] bad_arr = [[1, 2], [3, 4], [5, 6]];
/* Array of arrays passed to abi.encode is vulnerable */
function bad() public {
bytes memory b = abi.encode(bad_arr);
}
}
abi.encode(bad_arr) in a call to bad() will incorrectly encode the array as [[1, 2], [2, 3], [3, 4]] and lead to unintended behavior.
Recommendation
Use a compiler >= 0.5.10.
Arbitrary from in transferFrom
Configuration
- Check:
arbitrary-send-erc20 - Severity:
High - Confidence:
High
Description
Detect when msg.sender is not used as from in transferFrom.
Exploit Scenario:
function a(address from, address to, uint256 amount) public {
erc20.transferFrom(from, to, am);
}
Alice approves this contract to spend her ERC20 tokens. Bob can call a and specify Alice's address as the from parameter in transferFrom, allowing him to transfer Alice's tokens to himself.
Recommendation
Use msg.sender as from in transferFrom.
Modifying storage array by value
Configuration
- Check:
array-by-reference - Severity:
High - Confidence:
High
Description
Detect arrays passed to a function that expects reference to a storage array
Exploit Scenario:
contract Memory {
uint[1] public x; // storage
function f() public {
f1(x); // update x
f2(x); // do not update x
}
function f1(uint[1] storage arr) internal { // by reference
arr[0] = 1;
}
function f2(uint[1] arr) internal { // by value
arr[0] = 2;
}
}
Bob calls f(). Bob assumes that at the end of the call x[0] is 2, but it is 1.
As a result, Bob's usage of the contract is incorrect.
Recommendation
Ensure the correct usage of memory and storage in the function parameters. Make all the locations explicit.
ABI encodePacked Collision
Configuration
- Check:
encode-packed-collision - Severity:
High - Confidence:
High
Description
Detect collision due to dynamic type usages in abi.encodePacked
Exploit Scenario:
contract Sign {
function get_hash_for_signature(string name, string doc) external returns(bytes32) {
return keccak256(abi.encodePacked(name, doc));
}
}
Bob calls get_hash_for_signature with (bob, This is the content). The hash returned is used as an ID.
Eve creates a collision with the ID using (bo, bThis is the content) and compromises the system.
Recommendation
Do not use more than one dynamic type in abi.encodePacked()
(see the Solidity documentation).
Use abi.encode(), preferably.
Incorrect shift in assembly.
Configuration
- Check:
incorrect-shift - Severity:
High - Confidence:
High
Description
Detect if the values in a shift operation are reversed
Exploit Scenario:
contract C {
function f() internal returns (uint a) {
assembly {
a := shr(a, 8)
}
}
}
The shift statement will right-shift the constant 8 by a bits
Recommendation
Swap the order of parameters.
Multiple constructor schemes
Configuration
- Check:
multiple-constructors - Severity:
High - Confidence:
High
Description
Detect multiple constructor definitions in the same contract (using new and old schemes).
Exploit Scenario:
contract A {
uint x;
constructor() public {
x = 0;
}
function A() public {
x = 1;
}
function test() public returns(uint) {
return x;
}
}
In Solidity 0.4.22, a contract with both constructor schemes will compile. The first constructor will take precedence over the second, which may be unintended.
Recommendation
Only declare one constructor, preferably using the new scheme constructor(...) instead of function <contractName>(...).
Name reused
Configuration
- Check:
name-reused - Severity:
High - Confidence:
High
Description
If a codebase has two contracts the similar names, the compilation artifacts will not contain one of the contracts with the duplicate name.
Exploit Scenario:
Bob's truffle codebase has two contracts named ERC20.
When truffle compile runs, only one of the two contracts will generate artifacts in build/contracts.
As a result, the second contract cannot be analyzed.
Recommendation
Rename the contract.
Protected Variables
Configuration
- Check:
protected-vars - Severity:
High - Confidence:
High
Description
Detect unprotected variable that are marked protected
Exploit Scenario:
contract Buggy{
/// @custom:security write-protection="onlyOwner()"
address owner;
function set_protected() public onlyOwner(){
owner = msg.sender;
}
function set_not_protected() public{
owner = msg.sender;
}
}
owner must be always written by function using onlyOwner (write-protection="onlyOwner()"), however anyone can call set_not_protected.
Recommendation
Add access controls to the vulnerable function
Public mappings with nested variables
Configuration
- Check:
public-mappings-nested - Severity:
High - Confidence:
High
Description
Prior to Solidity 0.5, a public mapping with nested structures returned incorrect values.
Exploit Scenario:
Bob interacts with a contract that has a public mapping with nested structures. The values returned by the mapping are incorrect, breaking Bob's usage
Recommendation
Do not use public mapping with nested structures.
Right-to-Left-Override character
Configuration
- Check:
rtlo - Severity:
High - Confidence:
High
Description
An attacker can manipulate the logic of the contract by using a right-to-left-override character (U+202E).
Exploit Scenario:
contract Token
{
address payable o; // owner
mapping(address => uint) tokens;
function withdraw() external returns(uint)
{
uint amount = tokens[msg.sender];
address payable d = msg.sender;
tokens[msg.sender] = 0;
_withdraw(/*owner/*noitanitsed*/ d, o/*
/*value */, amount);
}
function _withdraw(address payable fee_receiver, address payable destination, uint value) internal
{
fee_receiver.transfer(1);
destination.transfer(value);
}
}
Token uses the right-to-left-override character when calling _withdraw. As a result, the fee is incorrectly sent to msg.sender, and the token balance is sent to the owner.
Recommendation
Special control characters must not be allowed.
State variable shadowing
Configuration
- Check:
shadowing-state - Severity:
High - Confidence:
High
Description
Detection of state variables shadowed.
Exploit Scenario:
contract BaseContract{
address owner;
modifier isOwner(){
require(owner == msg.sender);
_;
}
}
contract DerivedContract is BaseContract{
address owner;
constructor(){
owner = msg.sender;
}
function withdraw() isOwner() external{
msg.sender.transfer(this.balance);
}
}
owner of BaseContract is never assigned and the modifier isOwner does not work.
Recommendation
Remove the state variable shadowing.
Suicidal
Configuration
- Check:
suicidal - Severity:
High - Confidence:
High
Description
Unprotected call to a function executing selfdestruct/suicide.
Exploit Scenario:
contract Suicidal{
function kill() public{
selfdestruct(msg.sender);
}
}
Bob calls kill and destructs the contract.
Recommendation
Protect access to all sensitive functions.
Uninitialized state variables
Configuration
- Check:
uninitialized-state - Severity:
High - Confidence:
High
Description
Uninitialized state variables.
Exploit Scenario:
contract Uninitialized{
address destination;
function transfer() payable public{
destination.transfer(msg.value);
}
}
Bob calls transfer. As a result, the Ether are sent to the address 0x0 and are lost.
Recommendation
Initialize all the variables. If a variable is meant to be initialized to zero, explicitly set it to zero to improve code readability.
Uninitialized storage variables
Configuration
- Check:
uninitialized-storage - Severity:
High - Confidence:
High
Description
An uninitialized storage variable will act as a reference to the first state variable, and can override a critical variable.
Exploit Scenario:
contract Uninitialized{
address owner = msg.sender;
struct St{
uint a;
}
function func() {
St st;
st.a = 0x0;
}
}
Bob calls func. As a result, owner is overridden to 0.
Recommendation
Initialize all storage variables.
Unprotected upgradeable contract
Configuration
- Check:
unprotected-upgrade - Severity:
High - Confidence:
High
Description
Detects logic contract that can be destructed.
Exploit Scenario:
contract Buggy is Initializable{
address payable owner;
function initialize() external initializer{
require(owner == address(0));
owner = msg.sender;
}
function kill() external{
require(msg.sender == owner);
selfdestruct(owner);
}
}
Buggy is an upgradeable contract. Anyone can call initialize on the logic contract, and destruct the contract.
Recommendation
Add a constructor to ensure initialize cannot be called on the logic contract.
Arbitrary from in transferFrom used with permit
Configuration
- Check:
arbitrary-send-erc20-permit - Severity:
High - Confidence:
Medium
Description
Detect when msg.sender is not used as from in transferFrom and permit is used.
Exploit Scenario:
function bad(address from, uint256 value, uint256 deadline, uint8 v, bytes32 r, bytes32 s, address to) public {
erc20.permit(from, address(this), value, deadline, v, r, s);
erc20.transferFrom(from, to, value);
}
If an ERC20 token does not implement permit and has a fallback function e.g. WETH, transferFrom allows an attacker to transfer all tokens approved for this contract.
Recommendation
Ensure that the underlying ERC20 token correctly implements a permit function.
Functions that send Ether to arbitrary destinations
Configuration
- Check:
arbitrary-send-eth - Severity:
High - Confidence:
Medium
Description
Unprotected call to a function sending Ether to an arbitrary address.
Exploit Scenario:
contract ArbitrarySendEth{
address destination;
function setDestination(){
destination = msg.sender;
}
function withdraw() public{
destination.transfer(this.balance);
}
}
Bob calls setDestination and withdraw. As a result he withdraws the contract's balance.
Recommendation
Ensure that an arbitrary user cannot withdraw unauthorized funds.
Array Length Assignment
Configuration
- Check:
controlled-array-length - Severity:
High - Confidence:
Medium
Description
Detects the direct assignment of an array's length.
Exploit Scenario:
contract A {
uint[] testArray; // dynamic size array
function f(uint usersCount) public {
// ...
testArray.length = usersCount;
// ...
}
function g(uint userIndex, uint val) public {
// ...
testArray[userIndex] = val;
// ...
}
}
Contract storage/state-variables are indexed by a 256-bit integer.
The user can set the array length to 2**256-1 in order to index all storage slots.
In the example above, one could call the function f to set the array length, then call the function g to control any storage slot desired.
Note that storage slots here are indexed via a hash of the indexers; nonetheless, all storage will still be accessible and could be controlled by the attacker.
Recommendation
Do not allow array lengths to be set directly set; instead, opt to add values as needed. Otherwise, thoroughly review the contract to ensure a user-controlled variable cannot reach an array length assignment.
Controlled Delegatecall
Configuration
- Check:
controlled-delegatecall - Severity:
High - Confidence:
Medium
Description
Delegatecall or callcode to an address controlled by the user.
Exploit Scenario:
contract Delegatecall{
function delegate(address to, bytes data){
to.delegatecall(data);
}
}
Bob calls delegate and delegates the execution to his malicious contract. As a result, Bob withdraws the funds of the contract and destructs it.
Recommendation
Avoid using delegatecall. Use only trusted destinations.
Payable functions using delegatecall inside a loop
Configuration
- Check:
delegatecall-loop - Severity:
High - Confidence:
Medium
Description
Detect the use of delegatecall inside a loop in a payable function.
Exploit Scenario:
contract DelegatecallInLoop{
mapping (address => uint256) balances;
function bad(address[] memory receivers) public payable {
for (uint256 i = 0; i < receivers.length; i++) {
address(this).delegatecall(abi.encodeWithSignature("addBalance(address)", receivers[i]));
}
}
function addBalance(address a) public payable {
balances[a] += msg.value;
}
}
When calling bad the same msg.value amount will be accredited multiple times.
Recommendation
Carefully check that the function called by delegatecall is not payable/doesn't use msg.value.
Incorrect exponentiation
Configuration
- Check:
incorrect-exp - Severity:
High - Confidence:
Medium
Description
Detect use of bitwise xor ^ instead of exponential **
Exploit Scenario:
contract Bug{
uint UINT_MAX = 2^256 - 1;
...
}
Alice deploys a contract in which UINT_MAX incorrectly uses ^ operator instead of ** for exponentiation
Recommendation
Use the correct operator ** for exponentiation.
Incorrect return in assembly
Configuration
- Check:
incorrect-return - Severity:
High - Confidence:
Medium
Description
Detect if return in an assembly block halts unexpectedly the execution.
Exploit Scenario:
contract C {
function f() internal returns (uint a, uint b) {
assembly {
return (5, 6)
}
}
function g() returns (bool){
f();
return true;
}
}
The return statement in f will cause execution in g to halt.
The function will return 6 bytes starting from offset 5, instead of returning a boolean.
Recommendation
Use the leave statement.
msg.value inside a loop
Configuration
- Check:
msg-value-loop - Severity:
High - Confidence:
Medium
Description
Detect the use of msg.value inside a loop.
Exploit Scenario:
contract MsgValueInLoop{
mapping (address => uint256) balances;
function bad(address[] memory receivers) public payable {
for (uint256 i=0; i < receivers.length; i++) {
balances[receivers[i]] += msg.value;
}
}
}
Recommendation
Provide an explicit array of amounts alongside the receivers array, and check that the sum of all amounts matches msg.value.
Reentrancy vulnerabilities
Configuration
- Check:
reentrancy-eth - Severity:
High - Confidence:
Medium
Description
Detection of the reentrancy bug.
Do not report reentrancies that don't involve Ether (see reentrancy-no-eth)
Exploit Scenario:
function withdrawBalance(){
// send userBalance[msg.sender] Ether to msg.sender
// if msg.sender is a contract, it will call its fallback function
if( ! (msg.sender.call.value(userBalance[msg.sender])() ) ){
throw;
}
userBalance[msg.sender] = 0;
}
Bob uses the re-entrancy bug to call withdrawBalance two times, and withdraw more than its initial deposit to the contract.
Recommendation
Apply the check-effects-interactions pattern.
Return instead of leave in assembly
Configuration
- Check:
return-leave - Severity:
High - Confidence:
Medium
Description
Detect if a return is used where a leave should be used.
Exploit Scenario:
contract C {
function f() internal returns (uint a, uint b) {
assembly {
return (5, 6)
}
}
}
The function will halt the execution, instead of returning a two uint.
Recommendation
Use the leave statement.
Storage Signed Integer Array
Configuration
- Check:
storage-array - Severity:
High - Confidence:
Medium
Description
solc versions 0.4.7-0.5.9 contain a compiler bug
leading to incorrect values in signed integer arrays.
Exploit Scenario:
contract A {
int[3] ether_balances; // storage signed integer array
function bad0() private {
// ...
ether_balances = [-1, -1, -1];
// ...
}
}
bad0() uses a (storage-allocated) signed integer array state variable to store the ether balances of three accounts.
-1 is supposed to indicate uninitialized values but the Solidity bug makes these as 1, which could be exploited by the accounts.
Recommendation
Use a compiler version >= 0.5.10.
Unchecked transfer
Configuration
- Check:
unchecked-transfer - Severity:
High - Confidence:
Medium
Description
The return value of an external transfer/transferFrom call is not checked
Exploit Scenario:
contract Token {
function transferFrom(address _from, address _to, uint256 _value) public returns (bool success);
}
contract MyBank{
mapping(address => uint) balances;
Token token;
function deposit(uint amount) public{
token.transferFrom(msg.sender, address(this), amount);
balances[msg.sender] += amount;
}
}
Several tokens do not revert in case of failure and return false. If one of these tokens is used in MyBank, deposit will not revert if the transfer fails, and an attacker can call deposit for free..
Recommendation
Use SafeERC20, or ensure that the transfer/transferFrom return value is checked.
Weak PRNG
Configuration
- Check:
weak-prng - Severity:
High - Confidence:
Medium
Description
Weak PRNG due to a modulo on block.timestamp, now or blockhash. These can be influenced by miners to some extent so they should be avoided.
Exploit Scenario:
contract Game {
uint reward_determining_number;
function guessing() external{
reward_determining_number = uint256(block.blockhash(10000)) % 10;
}
}
Eve is a miner. Eve calls guessing and re-orders the block containing the transaction.
As a result, Eve wins the game.
Recommendation
Do not use block.timestamp, now or blockhash as a source of randomness
Codex
Configuration
- Check:
codex - Severity:
High - Confidence:
Low
Description
Use codex to find vulnerabilities
Exploit Scenario:
N/A
Recommendation
Review codex's message.
Domain separator collision
Configuration
- Check:
domain-separator-collision - Severity:
Medium - Confidence:
High
Description
An ERC20 token has a function whose signature collides with EIP-2612's DOMAIN_SEPARATOR(), causing unanticipated behavior for contracts using permit functionality.
Exploit Scenario:
contract Contract{
function some_collisions() external() {}
}
some_collision clashes with EIP-2612's DOMAIN_SEPARATOR() and will interfere with contract's using permit.
Recommendation
Remove or rename the function that collides with DOMAIN_SEPARATOR().
Dangerous enum conversion
Configuration
- Check:
enum-conversion - Severity:
Medium - Confidence:
High
Description
Detect out-of-range enum conversion (solc < 0.4.5).
Exploit Scenario:
pragma solidity 0.4.2;
contract Test{
enum E{a}
function bug(uint a) public returns(E){
return E(a);
}
}
Attackers can trigger unexpected behaviour by calling bug(1).
Recommendation
Use a recent compiler version. If solc <0.4.5 is required, check the enum conversion range.
Incorrect erc20 interface
Configuration
- Check:
erc20-interface - Severity:
Medium - Confidence:
High
Description
Incorrect return values for ERC20 functions. A contract compiled with Solidity > 0.4.22 interacting with these functions will fail to execute them, as the return value is missing.
Exploit Scenario:
contract Token{
function transfer(address to, uint value) external;
//...
}
Token.transfer does not return a boolean. Bob deploys the token. Alice creates a contract that interacts with it but assumes a correct ERC20 interface implementation. Alice's contract is unable to interact with Bob's contract.
Recommendation
Set the appropriate return values and types for the defined ERC20 functions.
Incorrect erc721 interface
Configuration
- Check:
erc721-interface - Severity:
Medium - Confidence:
High
Description
Incorrect return values for ERC721 functions. A contract compiled with solidity > 0.4.22 interacting with these functions will fail to execute them, as the return value is missing.
Exploit Scenario:
contract Token{
function ownerOf(uint256 _tokenId) external view returns (bool);
//...
}
Token.ownerOf does not return an address like ERC721 expects. Bob deploys the token. Alice creates a contract that interacts with it but assumes a correct ERC721 interface implementation. Alice's contract is unable to interact with Bob's contract.
Recommendation
Set the appropriate return values and vtypes for the defined ERC721 functions.
Dangerous strict equalities
Configuration
- Check:
incorrect-equality - Severity:
Medium - Confidence:
High
Description
Use of strict equalities that can be easily manipulated by an attacker.
Exploit Scenario:
contract Crowdsale{
function fund_reached() public returns(bool){
return this.balance == 100 ether;
}
Crowdsale relies on fund_reached to know when to stop the sale of tokens.
Crowdsale reaches 100 Ether. Bob sends 0.1 Ether. As a result, fund_reached is always false and the crowdsale never ends.
Recommendation
Don't use strict equality to determine if an account has enough Ether or tokens.
Contracts that lock Ether
Configuration
- Check:
locked-ether - Severity:
Medium - Confidence:
High
Description
Contract with a payable function, but without a withdrawal capacity.
Exploit Scenario:
pragma solidity 0.4.24;
contract Locked{
function receive() payable public{
}
}
Every Ether sent to Locked will be lost.
Recommendation
Remove the payable attribute or add a withdraw function.
Deletion on mapping containing a structure
Configuration
- Check:
mapping-deletion - Severity:
Medium - Confidence:
High
Description
A deletion in a structure containing a mapping will not delete the mapping (see the Solidity documentation). The remaining data may be used to compromise the contract.
Exploit Scenario:
struct BalancesStruct{
address owner;
mapping(address => uint) balances;
}
mapping(address => BalancesStruct) public stackBalance;
function remove() internal{
delete stackBalance[msg.sender];
}
remove deletes an item of stackBalance.
The mapping balances is never deleted, so remove does not work as intended.
Recommendation
Use a lock mechanism instead of a deletion to disable structure containing a mapping.
Pyth deprecated functions
Configuration
- Check:
pyth-deprecated-functions - Severity:
Medium - Confidence:
High
Description
Detect when a Pyth deprecated function is used
Exploit Scenario:
import "@pythnetwork/pyth-sdk-solidity/IPyth.sol";
import "@pythnetwork/pyth-sdk-solidity/PythStructs.sol";
contract C {
IPyth pyth;
constructor(IPyth _pyth) {
pyth = _pyth;
}
function A(bytes32 priceId) public {
PythStructs.Price memory price = pyth.getPrice(priceId);
...
}
}
The function A uses the deprecated getPrice Pyth function.
Recommendation
Do not use deprecated Pyth functions. Visit https://api-reference.pyth.network/.
Pyth unchecked confidence level
Configuration
- Check:
pyth-unchecked-confidence - Severity:
Medium - Confidence:
High
Description
Detect when the confidence level of a Pyth price is not checked
Exploit Scenario:
import "@pythnetwork/pyth-sdk-solidity/IPyth.sol";
import "@pythnetwork/pyth-sdk-solidity/PythStructs.sol";
contract C {
IPyth pyth;
constructor(IPyth _pyth) {
pyth = _pyth;
}
function bad(bytes32 id, uint256 age) public {
PythStructs.Price memory price = pyth.getEmaPriceNoOlderThan(id, age);
// Use price
}
}
The function A uses the price without checking its confidence level.
Recommendation
Check the confidence level of a Pyth price. Visit https://docs.pyth.network/price-feeds/best-practices#confidence-intervals for more information.
Pyth unchecked publishTime
Configuration
- Check:
pyth-unchecked-publishtime - Severity:
Medium - Confidence:
High
Description
Detect when the publishTime of a Pyth price is not checked
Exploit Scenario:
import "@pythnetwork/pyth-sdk-solidity/IPyth.sol";
import "@pythnetwork/pyth-sdk-solidity/PythStructs.sol";
contract C {
IPyth pyth;
constructor(IPyth _pyth) {
pyth = _pyth;
}
function bad(bytes32 id) public {
PythStructs.Price memory price = pyth.getEmaPriceUnsafe(id);
// Use price
}
}
The function A uses the price without checking its publishTime coming from the getEmaPriceUnsafe function.
Recommendation
Check the publishTime of a Pyth price.
State variable shadowing from abstract contracts
Configuration
- Check:
shadowing-abstract - Severity:
Medium - Confidence:
High
Description
Detection of state variables shadowed from abstract contracts.
Exploit Scenario:
contract BaseContract{
address owner;
}
contract DerivedContract is BaseContract{
address owner;
}
owner of BaseContract is shadowed in DerivedContract.
Recommendation
Remove the state variable shadowing.
Tautological compare
Configuration
- Check:
tautological-compare - Severity:
Medium - Confidence:
High
Description
A variable compared to itself is probably an error as it will always return true for ==, >=, <= and always false for <, > and !=.
Exploit Scenario:
function check(uint a) external returns(bool){
return (a >= a);
}
check always return true.
Recommendation
Remove comparison or compare to different value.
Tautology or contradiction
Configuration
- Check:
tautology - Severity:
Medium - Confidence:
High
Description
Detects expressions that are tautologies or contradictions.
Exploit Scenario:
contract A {
function f(uint x) public {
// ...
if (x >= 0) { // bad -- always true
// ...
}
// ...
}
function g(uint8 y) public returns (bool) {
// ...
return (y < 512); // bad!
// ...
}
}
x is a uint256, so x >= 0 will be always true.
y is a uint8, so y <512 will be always true.
Recommendation
Fix the incorrect comparison by changing the value type or the comparison.
Write after write
Configuration
- Check:
write-after-write - Severity:
Medium - Confidence:
High
Description
Detects variables that are written but never read and written again.
Exploit Scenario:
```solidity
contract Buggy{
function my_func() external initializer{
// ...
a = b;
a = c;
// ..
}
}
```
`a` is first asigned to `b`, and then to `c`. As a result the first write does nothing.
Recommendation
Fix or remove the writes.
Misuse of a Boolean constant
Configuration
- Check:
boolean-cst - Severity:
Medium - Confidence:
Medium
Description
Detects the misuse of a Boolean constant.
Exploit Scenario:
contract A {
function f(uint x) public {
// ...
if (false) { // bad!
// ...
}
// ...
}
function g(bool b) public returns (bool) {
// ...
return (b || true); // bad!
// ...
}
}
Boolean constants in code have only a few legitimate uses. Other uses (in complex expressions, as conditionals) indicate either an error or, most likely, the persistence of faulty code.
Recommendation
Verify and simplify the condition.
Chronicle unchecked price
Configuration
- Check:
chronicle-unchecked-price - Severity:
Medium - Confidence:
Medium
Description
Chronicle oracle is used and the price returned is not checked to be valid. For more information https://docs.chroniclelabs.org/Resources/FAQ/Oracles#how-do-i-check-if-an-oracle-becomes-inactive-gets-deprecated.
Exploit Scenario:
contract C {
IChronicle chronicle;
constructor(address a) {
chronicle = IChronicle(a);
}
function bad() public {
uint256 price = chronicle.read();
}
The bad function gets the price from Chronicle by calling the read function however it does not check if the price is valid.
Recommendation
Validate that the price returned by the oracle is valid.
Constant functions using assembly code
Configuration
- Check:
constant-function-asm - Severity:
Medium - Confidence:
Medium
Description
Functions declared as constant/pure/view using assembly code.
constant/pure/view was not enforced prior to Solidity 0.5.
Starting from Solidity 0.5, a call to a constant/pure/view function uses the STATICCALL opcode, which reverts in case of state modification.
As a result, a call to an incorrectly labeled function may trap a contract compiled with Solidity 0.5.
Exploit Scenario:
contract Constant{
uint counter;
function get() public view returns(uint){
counter = counter +1;
return counter
}
}
Constant was deployed with Solidity 0.4.25. Bob writes a smart contract that interacts with Constant in Solidity 0.5.0.
All the calls to get revert, breaking Bob's smart contract execution.
Recommendation
Ensure the attributes of contracts compiled prior to Solidity 0.5.0 are correct.
Constant functions changing the state
Configuration
- Check:
constant-function-state - Severity:
Medium - Confidence:
Medium
Description
Functions declared as constant/pure/view change the state.
constant/pure/view was not enforced prior to Solidity 0.5.
Starting from Solidity 0.5, a call to a constant/pure/view function uses the STATICCALL opcode, which reverts in case of state modification.
As a result, a call to an incorrectly labeled function may trap a contract compiled with Solidity 0.5.
Exploit Scenario:
contract Constant{
uint counter;
function get() public view returns(uint){
counter = counter +1;
return counter
}
}
Constant was deployed with Solidity 0.4.25. Bob writes a smart contract that interacts with Constant in Solidity 0.5.0.
All the calls to get revert, breaking Bob's smart contract execution.
Recommendation
Ensure that attributes of contracts compiled prior to Solidity 0.5.0 are correct.
Divide before multiply
Configuration
- Check:
divide-before-multiply - Severity:
Medium - Confidence:
Medium
Description
Solidity's integer division truncates. Thus, performing division before multiplication can lead to precision loss.
Exploit Scenario:
contract A {
function f(uint n) public {
coins = (oldSupply / n) * interest;
}
}
If n is greater than oldSupply, coins will be zero. For example, with oldSupply = 5; n = 10, interest = 2, coins will be zero.
If (oldSupply * interest / n) was used, coins would have been 1.
In general, it's usually a good idea to re-arrange arithmetic to perform multiplication before division, unless the limit of a smaller type makes this dangerous.
Recommendation
Consider ordering multiplication before division.
Gelato unprotected randomness
Configuration
- Check:
gelato-unprotected-randomness - Severity:
Medium - Confidence:
Medium
Description
Detect calls to _requestRandomness within an unprotected function.
Exploit Scenario:
contract C is GelatoVRFConsumerBase {
function _fulfillRandomness(
uint256 randomness,
uint256,
bytes memory extraData
) internal override {
// Do something with the random number
}
function bad() public {
_requestRandomness(abi.encode(msg.sender));
}
}
The function bad is uprotected and requests randomness.
Recommendation
Function that request randomness should be allowed only to authorized users.
Out-of-order retryable transactions
Configuration
- Check:
out-of-order-retryable - Severity:
Medium - Confidence:
Medium
Description
Out-of-order retryable transactions
Exploit Scenario:
contract L1 {
function doStuffOnL2() external {
// Retryable A
IInbox(inbox).createRetryableTicket({
to: l2contract,
l2CallValue: 0,
maxSubmissionCost: maxSubmissionCost,
excessFeeRefundAddress: msg.sender,
callValueRefundAddress: msg.sender,
gasLimit: gasLimit,
maxFeePerGas: maxFeePerGas,
data: abi.encodeCall(l2contract.claim_rewards, ())
});
// Retryable B
IInbox(inbox).createRetryableTicket({
to: l2contract,
l2CallValue: 0,
maxSubmissionCost: maxSubmissionCost,
excessFeeRefundAddress: msg.sender,
callValueRefundAddress: msg.sender,
gasLimit: gas,
maxFeePerGas: maxFeePerGas,
data: abi.encodeCall(l2contract.unstake, ())
});
}
}
contract L2 {
function claim_rewards() public {
// rewards is computed based on balance and staking period
uint unclaimed_rewards = _compute_and_update_rewards();
token.safeTransfer(msg.sender, unclaimed_rewards);
}
// Call claim_rewards before unstaking, otherwise you lose your rewards
function unstake() public {
_free_rewards(); // clean up rewards related variables
balance = balance[msg.sender];
balance[msg.sender] = 0;
staked_token.safeTransfer(msg.sender, balance);
}
}
Bob calls doStuffOnL2 but the first retryable ticket calling claim_rewards fails. The second retryable ticket calling unstake is executed successfully. As a result, Bob loses his rewards.
Recommendation
Do not rely on the order or successful execution of retryable tickets.
Reentrancy vulnerabilities
Configuration
- Check:
reentrancy-no-eth - Severity:
Medium - Confidence:
Medium
Description
Detection of the reentrancy bug.
Do not report reentrancies that involve Ether (see reentrancy-eth).
Exploit Scenario:
function bug(){
require(not_called);
if( ! (msg.sender.call() ) ){
throw;
}
not_called = False;
}
Recommendation
Apply the check-effects-interactions pattern.
Reused base constructors
Configuration
- Check:
reused-constructor - Severity:
Medium - Confidence:
Medium
Description
Detects if the same base constructor is called with arguments from two different locations in the same inheritance hierarchy.
Exploit Scenario:
pragma solidity ^0.4.0;
contract A{
uint num = 5;
constructor(uint x) public{
num += x;
}
}
contract B is A{
constructor() A(2) public { /* ... */ }
}
contract C is A {
constructor() A(3) public { /* ... */ }
}
contract D is B, C {
constructor() public { /* ... */ }
}
contract E is B {
constructor() A(1) public { /* ... */ }
}
The constructor of A is called multiple times in D and E:
Dinherits fromBandC, both of which constructA.Eonly inherits fromB, butBandEconstructA. .
Recommendation
Remove the duplicate constructor call.
Dangerous usage of tx.origin
Configuration
- Check:
tx-origin - Severity:
Medium - Confidence:
Medium
Description
tx.origin-based protection can be abused by a malicious contract if a legitimate user interacts with the malicious contract.
Exploit Scenario:
contract TxOrigin {
address owner = msg.sender;
function bug() {
require(tx.origin == owner);
}
Bob is the owner of TxOrigin. Bob calls Eve's contract. Eve's contract calls TxOrigin and bypasses the tx.origin protection.
Recommendation
Do not use tx.origin for authorization.
Unchecked low-level calls
Configuration
- Check:
unchecked-lowlevel - Severity:
Medium - Confidence:
Medium
Description
The return value of a low-level call is not checked.
Exploit Scenario:
contract MyConc{
function my_func(address payable dst) public payable{
dst.call.value(msg.value)("");
}
}
The return value of the low-level call is not checked, so if the call fails, the Ether will be locked in the contract. If the low level is used to prevent blocking operations, consider logging failed calls.
Recommendation
Ensure that the return value of a low-level call is checked or logged.
Unchecked Send
Configuration
- Check:
unchecked-send - Severity:
Medium - Confidence:
Medium
Description
The return value of a send is not checked.
Exploit Scenario:
contract MyConc{
function my_func(address payable dst) public payable{
dst.send(msg.value);
}
}
The return value of send is not checked, so if the send fails, the Ether will be locked in the contract.
If send is used to prevent blocking operations, consider logging the failed send.
Recommendation
Ensure that the return value of send is checked or logged.
Uninitialized local variables
Configuration
- Check:
uninitialized-local - Severity:
Medium - Confidence:
Medium
Description
Uninitialized local variables.
Exploit Scenario:
contract Uninitialized is Owner{
function withdraw() payable public onlyOwner{
address to;
to.transfer(this.balance)
}
}
Bob calls transfer. As a result, all Ether is sent to the address 0x0 and is lost.
Recommendation
Initialize all the variables. If a variable is meant to be initialized to zero, explicitly set it to zero to improve code readability.
Unused return
Configuration
- Check:
unused-return - Severity:
Medium - Confidence:
Medium
Description
The return value of an external call is not stored in a local or state variable.
Exploit Scenario:
contract MyConc{
using SafeMath for uint;
function my_func(uint a, uint b) public{
a.add(b);
}
}
MyConc calls add of SafeMath, but does not store the result in a. As a result, the computation has no effect.
Recommendation
Ensure that all the return values of the function calls are used.
Chainlink Feed Registry usage
Configuration
- Check:
chainlink-feed-registry - Severity:
Low - Confidence:
High
Description
Detect when Chainlink Feed Registry is used. At the moment is only available on Ethereum Mainnet.
Exploit Scenario:
import "chainlink/contracts/src/v0.8/interfaces/FeedRegistryInteface.sol"
contract A {
FeedRegistryInterface public immutable registry;
constructor(address _registry) {
registry = _registry;
}
function getPrice(address base, address quote) public return(uint256) {
(, int256 price,,,) = registry.latestRoundData(base, quote);
// Do price validation
return uint256(price);
}
}
If the contract is deployed on a different chain than Ethereum Mainnet the getPrice function will revert.
Recommendation
Do not use Chainlink Feed Registry outside of Ethereum Mainnet.
Incorrect modifier
Configuration
- Check:
incorrect-modifier - Severity:
Low - Confidence:
High
Description
If a modifier does not execute _ or revert, the execution of the function will return the default value, which can be misleading for the caller.
Exploit Scenario:
modidfier myModif(){
if(..){
_;
}
}
function get() myModif returns(uint){
}
If the condition in myModif is false, the execution of get() will return 0.
Recommendation
All the paths in a modifier must execute _ or revert.
Optimism deprecated predeploy or function
Configuration
- Check:
optimism-deprecation - Severity:
Low - Confidence:
High
Description
Detect when deprecated Optimism predeploy or function is used.
Exploit Scenario:
interface GasPriceOracle {
function scalar() external view returns (uint256);
}
contract Test {
GasPriceOracle constant OPT_GAS = GasPriceOracle(0x420000000000000000000000000000000000000F);
function a() public {
OPT_GAS.scalar();
}
}
The call to the scalar function of the Optimism GasPriceOracle predeploy always revert.
Recommendation
Do not use the deprecated components.
Built-in Symbol Shadowing
Configuration
- Check:
shadowing-builtin - Severity:
Low - Confidence:
High
Description
Detection of shadowing built-in symbols using local variables, state variables, functions, modifiers, or events.
Exploit Scenario:
pragma solidity ^0.4.24;
contract Bug {
uint now; // Overshadows current time stamp.
function assert(bool condition) public {
// Overshadows built-in symbol for providing assertions.
}
function get_next_expiration(uint earlier_time) private returns (uint) {
return now + 259200; // References overshadowed timestamp.
}
}
now is defined as a state variable, and shadows with the built-in symbol now. The function assert overshadows the built-in assert function. Any use of either of these built-in symbols may lead to unexpected results.
Recommendation
Rename the local variables, state variables, functions, modifiers, and events that shadow a Built-in symbol.
Local variable shadowing
Configuration
- Check:
shadowing-local - Severity:
Low - Confidence:
High
Description
Detection of shadowing using local variables.
Exploit Scenario:
pragma solidity ^0.4.24;
contract Bug {
uint owner;
function sensitive_function(address owner) public {
// ...
require(owner == msg.sender);
}
function alternate_sensitive_function() public {
address owner = msg.sender;
// ...
require(owner == msg.sender);
}
}
sensitive_function.owner shadows Bug.owner. As a result, the use of owner in sensitive_function might be incorrect.
Recommendation
Rename the local variables that shadow another component.
Uninitialized function pointers in constructors
Configuration
- Check:
uninitialized-fptr-cst - Severity:
Low - Confidence:
High
Description
solc versions 0.4.5-0.4.26 and 0.5.0-0.5.8 contain a compiler bug leading to unexpected behavior when calling uninitialized function pointers in constructors.
Exploit Scenario:
contract bad0 {
constructor() public {
/* Uninitialized function pointer */
function(uint256) internal returns(uint256) a;
a(10);
}
}
The call to a(10) will lead to unexpected behavior because function pointer a is not initialized in the constructor.
Recommendation
Initialize function pointers before calling. Avoid function pointers if possible.
Pre-declaration usage of local variables
Configuration
- Check:
variable-scope - Severity:
Low - Confidence:
High
Description
Detects the possible usage of a variable before the declaration is stepped over (either because it is later declared, or declared in another scope).
Exploit Scenario:
contract C {
function f(uint z) public returns (uint) {
uint y = x + 9 + z; // 'x' is used pre-declaration
uint x = 7;
if (z % 2 == 0) {
uint max = 5;
// ...
}
// 'max' was intended to be 5, but it was mistakenly declared in a scope and not assigned (so it is zero).
for (uint i = 0; i < max; i++) {
x += 1;
}
return x;
}
}
In the case above, the variable x is used before its declaration, which may result in unintended consequences.
Additionally, the for-loop uses the variable max, which is declared in a previous scope that may not always be reached. This could lead to unintended consequences if the user mistakenly uses a variable prior to any intended declaration assignment. It also may indicate that the user intended to reference a different variable.
Recommendation
Move all variable declarations prior to any usage of the variable, and ensure that reaching a variable declaration does not depend on some conditional if it is used unconditionally.
Void constructor
Configuration
- Check:
void-cst - Severity:
Low - Confidence:
High
Description
Detect the call to a constructor that is not implemented
Exploit Scenario:
contract A{}
contract B is A{
constructor() public A(){}
}
When reading B's constructor definition, we might assume that A() initiates the contract, but no code is executed.
Recommendation
Remove the constructor call.
Calls inside a loop
Configuration
- Check:
calls-loop - Severity:
Low - Confidence:
Medium
Description
Calls inside a loop might lead to a denial-of-service attack.
Exploit Scenario:
contract CallsInLoop{
address[] destinations;
constructor(address[] newDestinations) public{
destinations = newDestinations;
}
function bad() external{
for (uint i=0; i < destinations.length; i++){
destinations[i].transfer(i);
}
}
}
If one of the destinations has a fallback function that reverts, bad will always revert.
Recommendation
Favor pull over push strategy for external calls.
Missing events access control
Configuration
- Check:
events-access - Severity:
Low - Confidence:
Medium
Description
Detect missing events for critical access control parameters
Exploit Scenario:
contract C {
modifier onlyAdmin {
if (msg.sender != owner) throw;
_;
}
function updateOwner(address newOwner) onlyAdmin external {
owner = newOwner;
}
}
updateOwner() has no event, so it is difficult to track off-chain owner changes.
Recommendation
Emit an event for critical parameter changes.
Missing events arithmetic
Configuration
- Check:
events-maths - Severity:
Low - Confidence:
Medium
Description
Detect missing events for critical arithmetic parameters.
Exploit Scenario:
contract C {
modifier onlyOwner {
if (msg.sender != owner) throw;
_;
}
function setBuyPrice(uint256 newBuyPrice) onlyOwner public {
buyPrice = newBuyPrice;
}
function buy() external {
... // buyPrice is used to determine the number of tokens purchased
}
}
setBuyPrice() does not emit an event, so it is difficult to track changes in the value of buyPrice off-chain.
Recommendation
Emit an event for critical parameter changes.
Dangerous unary expressions
Configuration
- Check:
incorrect-unary - Severity:
Low - Confidence:
Medium
Description
Unary expressions such as x=+1 probably typos.
Exploit Scenario:
contract Bug{
uint public counter;
function increase() public returns(uint){
counter=+1;
return counter;
}
}
increase() uses =+ instead of +=, so counter will never exceed 1.
Recommendation
Remove the unary expression.
Missing zero address validation
Configuration
- Check:
missing-zero-check - Severity:
Low - Confidence:
Medium
Description
Detect missing zero address validation.
Exploit Scenario:
contract C {
modifier onlyAdmin {
if (msg.sender != owner) throw;
_;
}
function updateOwner(address newOwner) onlyAdmin external {
owner = newOwner;
}
}
Bob calls updateOwner without specifying the newOwner, so Bob loses ownership of the contract.
Recommendation
Check that the address is not zero.
Reentrancy vulnerabilities
Configuration
- Check:
reentrancy-benign - Severity:
Low - Confidence:
Medium
Description
Detection of the reentrancy bug.
Only report reentrancy that acts as a double call (see reentrancy-eth, reentrancy-no-eth).
Exploit Scenario:
function callme(){
if( ! (msg.sender.call()() ) ){
throw;
}
counter += 1
}
callme contains a reentrancy. The reentrancy is benign because it's exploitation would have the same effect as two consecutive calls.
Recommendation
Apply the check-effects-interactions pattern.
Reentrancy vulnerabilities
Configuration
- Check:
reentrancy-events - Severity:
Low - Confidence:
Medium
Description
Detects reentrancies that allow manipulation of the order or value of events.
Exploit Scenario:
contract ReentrantContract {
function f() external {
if (BugReentrancyEvents(msg.sender).counter() == 1) {
BugReentrancyEvents(msg.sender).count(this);
}
}
}
contract Counter {
uint public counter;
event Counter(uint);
}
contract BugReentrancyEvents is Counter {
function count(ReentrantContract d) external {
counter += 1;
d.f();
emit Counter(counter);
}
}
contract NoReentrancyEvents is Counter {
function count(ReentrantContract d) external {
counter += 1;
emit Counter(counter);
d.f();
}
}
If the external call d.f() re-enters BugReentrancyEvents, the Counter events will be incorrect (Counter(2), Counter(2)) whereas NoReentrancyEvents will correctly emit
(Counter(1), Counter(2)). This may cause issues for offchain components that rely on the values of events e.g. checking for the amount deposited to a bridge.
Recommendation
Apply the check-effects-interactions pattern.
Return Bomb
Configuration
- Check:
return-bomb - Severity:
Low - Confidence:
Medium
Description
A low level callee may consume all callers gas unexpectedly.
Exploit Scenario:
//Modified from https://github.com/nomad-xyz/ExcessivelySafeCall
contract BadGuy {
function youveActivateMyTrapCard() external pure returns (bytes memory) {
assembly{
revert(0, 1000000)
}
}
}
contract Mark {
function oops(address badGuy) public{
bool success;
bytes memory ret;
// Mark pays a lot of gas for this copy
//(success, ret) = badGuy.call{gas:10000}(
(success, ret) = badGuy.call(
abi.encodeWithSelector(
BadGuy.youveActivateMyTrapCard.selector
)
);
// Mark may OOG here, preventing local state changes
//importantCleanup();
}
}
After Mark calls BadGuy bytes are copied from returndata to memory, the memory expansion cost is paid. This means that when using a standard solidity call, the callee can "returnbomb" the caller, imposing an arbitrary gas cost. Callee unexpectedly makes the caller OOG.
Recommendation
Avoid unlimited implicit decoding of returndata.
Block timestamp
Configuration
- Check:
timestamp - Severity:
Low - Confidence:
Medium
Description
Dangerous usage of block.timestamp. block.timestamp can be manipulated by miners.
Exploit Scenario:
"Bob's contract relies on block.timestamp for its randomness. Eve is a miner and manipulates block.timestamp to exploit Bob's contract.
Recommendation
Avoid relying on block.timestamp.
Assembly usage
Configuration
- Check:
assembly - Severity:
Informational - Confidence:
High
Description
The use of assembly is error-prone and should be avoided.
Recommendation
Do not use evm assembly.
Assert state change
Configuration
- Check:
assert-state-change - Severity:
Informational - Confidence:
High
Description
Incorrect use of assert(). See Solidity best practices.
Exploit Scenario:
contract A {
uint s_a;
function bad() public {
assert((s_a += 1) > 10);
}
}
The assert in bad() increments the state variable s_a while checking for the condition.
Recommendation
Use require for invariants modifying the state.
Boolean equality
Configuration
- Check:
boolean-equal - Severity:
Informational - Confidence:
High
Description
Detects the comparison to boolean constants.
Exploit Scenario:
contract A {
function f(bool x) public {
// ...
if (x == true) { // bad!
// ...
}
// ...
}
}
Boolean constants can be used directly and do not need to be compare to true or false.
Recommendation
Remove the equality to the boolean constant.
Cyclomatic complexity
Configuration
- Check:
cyclomatic-complexity - Severity:
Informational - Confidence:
High
Description
Detects functions with high (> 11) cyclomatic complexity.
Recommendation
Reduce cyclomatic complexity by splitting the function into several smaller subroutines.
Deprecated standards
Configuration
- Check:
deprecated-standards - Severity:
Informational - Confidence:
High
Description
Detect the usage of deprecated standards.
Exploit Scenario:
contract ContractWithDeprecatedReferences {
// Deprecated: Change block.blockhash() -> blockhash()
bytes32 globalBlockHash = block.blockhash(0);
// Deprecated: Change constant -> view
function functionWithDeprecatedThrow() public constant {
// Deprecated: Change msg.gas -> gasleft()
if(msg.gas == msg.value) {
// Deprecated: Change throw -> revert()
throw;
}
}
// Deprecated: Change constant -> view
function functionWithDeprecatedReferences() public constant {
// Deprecated: Change sha3() -> keccak256()
bytes32 sha3Result = sha3("test deprecated sha3 usage");
// Deprecated: Change callcode() -> delegatecall()
address(this).callcode();
// Deprecated: Change suicide() -> selfdestruct()
suicide(address(0));
}
}
Recommendation
Replace all uses of deprecated symbols.
Unindexed ERC20 event parameters
Configuration
- Check:
erc20-indexed - Severity:
Informational - Confidence:
High
Description
Detects whether events defined by the ERC20 specification that should have some parameters as indexed are missing the indexed keyword.
Exploit Scenario:
contract ERC20Bad {
// ...
event Transfer(address from, address to, uint value);
event Approval(address owner, address spender, uint value);
// ...
}
Transfer and Approval events should have the 'indexed' keyword on their two first parameters, as defined by the ERC20 specification.
Failure to include these keywords will exclude the parameter data in the transaction/block's bloom filter, so external tooling searching for these parameters may overlook them and fail to index logs from this token contract.
Recommendation
Add the indexed keyword to event parameters that should include it, according to the ERC20 specification.
Function Initializing State
Configuration
- Check:
function-init-state - Severity:
Informational - Confidence:
High
Description
Detects the immediate initialization of state variables through function calls that are not pure/constant, or that use non-constant state variable.
Exploit Scenario:
contract StateVarInitFromFunction {
uint public v = set(); // Initialize from function (sets to 77)
uint public w = 5;
uint public x = set(); // Initialize from function (sets to 88)
address public shouldntBeReported = address(8);
constructor(){
// The constructor is run after all state variables are initialized.
}
function set() public returns(uint) {
// If this function is being used to initialize a state variable declared
// before w, w will be zero. If it is declared after w, w will be set.
if(w == 0) {
return 77;
}
return 88;
}
}
In this case, users might intend a function to return a value a state variable can initialize with, without realizing the context for the contract is not fully initialized. In the example above, the same function sets two different values for state variables because it checks a state variable that is not yet initialized in one case, and is initialized in the other. Special care must be taken when initializing state variables from an immediate function call so as not to incorrectly assume the state is initialized.
Recommendation
Remove any initialization of state variables via non-constant state variables or function calls. If variables must be set upon contract deployment, locate initialization in the constructor instead.
Incorrect usage of using-for statement
Configuration
- Check:
incorrect-using-for - Severity:
Informational - Confidence:
High
Description
In Solidity, it is possible to use libraries for certain types, by the using-for statement (using <library> for <type>). However, the Solidity compiler doesn't check whether a given library has at least one function matching a given type. If it doesn't, such a statement has no effect and may be confusing.
Exploit Scenario:
```solidity
library L {
function f(bool) public pure {}
}
using L for uint;
```
Such a code will compile despite the fact that `L` has no function with `uint` as its first argument.
Recommendation
Make sure that the libraries used in using-for statements have at least one function matching a type used in these statements.
Low-level calls
Configuration
- Check:
low-level-calls - Severity:
Informational - Confidence:
High
Description
The use of low-level calls is error-prone. Low-level calls do not check for code existence or call success.
Recommendation
Avoid low-level calls. Check the call success. If the call is meant for a contract, check for code existence.
Missing inheritance
Configuration
- Check:
missing-inheritance - Severity:
Informational - Confidence:
High
Description
Detect missing inheritance.
Exploit Scenario:
interface ISomething {
function f1() external returns(uint);
}
contract Something {
function f1() external returns(uint){
return 42;
}
}
Something should inherit from ISomething.
Recommendation
Inherit from the missing interface or contract.
Conformance to Solidity naming conventions
Configuration
- Check:
naming-convention - Severity:
Informational - Confidence:
High
Description
Solidity defines a naming convention that should be followed.
Rule exceptions
- Allow constant variable name/symbol/decimals to be lowercase (
ERC20). - Allow
_at the beginning of themixed_casematch for private variables and unused parameters.
Recommendation
Follow the Solidity naming convention.
Different pragma directives are used
Configuration
- Check:
pragma - Severity:
Informational - Confidence:
High
Description
Detect whether different Solidity versions are used.
Recommendation
Use one Solidity version.
Redundant Statements
Configuration
- Check:
redundant-statements - Severity:
Informational - Confidence:
High
Description
Detect the usage of redundant statements that have no effect.
Exploit Scenario:
contract RedundantStatementsContract {
constructor() public {
uint; // Elementary Type Name
bool; // Elementary Type Name
RedundantStatementsContract; // Identifier
}
function test() public returns (uint) {
uint; // Elementary Type Name
assert; // Identifier
test; // Identifier
return 777;
}
}
Each commented line references types/identifiers, but performs no action with them, so no code will be generated for such statements and they can be removed.
Recommendation
Remove redundant statements if they congest code but offer no value.
Incorrect versions of Solidity
Configuration
- Check:
solc-version - Severity:
Informational - Confidence:
High
Description
solc frequently releases new compiler versions. Using an old version prevents access to new Solidity security checks.
We also recommend avoiding complex pragma statement.
Recommendation
Deploy with a recent version of Solidity (at least 0.8.0) with no known severe issues.
Use a simple pragma version that allows any of these versions. Consider using the latest version of Solidity for testing.
Unimplemented functions
Configuration
- Check:
unimplemented-functions - Severity:
Informational - Confidence:
High
Description
Detect functions that are not implemented on derived-most contracts.
Exploit Scenario:
interface BaseInterface {
function f1() external returns(uint);
function f2() external returns(uint);
}
interface BaseInterface2 {
function f3() external returns(uint);
}
contract DerivedContract is BaseInterface, BaseInterface2 {
function f1() external returns(uint){
return 42;
}
}
DerivedContract does not implement BaseInterface.f2 or BaseInterface2.f3.
As a result, the contract will not properly compile.
All unimplemented functions must be implemented on a contract that is meant to be used.
Recommendation
Implement all unimplemented functions in any contract you intend to use directly (not simply inherit from).
Unused state variable
Configuration
- Check:
unused-state - Severity:
Informational - Confidence:
High
Description
Unused state variable.
Recommendation
Remove unused state variables.
Costly operations inside a loop
Configuration
- Check:
costly-loop - Severity:
Informational - Confidence:
Medium
Description
Costly operations inside a loop might waste gas, so optimizations are justified.
Exploit Scenario:
contract CostlyOperationsInLoop{
uint loop_count = 100;
uint state_variable=0;
function bad() external{
for (uint i=0; i < loop_count; i++){
state_variable++;
}
}
function good() external{
uint local_variable = state_variable;
for (uint i=0; i < loop_count; i++){
local_variable++;
}
state_variable = local_variable;
}
}
Incrementing state_variable in a loop incurs a lot of gas because of expensive SSTOREs, which might lead to an out-of-gas.
Recommendation
Use a local variable to hold the loop computation result.
Dead-code
Configuration
- Check:
dead-code - Severity:
Informational - Confidence:
Medium
Description
Functions that are not used.
Exploit Scenario:
contract Contract{
function dead_code() internal() {}
}
dead_code is not used in the contract, and make the code's review more difficult.
Recommendation
Remove unused functions.
Reentrancy vulnerabilities
Configuration
- Check:
reentrancy-unlimited-gas - Severity:
Informational - Confidence:
Medium
Description
Detection of the reentrancy bug.
Only report reentrancy that is based on transfer or send.
Exploit Scenario:
function callme(){
msg.sender.transfer(balances[msg.sender]):
balances[msg.sender] = 0;
}
send and transfer do not protect from reentrancies in case of gas price changes.
Recommendation
Apply the check-effects-interactions pattern.
Too many digits
Configuration
- Check:
too-many-digits - Severity:
Informational - Confidence:
Medium
Description
Literals with many digits are difficult to read and review. Use scientific notation or suffixes to make the code more readable.
Exploit Scenario:
contract MyContract{
uint 1_ether = 10000000000000000000;
}
While 1_ether looks like 1 ether, it is 10 ether. As a result, it's likely to be used incorrectly.
Recommendation
Use:
Cache array length
Configuration
- Check:
cache-array-length - Severity:
Optimization - Confidence:
High
Description
Detects for loops that use length member of some storage array in their loop condition and don't modify it.
Exploit Scenario:
contract C
{
uint[] array;
function f() public
{
for (uint i = 0; i < array.length; i++)
{
// code that does not modify length of `array`
}
}
}
Since the for loop in f doesn't modify array.length, it is more gas efficient to cache it in some local variable and use that variable instead, like in the following example:
contract C
{
uint[] array;
function f() public
{
uint array_length = array.length;
for (uint i = 0; i < array_length; i++)
{
// code that does not modify length of `array`
}
}
}
Recommendation
Cache the lengths of storage arrays if they are used and not modified in for loops.
State variables that could be declared constant
Configuration
- Check:
constable-states - Severity:
Optimization - Confidence:
High
Description
State variables that are not updated following deployment should be declared constant to save gas.
Recommendation
Add the constant attribute to state variables that never change.
Public function that could be declared external
Configuration
- Check:
external-function - Severity:
Optimization - Confidence:
High
Description
public functions that are never called by the contract should be declared external, and its immutable parameters should be located in calldata to save gas.
Recommendation
Use the external attribute for functions never called from the contract, and change the location of immutable parameters to calldata to save gas.
State variables that could be declared immutable
Configuration
- Check:
immutable-states - Severity:
Optimization - Confidence:
High
Description
State variables that are not updated following deployment should be declared immutable to save gas.
Recommendation
Add the immutable attribute to state variables that never change or are set only in the constructor.
Public variable read in external context
Configuration
- Check:
var-read-using-this - Severity:
Optimization - Confidence:
High
Description
The contract reads its own variable using this, adding overhead of an unnecessary STATICCALL.
Exploit Scenario:
contract C {
mapping(uint => address) public myMap;
function test(uint x) external returns(address) {
return this.myMap(x);
}
}
Recommendation
Read the variable directly from storage instead of calling the contract.
Slither's plugin architecture lets you integrate new detectors that run from the command-line.
Detector Skeleton
The skeleton for a detector is:
from slither.detectors.abstract_detector import AbstractDetector, DetectorClassification
class Skeleton(AbstractDetector):
"""
Documentation
"""
ARGUMENT = 'mydetector' # slither will launch the detector with slither.py --detect mydetector
HELP = 'Help printed by slither'
IMPACT = DetectorClassification.HIGH
CONFIDENCE = DetectorClassification.HIGH
WIKI = ''
WIKI_TITLE = ''
WIKI_DESCRIPTION = ''
WIKI_EXPLOIT_SCENARIO = ''
WIKI_RECOMMENDATION = ''
def _detect(self):
info = ['This is an example']
res = self.generate_result(info)
return [res]
ARGUMENTlets you run the detector from the command-lineHELPis the information printed from the command-lineIMPACTindicates the impact of the issue. Allowed values are:DetectorClassification.OPTIMIZATION: printed in greenDetectorClassification.INFORMATIONAL: printed in greenDetectorClassification.LOW: printed in greenDetectorClassification.MEDIUM: printed in yellowDetectorClassification.HIGH: printed in red
CONFIDENCEindicates your confidence in the analysis. Allowed values are:DetectorClassification.LOWDetectorClassification.MEDIUMDetectorClassification.HIGH
WIKIconstants are used to generate automatically the documentation.
_detect() needs to return a list of findings. A finding is an element generated with self.generate_result(info), where info is a list of text or contract's object (contract, function, node, ...)
An AbstractDetector object has the slither attribute, which returns the current Slither object.
Integration
You can integrate your detector into Slither by:
- Adding it in slither/detectors/all_detectors.py
- or, by creating a plugin package (see the skeleton example).
Test the detector
See CONTRIBUTING.md#development-environment
Example
backdoor.py will detect any function with backdoor in its name.
Slither allows printing contracts information through its printers.
| Num | Printer | Description |
|---|---|---|
| 1 | call-graph | Export the call-graph of the contracts to a dot file |
| 2 | cfg | Export the CFG of each functions |
| 3 | cheatcode | Print the usage of (Foundry) cheatcodes in the code. |
| 4 | ck | Chidamber and Kemerer (CK) complexity metrics and related function attributes |
| 5 | constructor-calls | Print the constructors executed |
| 6 | contract-summary | Print a summary of the contracts |
| 7 | data-dependency | Print the data dependencies of the variables |
| 8 | declaration | Prototype showing the source code declaration, implementation and references of the contracts objects |
| 9 | dominator | Export the dominator tree of each functions |
| 10 | echidna | Export Echidna guiding information |
| 11 | entry-points | Print all the state-changing entry point functions of the contracts |
| 12 | evm | Print the evm instructions of nodes in functions |
| 13 | function-id | Print the keccak256 signature of the functions |
| 14 | function-summary | Print a summary of the functions |
| 15 | halstead | Computes the Halstead complexity metrics for each contract |
| 16 | human-summary | Print a human-readable summary of the contracts |
| 17 | inheritance | Print the inheritance relations between contracts |
| 18 | inheritance-graph | Export the inheritance graph of each contract to a dot file |
| 19 | loc | Count the total number lines of code (LOC), source lines of code (SLOC) |
| 20 | martin | Martin agile software metrics (Ca, Ce, I, A, D) |
| 21 | modifiers | Print the modifiers called by each function |
| 22 | not-pausable | Print functions that do not use whenNotPaused |
| 23 | require | Print the require and assert calls of each function |
| 24 | slithir | Print the slithIR representation of the functions |
| 25 | slithir-ssa | Print the slithIR representation of the functions |
| 26 | variable-order | Print the storage order of the state variables |
| 27 | vars-and-auth | Print the state variables written and the authorization of the functions |
Several printers require xdot installed for visualization:
sudo apt install xdot
Call Graph
slither file.sol --print call-graph
Export the call-graph of the contracts to a dot file
Example
$ slither examples/printers/call_graph.sol --print call-graph
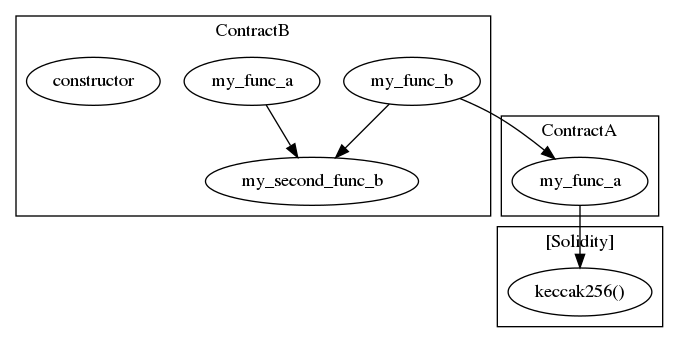
The output format is dot. To vizualize the graph:
$ xdot examples/printers/call_graph.sol.dot
To convert the file to svg:
$ dot examples/printers/call_graph.sol.dot -Tpng -o examples/printers/call_graph.sol.png
CFG
Export the control flow graph of each function
slither file.sol --print cfg
Example
The output format is dot. To vizualize the graph:
$ xdot function.sol.dot
To convert the file to svg:
$ dot function.dot -Tsvg -o function.sol.png
Contract Summary
Output a quick summary of the contract.
slither file.sol --print contract-summary
Example
$ slither examples/printers/quick_summary.sol --print contract-summary
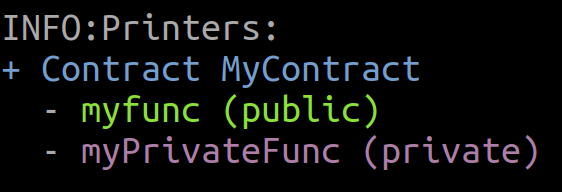
Data Dependencies
Print the data dependencies of the variables
slither file.sol --print data-dependency
Example
$ slither examples/printers/data_dependencies.sol --print data-dependency
Contract MyContract
+----------+----------------------+
| Variable | Dependencies |
+----------+----------------------+
| a | ['input_a'] |
| b | ['input_b', 'input'] |
| c | [] |
+----------+----------------------+
Function setA(uint256,uint256)
+--------------+--------------+
| Variable | Dependencies |
+--------------+--------------+
| input_a | [] |
| input_b | [] |
| MyContract:a | ['input_a'] |
| MyContract:b | [] |
| MyContract:c | [] |
+--------------+--------------+
Function setB(uint256)
+--------------+----------------------+
| Variable | Dependencies |
+--------------+----------------------+
| input | ['input_b'] |
| MyContract:a | [] |
| MyContract:b | ['input_b', 'input'] |
| MyContract:c | [] |
+--------------+----------------------+
Constructor Calls
slither file.sol --print constructor-calls
Print the calling sequence of constructors based on C3 linearization.
Example
...
$ slither examples/printers/constructors.sol --print constructor-calls
[..]
Contact Name: test2
Constructor Call Sequence: test--> test2
Constructor Definitions:
contract name : test2
constructor()public{
a=10;
}
contract name : test
constructor()public{
a =5;
}
Contact Name: test3
Constructor Call Sequence: test--> test2--> test3
Constructor Definitions:
contract name : test3
constructor(bytes32 _name)public{
owner = msg.sender;
name = _name;
a=20;
}
contract name : test2
constructor()public{
a=10;
}
contract name : test
constructor()public{
a =5;
}
Echidna
This printer is meant to improve Echidna code coverage. The printer is a WIP and is not yet used by Echidna.
EVM
slither file.sol --print evm
Print the EVM representation of the functions
Example
$ slither examples/printers/evm.sol --print evm
INFO:Printers:Contract Test
Function Test.foo()
Node: ENTRY_POINT None
Source line 5: function foo() public returns (address) {
EVM Instructions:
0x44: JUMPDEST
0x45: CALLVALUE
0x50: POP
0x51: PUSH1 0x56
0x53: PUSH1 0x98
0x55: JUMP
0x56: JUMPDEST
0x57: PUSH1 0x40
0x59: MLOAD
0x5a: DUP1
0x5b: DUP3
0x5c: PUSH20 0xffffffffffffffffffffffffffffffffffffffff
0x71: AND
0x72: PUSH20 0xffffffffffffffffffffffffffffffffffffffff
0x87: AND
0x88: DUP2
0x89: MSTORE
0x8a: PUSH1 0x20
0x8c: ADD
0x8d: SWAP2
0x8e: POP
0x8f: POP
0x90: PUSH1 0x40
0x92: MLOAD
0x93: DUP1
0x94: SWAP2
0x95: SUB
0x96: SWAP1
0x97: RETURN
0x98: JUMPDEST
0x99: PUSH1 0x0
0xa2: POP
0xa3: SWAP1
0xa4: JUMP
Node: NEW VARIABLE from = msg.sender
Source line 6: address from = msg.sender;
EVM Instructions:
0x9b: DUP1
0x9c: CALLER
0x9d: SWAP1
0x9e: POP
Node: RETURN (from)
Source line 7: return(from);
EVM Instructions:
0x9f: DUP1
0xa0: SWAP2
0xa1: POP
Function ID
slither file.sol --print function-id
Print the keccack256 signature of the functions
Examples
$ slither examples/printers/authorization.sol --print function-id
INFO:Printers:
MyContract:
+---------------+------------+
| Name | ID |
+---------------+------------+
| constructor() | 0x90fa17bb |
| mint(uint256) | 0xa0712d68 |
+---------------+------------+
Function Summary
slither file.sol --print function-summary
Output a summary of the contract showing for each function:
- What are the visibility and the modifiers
- What are the state variables read or written
- What are the calls
Example
$ slither tests/backdoor.sol --print function-summary
[...]
Contract C
Contract vars: []
Inheritances:: []
+-----------------+------------+-----------+----------------+-------+---------------------------+----------------+
| Function | Visibility | Modifiers | Read | Write | Internal Calls | External Calls |
+-----------------+------------+-----------+----------------+-------+---------------------------+----------------+
| i_am_a_backdoor | public | [] | ['msg.sender'] | [] | ['selfdestruct(address)'] | [] |
+-----------------+------------+-----------+----------------+-------+---------------------------+----------------+
+-----------+------------+------+-------+----------------+----------------+
| Modifiers | Visibility | Read | Write | Internal Calls | External Calls |
+-----------+------------+------+-------+----------------+----------------+
+-----------+------------+------+-------+----------------+----------------+
Human Summary
slither file.sol --print human-summary
Print a human-readable summary of the contracts
Example
$ slither examples/printers/human_printer.sol --print human-summary
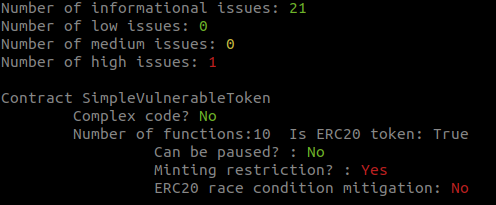
Inheritance
slither file.sol --print inheritance
Print the inheritance relations between contracts
Example
$ slither examples/printers/inheritances.sol --print inheritance
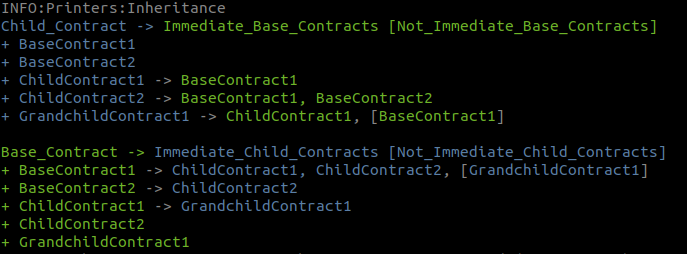
Inheritance Graph
slither file.sol --print inheritance-graph
Output a graph showing the inheritance interaction between the contracts.
Example
$ slither examples/printers/inheritances.sol --print inheritance-graph
[...]
INFO:PrinterInheritance:Inheritance Graph: examples/DAO.sol.dot
The output format is dot. To vizualize the graph:
$ xdot examples/printers/inheritances.sol.dot
To convert the file to svg:
$ dot examples/printers/inheritances.sol.dot -Tsvg -o examples/printers/inheritances.sol.png
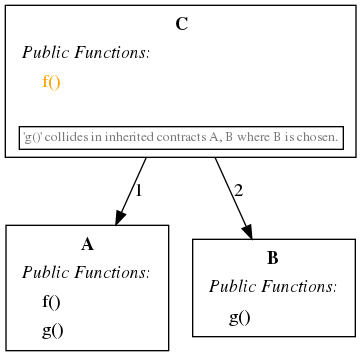
Indicators:
- If a contract has multiple inheritance, the connecting edges will be labelled in order of declaration.
- Functions highlighted orange override a parent's function.
- Functions which do not override each other directly (but collide due to multiple inheritance) will be emphasized at the bottom of the affected contract node in grey font.
- Variables highlighted red overshadow a parent's variable declaration.
- Variables of type
contractspecify the contract name in parentheses in a blue font.
Modifiers
slither file.sol --print modifiers
Print the modifiers called by each function.
Example
$ slither examples/printers/modifier.sol --print modifiers
INFO:Printers:
Contract C
+-------------+-------------+
| Function | Modifiers |
+-------------+-------------+
| constructor | [] |
| set | ['isOwner'] |
+-------------+-------------+
Require
slither file.sol --print require
Print the require and assert calls of each function.
Example
$ slither examples/printers/require.sol --print require
INFO:Printers:
Contract Lib
+----------+--------------------------------------+
| Function | require or assert |
+----------+--------------------------------------+
| set | require(bool)(msg.sender == s.owner) |
+----------+--------------------------------------+
INFO:Printers:
Contract C
+-------------+--------------------------------------+
| Function | require or assert |
+-------------+--------------------------------------+
| constructor | |
| set | require(bool)(msg.sender == s.owner) |
+-------------+--------------------------------------+
SlithIR
slither file.sol --print slithir
Print the slithIR representation of the functions
Example
$ slither examples/printers/slihtir.sol --print slithir
Contract UnsafeMath
Function add(uint256,uint256)
Expression: a + b
IRs:
TMP_0(uint256) = a + b
RETURN TMP_0
Function min(uint256,uint256)
Expression: a - b
IRs:
TMP_0(uint256) = a - b
RETURN TMP_0
Contract MyContract
Function transfer(address,uint256)
Expression: balances[msg.sender] = balances[msg.sender].min(val)
IRs:
REF_3(uint256) -> balances[msg.sender]
REF_1(uint256) -> balances[msg.sender]
TMP_1(uint256) = LIBRARY_CALL, dest:UnsafeMath, function:min, arguments:['REF_1', 'val']
REF_3 := TMP_1
Expression: balances[to] = balances[to].add(val)
IRs:
REF_3(uint256) -> balances[to]
REF_1(uint256) -> balances[to]
TMP_1(uint256) = LIBRARY_CALL, dest:UnsafeMath, function:add, arguments:['REF_1', 'val']
REF_3 := TMP_1
SlithIR-SSA
slither file.sol --print slithir-ssa
Print the slithIR representation of the functions (SSA version)
Variable order
slither file.sol --print variable-order
Print the storage order of the state variables
Example
$ slither tests/check-upgradability/contractV2_bug.sol --print variable-order
INFO:Printers:
ContractV2:
+-------------+---------+
| Name | Type |
+-------------+---------+
| destination | uint256 |
| myFunc | uint256 |
+-------------+---------+
Variables written and authorization
slither file.sol --print vars-and-auth
Print the variables written and the check on msg.sender of each function.
Example
...
$ slither examples/printers/authorization.sol --print vars-and-auth
[..]
INFO:Printers:
Contract MyContract
+-------------+-------------------------+----------------------------------------+
| Function | State variables written | Conditions on msg.sender |
+-------------+-------------------------+----------------------------------------+
| constructor | ['owner'] | [] |
| mint | ['balances'] | ['require(bool)(msg.sender == owner)'] |
+-------------+-------------------------+----------------------------------------+
Slither comes with inbuilt tools
| Name | Command-Line | What it Does |
|---|---|---|
| Code Similarity | slither-simil | Detects similar Solidity functions/contracts using code similarity analysis. Useful for finding duplicated code, similar vulnerabilities, or analyzing large codebases. |
| Contract Flattening | slither-flat | Flattens a Solidity codebase by inlining all imports into a single file. Useful for contract verification on Etherscan or debugging. |
| Documentation | slither-doc | Automatically generates documentation for Solidity contracts, including inheritance information, functions, modifiers, and more. |
| Doctor | slither-doctor | Helps diagnose and fix common issues in your environment that might prevent Slither from working correctly. |
| ERC Conformance | slither-check-erc | Validates whether a contract correctly implements various ERC standards (ERC20, ERC721, etc.) by checking required functions and their signatures. |
| Interface | slither-interface | Generates Solidity interfaces from contract implementations, useful for creating minimal interfaces for contract interactions. |
| Mutator | slither-mutate | Performs mutation testing on Solidity contracts by automatically generating variants with small modifications to test suite effectiveness. |
| Path Finding | slither-prop | Analyzes call paths between functions in smart contracts to understand control and data flow. |
| Property Generation | slither-prop | Automatically generates security properties and unit tests for smart contracts based on their behavior. |
| Read Storage | slither-read-storage | Reads contract storage values directly from the blockchain, helping debug deployed contracts. |
| Format | slither-format | Automatically patch bugs. |
| Upgradeability Checks | slither-check-upgradeability | Analyzes upgradeable contracts for common issues and vulnerabilities in proxy patterns. |
Slither can be used as a library to create new utilities. Official utils are present in tools
Skeleton
The skeleton util is present in tools/demo
Integration
To enable an util from the command-line, update entry_points in setup.py.
Installing Slither will then install the util.
Guidelines
- Favor the
loggingmodule rather thanprint - Favor raising an exception rather than
sys.exit - Add unit-tests (ex: scripts/travis_test_find_paths.sh)
Getting Help
Join our slack channel to get any help (#ethereum).
slither-simil uses state-of-the-art machine learning to detect similar (vulnerable) Solidity functions. We have provided a pretrained model from etherscan_verified_contracts with 60,000 contracts and more than 850,000 functions to get you started quickly. We included the capability to easily train new models if you have access to larger or different datasets.
slither-simil uses FastText, a vector embedding technique, to generate compact numerical representations of every function. We used FastText because it:
- implements several state-of-the-art techniques such as nbow and skipgrams,
- has high performance (it is C++ code with Python bindings),
- has MIT license, and
- is well maintained (by Facebook).
Requirements
Install the required packages before using slither-simil:
$ pip3 install pybind11 --user
$ pip3 install https://github.com/facebookresearch/fastText/archive/0.2.0.zip --user
$ pip3 install sklearn matplotlib --user # for plot mode
Make sure that you are using pip3.6 or later. If you are running from inside a virtualenv, remove the --user parameter.
Usage
Note that these examples will use the following files:
slither-simil has three modes:
test- finds similar functions to your own in a dataset of contractsplot- provide a visual representation of similarity of multiple sampled functionstrain- builds new models of large datasets of contractsinfo- inspects the internal information of the pre-trained model or the assessed code
Test mode
This mode transforms a function into a vector and uses it to find similar functions.
Test mode requires the following parameters:
- A pre-trained model: this file will be used to transform every function into a vector, you can train your own or use our pre-trained one (etherscan_verified_contracts.bin).
- A contract filename: this file will contain the code that you want to compare,
- A function name (e.g.
SafeMath.addoradd), - An input directory or file: this can be either a directory with contracts or a cache file with a pre-computed list of vectors for every contract (cache.npz).
Use the cache to avoid long processing times to compile and vectorize the input contracts.
Here's an example that finds functions similar to sendCoin in MetaCoin (compiled with solc-0.4.25). Searching for similar functions among more than 800,000 functions takes only 20 seconds.
$ slither-simil test etherscan_verified_contracts.bin --filename MetaCoin.sol --fname MetaCoin.sendCoin --input cache.npz --ntop 25 --solc solc-0.4.25
INFO:Slither-simil:Reviewed 825062 functions, listing the 25 most similar ones:
INFO:Slither-simil:filename contract function score
INFO:Slither-simil:0x954b5de09a55e59755acbda29e1eb74a45d30175_Fluz.sol Fluz transfer 1.0
INFO:Slither-simil:0x55648de19836338549130b1af587f16bea46f66b_Pebbles.sol Pebbles transfer 1.0
INFO:Slither-simil:0x3fcee23add6e86dde3c4d395cbce1cae7f16d06d_SnipCoin.sol SnipCoin sendCoin 1.0
INFO:Slither-simil:0x000000005fbe2cc9b1b684ec445caf176042348e_ProperProposal.sol Vote transfer 1.0
INFO:Slither-simil:0x000000002bb43c83ece652d161ad0fa862129a2c_AccountRegistry.sol Vote transfer 1.0
INFO:Slither-simil:0x4e84e9e5fb0a972628cf4568c403167ef1d40431_Fluzcoin.sol Fluzcoin transfer 1.0
INFO:Slither-simil:0x334eec1482109bd802d9e72a447848de3bcc1063_AirDropToken.sol AirDropToken transfer 1.0
INFO:Slither-simil:0x28ccdda197d319a241005b9c9f01bac48b90f556_AirDropToken.sol AirDropToken transfer 1.0
INFO:Slither-simil:0x000000002647e16d9bab9e46604d75591d289277_Vote.sol Vote transfer 1.0
INFO:Slither-simil:0xc6c4c7826D44ABF22c711E8E86bDC3f5242d2182_token.sol token sendCoin 1.0
INFO:Slither-simil:0x22033df1d104736ff4c2b23a28affe52863ca9c8_AtmOnlyFluzcoin.sol AtmOnlyFluzcoin transfer 1.0
INFO:Slither-simil:0xcad796d6a2c0bb1de7f24262819be96fb08c1c3a_Love.sol Love transfer 1.0
INFO:Slither-simil:0x6cb2b8dc6a508c9a21db9683d1a729715969a6ee_TokenEscrow.sol TokenEscrow transferFromOwner 0.996
INFO:Slither-simil:0xd75fefe3cdb647281eec3f8fc738e3bc9658f9e4_ProofOfReadToken.sol ProofOfReadToken transfer 0.996
INFO:Slither-simil:0x7A8Ef7E8c8f16B9D6F39069ce03d752Af23b46d6_OBS_V1.sol MyObs transfer 0.996
INFO:Slither-simil:0x5ac0197c944c961f58bb02f3d0df58a74fdc15b6_TokenEscrow.sol TokenEscrow transferFromOwner 0.996
INFO:Slither-simil:0x69719c8c207036bdfc3632ccc24b290fb7240f4a_BitPayToken.sol BitPayToken transfer 0.996
INFO:Slither-simil:0x3d8a10ce3228cb428cb56baa058d4432464ea25d_TestToken.sol TestToken transfer 0.993
INFO:Slither-simil:0x69719c8c207036bdfc3632ccc24b290fb7240f4a_BitPayToken.sol BitPayToken transferFrom 0.992
INFO:Slither-simil:0x486e1f44b2a85150a6dd2de5aab87df375cd8880_CAIRToken.sol StandardToken transfer 0.991
INFO:Slither-simil:0x2bec16b164725efc192b7ec0296f838c61317514_eda.sol StandardToken transfer 0.991
INFO:Slither-simil:0xb7cb1c96db6b22b0d3d9536e0108d062bd488f74_WaltonToken.sol StandardToken transfer 0.991
INFO:Slither-simil:0x346c3be6aebEBaF5Cb766a75aDc9827EfbB7E41A_DelphiToken.sol StandardToken transfer 0.991
INFO:Slither-simil:0xf5068761511594c82328102f4fde4650ed9ea6c4_WHP.sol WHP transfer 0.991
INFO:Slither-simil:0x5f9f2ae7150d0beef3bb50ac8d8f4b43e6a6cc57_NABC.sol NABC transfer 0.991
Train mode
Train mode trains new models used to vectorize functions. You will need a large amount of contracts/functions if you plan to train a new model.
$ slither-simil train model.bin --input contracts
INFO:Slither-simil:Saving extracted data into last_data_train.txt
INFO:Slither-simil:Starting training
Read 0M words
Number of words: 348
Number of labels: 0
Progress: 100.0% words/sec/thread: 53124 lr: 0.000000 loss: 2.066949 ETA: 0h 0m
INFO:Slither-simil:Training complete
INFO:Slither-simil:Saving model
INFO:Slither-simil:Saving cache in cache.npz
INFO:Slither-simil:Done!
After it runs, the slither-simil will output the the trained model in model.bin, a cache of every function for use in test mode in cache.npz, and the SlithIR of every function for debugging in last_data_train.txt.
Plot mode
Plot mode plots sets of functions to visually detect clusters of similar ones.
Here's an example to plot all the functions named add from contracts named SafeMath sampling from 500 random contracts:
$ slither-simil plot etherscan_verified_contracts.bin --fname SafeMath.add --input cache.npz --nsamples 500
INFO:Slither-simil:Loading data..
INFO:Slither-simil:Procesing data..
INFO:Slither-simil:Plotting data..
INFO:Slither-simil:Saving figure to plot.png..

This mode performs dimensionality reduction using PCA, so the axes you see here are not associated with any particular unit.
It can can be also used to plot sets of functions using only a name from any contract (e.g. burn) .
Info mode
This mode has two features. You can inspect the internal information about a pre-trained model. Info mode is typically used for debugging.
$ slither-simil info etherscan_verified_contracts.bin
INFO:Slither-simil:etherscan_verified_contracts.bin uses the following words:
INFO:Slither-simil:</s>
INFO:Slither-simil:index(uint256)
INFO:Slither-simil:return
INFO:Slither-simil:condition(temporary_variable)
INFO:Slither-simil:member
INFO:Slither-simil:solidity_call(require(bool))
INFO:Slither-simil:library_call
INFO:Slither-simil:binary(+)
INFO:Slither-simil:event
INFO:Slither-simil:(local_solc_variable(default)):=(temporary_variable)
...
... or examine the internal representation of function:
$ slither-simil info etherscan_verified_contracts.bin --filename MetaCoin.sol --fname MetaCoin.sendCoin --solc solc-0.4.25
INFO:Slither-simil:Function sendCoin in contract MetaCoin is encoded as:
INFO:Slither-simil:index(uint256) binary(<) condition(temporary_variable) return index(uint256) binary(-) index(uint256) binary(+) event return
INFO:Slither-simil:[ 0.00689753 -0.05349572 -0.06854086 -0.01667773 0.1259813 -0.05974023
0.06719872 -0.04520541 0.13745852 0.14690697 -0.03721125 0.00579037
0.06865194 -0.03804035 0.01224702 -0.1014601 -0.02655532 -0.15334933
...
slither-flat produces a flattened version of the codebase.
Features
- Code flattening
- Support multiple strategies
- Support circular dependency
- Support all the compilation platforms (Truffle, embark, buidler, etherlime, ...).
Usage
slither-flat target
--contract ContractName: flatten only one contract (standalone file)
Strategies
slither-flat contains three strategies that can be specified with the --strategy flag:
MostDerived: Export all the most derived contracts (every file is standalone)OneFile: Export all the contracts in one standalone fileLocalImport: Export every contract in one separate file, and include import ".." in their preludes
Default: MostDerived
Patching
slither-flat can transform the codebase to help some usage (eg. Echidna)
--convert-external: convertexternalfunction topublic. This is meant to facilitate Echidna usage.--contract name: To flatten only a target contract--remove-assert: Remove call to assert().
Export option
--dir DirName: output directory--json file.json: export the results to a json file (--json -output to the standard output--zip file.zip: export to a ZIP file--zip-type type: ZIP compression type (default lzma))
slither-documentation
slither-documentation uses codex to generate natspec documentation.
This tool is experimental. See solmate documentation for an example of usage.
Slither doctor
Slither doctor is a tool designed to troubleshoot running Slither on a project.
slither-check-erc checks for ERC's conformance.
Features
slither-check-erc will check that:
- All the functions are present
- All the events are present
- Functions return the correct type
- Functions that must be view are view
- Events' parameters are correctly indexed
- The functions emit the events
- Derived contracts do not break the conformance
Supported ERCs
- ERC20: Token standard
- ERC223: Token standard
- ERC777: Token standard
- ERC721: Non-fungible token standard
- ERC165: Standard interface detection
- ERC1155: Multi Token Standard
- ERC1820: Pseudo-introspection registry contract
- ERC4524: Safer ERC-20
- ERC1363: Payable Token
- ERC2612: Permit Extension for EIP-20 Signed Approvals
- ERC4626: Tokenized Vaults
Usage:
slither-check-erc contract.sol ContractName
For example, on
contract ERC20{
event Transfer(address indexed,address,uint256);
function transfer(address, uint256) public{
emit Transfer(msg.sender,msg.sender,0);
}
}
The tool will report:
# Check ERC20
## Check functions
[ ] totalSupply() is missing
[ ] balanceOf(address) is missing
[✓] transfer(address,uint256) is present
[ ] transfer(address,uint256) -> () should return bool
[✓] Transfer(address,address,uint256) is emitted
[ ] transferFrom(address,address,uint256) is missing
[ ] approve(address,uint256) is missing
[ ] allowance(address,address) is missing
[ ] name() is missing (optional)
[ ] symbol() is missing (optional)
[ ] decimals() is missing (optional)
## Check events
[✓] Transfer(address,address,uint256) is present
[✓] parameter 0 is indexed
[ ] parameter 1 should be indexed
[ ] Approval(address,address,uint256) is missing
Slither-interface
Generates code for a Solidity interface from contract
Usage
Run slither-interface <ContractName> <source file or deployment address>.
CLI Interface
positional arguments:
contract_source The name of the contract (case sensitive) followed by the deployed contract address if verified on etherscan or project directory/filename for local contracts.
optional arguments:
-h, --help show this help message and exit
--unroll-structs Whether to use structures' underlying types instead of the user-defined type
--exclude-events Excludes event signatures in the interface
--exclude-errors Excludes custom error signatures in the interface
--exclude-enums Excludes enum definitions in the interface
--exclude-structs Exclude struct definitions in the interface
Slither-mutate
slither-mutate is a mutation testing tool for solidity based smart contracts.
Quick Start
In a foundry project with passing tests that are run with forge test, you can mutate all solidity files in the src folder by running the following:
slither-mutate src --test-cmd='forge test'
You can provide flags to forge as part of the --test-cmd parameter or target a single file path instead of the whole src directory, for example:
slither-mutate src/core/MyContract.sol --test-cmd='forge test --match-contract="MyContract"'
CLI Interface
$ slither-mutate --help
usage: slither-mutate <codebase> --test-cmd <test command> <options>
Experimental smart contract mutator. Based on https://arxiv.org/abs/2006.11597
positional arguments:
codebase Codebase to analyze (.sol file, project directory, ...)
options:
-h, --help show this help message and exit
--list-mutators List available detectors
--test-cmd TEST_CMD Command to run the tests for your project
--test-dir TEST_DIR Tests directory
--ignore-dirs IGNORE_DIRS
Directories to ignore
--timeout TIMEOUT Set timeout for test command (by default 30 seconds)
--output-dir OUTPUT_DIR
Name of output directory (by default 'mutation_campaign')
-v, --verbose log mutants that are caught, uncaught, and fail to compile
--mutators-to-run MUTATORS_TO_RUN
mutant generators to run
--contract-names CONTRACT_NAMES
list of contract names you want to mutate
--comprehensive continue testing minor mutations if severe mutants are uncaught
slither-find-paths finds all the paths that reach a given target.
Usage
slither-find-paths file.sol [contract.function targets]
[contract.function targets]is either one target, or a list of target
Example
Tested on tests/possible_paths/paths.sol
$ slither-find-paths paths.sol A.destination
Target functions:
- A.destination()
The following functions reach the specified targets:
- A.call()
- B.call2(A)
The following paths reach the specified targets:
A.call() -> A.destination()
B.call2(A) -> A.call() -> A.destination()
slither-prop generates code properties (e.g., invariants) that can be tested with unit tests or Echidna, entirely automatically. Once you have these properties in hand, use Crytic to continuously test them with every commit.
Note: slither-prop only supports Truffle for now. We'll be adding support for other frameworks soon!
How to Use Slither's Property Generator
There are four steps:
Step 1. Generate the tests
slither-prop . --contract ContractName
slither-prop will generate:
- Solidity files containing the properties
echidna_config.yamlto configure Echidna- One Truffle migration file
- Two Truffle unit-test files
For example on examples/slither-prop.
Write contracts/crytic/interfaces.sol
Write contracts/crytic/PropertiesERC20BuggyTransferable.sol
Write contracts/crytic/TestERC20BuggyTransferable.sol
Write echidna_config.yaml
Write migrations/1_TestERC20BuggyTransferable.js
Write test/crytic/InitializationTestERC20BuggyTransferable.js
Write test/crytic/TestERC20BuggyTransferable.js
################################################
Update the constructor in contracts/crytic/TestERC20BuggyTransferable.sol
To run the unit tests:
truffle test test/crytic/InitializationTestERC20BuggyTransferable.js
truffle test test/crytic/TestERC20BuggyTransferable.js
To run Echidna:
echidna-test . --contract TestERC20BuggyTransferable --config echidna_config.yaml
Step 2. Customize the constructor
Next, update the constructor in contracts/crytic/TestX.sol:
On examples/slither-prop/contracts, update the constructor as follow:
constructor() public{
_balanceOf[crytic_user] = 1 ether;
_balanceOf[crytic_owner] = 1 ether;
_balanceOf[crytic_attacker] = 1 ether;
_totalSupply = 3 ether;
//
//
// Update the following if totalSupply and balanceOf are external functions or state variables:
initialTotalSupply = totalSupply();
initialBalance_owner = balanceOf(crytic_owner);
initialBalance_user = balanceOf(crytic_user);
initialBalance_attacker = balanceOf(crytic_attacker);
}
Step 3. Run the unit tests with Truffle
The first unit test file, named InitializationX.js will check that the constructor has been correctly initialized:
$ truffle test test/crytic/InitializationTestERC20BuggyTransferable.js
[..]
Contract: TestERC20BuggyTransferable
✓ The total supply is correctly initialized. (47ms)
✓ Owner's balance is correctly initialized.
✓ User's balance is correctly initialized.
✓ Attacker's balance is correctly initialized.
✓ All the users have a positive balance. (69ms)
✓ The total supply is the user and owner balance. (38ms)
If all the unit tests passed, run the property tests:
$ truffle test test/crytic/InitializationTestERC20BuggyTransferable.js
Contract: TestERC20BuggyTransferable
✓ The address 0x0 should not receive tokens.
✓ Allowance can be changed. (108ms)
✓ Balance of one user must be less or equal to the total supply. (70ms)
✓ Balance of the crytic users must be less or equal to the total supply.
1) No one should be able to send tokens to the address 0x0 (transfer).
> No events were emitted
2) No one should be able to send tokens to the address 0x0 (transferFrom).
> No events were emitted
✓ Self transferFrom works. (115ms)
✓ transferFrom works. (108ms)
✓ Self transfer works. (89ms)
✓ transfer works. (97ms)
3) Cannot transfer more than the balance.
> No events were emitted
As you can see, the unit tests detect some of the bugs.
Step 4. Run the property tests with Echidna
$ echidna-test . --contract TestERC20BuggyTransferable --config echidna_config.yaml
Scenarios
slither-prop contains different scenarios that can be specified with the --scenario NAME flag.
Here are the available scenarios:
#################### ERC20 ####################
Transferable - Test the correct tokens transfer
Pausable - Test the pausable functionality
NotMintable - Test that no one can mint tokens
NotMintableNotBurnable - Test that no one can mint or burn tokens
NotBurnable - Test that no one can burn tokens
Burnable - Test the burn of tokens. Require the "burn(address) returns()" function
All properties
+-----+-------------------------------------------------------------------------+------------------------+
| Num | Description | Scenario |
+-----+-------------------------------------------------------------------------+------------------------+
| 0 | The address 0x0 should not receive tokens. | Transferable |
| 1 | Allowance can be changed. | Transferable |
| 2 | Balance of one user must be less or equal to the total supply. | Transferable |
| 3 | Balance of the crytic users must be less or equal to the total supply. | Transferable |
| 4 | No one should be able to send tokens to the address 0x0 (transfer). | Transferable |
| 5 | No one should be able to send tokens to the address 0x0 (transferFrom). | Transferable |
| 6 | Self transferFrom works. | Transferable |
| 7 | transferFrom works. | Transferable |
| 8 | Self transfer works. | Transferable |
| 9 | transfer works. | Transferable |
| 10 | Cannot transfer more than the balance. | Transferable |
| 11 | Cannot transfer. | Pausable |
| 12 | Cannot execute transferFrom. | Pausable |
| 13 | Cannot change the balance. | Pausable |
| 14 | Cannot change the allowance. | Pausable |
| 15 | The total supply does not increase. | NotMintable |
| 16 | The total supply does not change. | NotMintableNotBurnable |
| 17 | The total supply does not decrease. | NotBurnable |
| 18 | The total supply does not decrease. | Burnable |
+-----+-------------------------------------------------------------------------+------------------------+
Slither-read-storage
Slither-read-storage is a tool to retrieve the storage slots and values of entire contracts or single variables.
Usage
CLI Interface
positional arguments:
contract_source The deployed contract address if verified on etherscan. Prepend project directory for unverified contracts.
optional arguments:
-h, --help show this help message and exit
--variable-name VARIABLE_NAME
The name of the variable whose value will be returned.
--rpc-url RPC_URL An endpoint for web3 requests.
--key KEY The key/ index whose value will be returned from a mapping or array.
--deep-key DEEP_KEY The key/ index whose value will be returned from a deep mapping or multidimensional array.
--struct-var STRUCT_VAR
The name of the variable whose value will be returned from a struct.
--storage-address STORAGE_ADDRESS
The address of the storage contract (if a proxy pattern is used).
--contract-name CONTRACT_NAME
The name of the logic contract.
--json JSON Save the result in a JSON file.
--value Toggle used to include values in output.
--table Print table view of storage layout
--silent Silence log outputs
--max-depth MAX_DEPTH
Max depth to search in data structure.
--block BLOCK The block number to read storage from. Requires an archive node to be provided as the RPC url.
--unstructured Include unstructured storage slots
Examples
Retrieve the storage slots of a local contract:
slither-read-storage file.sol 0x8ad599c3a0ff1de082011efddc58f1908eb6e6d8 --json storage_layout.json
Retrieve the storage slots of a contract verified on an Etherscan-like platform:
slither-read-storage 0x8ad599c3a0ff1de082011efddc58f1908eb6e6d8 --json storage_layout.json
To retrieve the values as well, pass --value and --rpc-url $RPC_URL:
slither-read-storage 0x8ad599c3a0ff1de082011efddc58f1908eb6e6d8 --json storage_layout.json --rpc-url $RPC_URL --value
To view only the slot of the slot0 structure variable, pass --variable-name slot0:
slither-read-storage 0x8ad599c3a0ff1de082011efddc58f1908eb6e6d8 --variable-name slot0 --rpc-url $RPC_URL --value
To view a member of the slot0 struct, pass --struct-var tick
slither-read-storage 0x8ad599c3a0ff1de082011efddc58f1908eb6e6d8 --variable-name slot0 --rpc-url $RPC_URL --value --struct-var tick
Retrieve the ERC20 balance slot of an account:
slither-read-storage 0xa2327a938Febf5FEC13baCFb16Ae10EcBc4cbDCF --variable-name balances --key 0xab5801a7d398351b8be11c439e05c5b3259aec9b
To retrieve the actual balance, pass --variable-name balances and --key 0xab5801a7d398351b8be11c439e05c5b3259aec9b. (balances is a mapping(address => uint))
Since this contract uses the delegatecall-proxy pattern, the proxy address must be passed as the --storage-address. Otherwise, it is not required.
slither-read-storage 0xa2327a938Febf5FEC13baCFb16Ae10EcBc4cbDCF --variable-name balances --key 0xab5801a7d398351b8be11c439e05c5b3259aec9b --storage-address 0xa0b86991c6218b36c1d19d4a2e9eb0ce3606eb48 --rpc-url $RPC_URL --value
Troubleshooting/FAQ
-
If the storage slots or values of a contract verified Etherscan are wrong, try passing
--contract $CONTRACT_NAMEexplicitly. Otherwise, the storage may be retrieved from storage slots based off an unrelated contract (Etherscan includes these). (Also, make sure that the RPC is for the correct network.) -
If Etherscan fails to return a source code, try passing
--etherscan-apikey $API_KEYto avoid hitting a rate-limit. -
How do I use this tool on other chains? If an EVM chain has an Etherscan-like platform the crytic-compile supports, this tool supports it by making the following modifications. Take Avalanche, for instance:
slither-read-storage avax:0x0000000000000000000000000000000000000000 --json storage_layout.json --value --rpc-url $AVAX_RPC_URL
Limitations
- Requires source code.
- Only works on Solidity contracts.
- Cannot find variables with unstructured storage.
- Does not support all data types (please open an issue or PR).
- Mappings cannot be completely enumerated since all keys used historically are not immediately available.
slither-format generates automatically patches. The patches are compatible with git.
Carefully review each patch before applying it.
Usage
slither-format target.
The patches will be generated in crytic-export/patches
Detectors supported
unused-statesolc-versionpragmanaming-conventionexternal-functionconstable-statesconstant-function
Upgradeability Checks
slither-check-upgradeability helps review contracts that use the delegatecall proxy pattern.
Checks
| Num | Check | What it Detects | Impact | Proxy | Contract V2 |
|---|---|---|---|---|---|
| 1 | became-constant | Variables that should not be constant | High | X | |
| 2 | function-id-collision | Functions IDs collision | High | X | |
| 3 | function-shadowing | Functions shadowing | High | X | |
| 4 | missing-calls | Missing calls to init functions | High | ||
| 5 | missing-init-modifier | initializer() is not called | High | ||
| 6 | multiple-calls | Init functions called multiple times | High | ||
| 7 | order-vars-contracts | Incorrect vars order with the v2 | High | X | |
| 8 | order-vars-proxy | Incorrect vars order with the proxy | High | X | |
| 9 | variables-initialized | State variables with an initial value | High | ||
| 10 | were-constant | Variables that should be constant | High | X | |
| 11 | extra-vars-proxy | Extra vars in the proxy | Medium | X | |
| 12 | missing-variables | Variable missing in the v2 | Medium | X | |
| 13 | extra-vars-v2 | Extra vars in the v2 | Informational | X | |
| 14 | init-inherited | Initializable is not inherited | Informational | ||
| 15 | init-missing | Initializable is missing | Informational | ||
| 16 | initialize-target | Initialize function that must be called | Informational | ||
| 17 | initializer-missing | initializer() is missing | Informational |
Usage
slither-check-upgradeability project ContractName
projectcan be a Solidity file, or a platform (truffle/embark/..) directory
Contract V2
If you want to check the contract and its update, use:
--new-contract-name ContractName--new-contract-filename contract_project
--new-contract-filename is not needed if the new contract is in the same codebase than the original one.
Proxy
If you want to check also the proxy, use:
--proxy-name ProxyName--proxy-filename proxy_project
--proxy-filename is not needed if the proxy is in the same codebase than the targeted contract.
ZOS
If you use zos, you will have the proxy and the contract in different directories.
Likely, you will use one of the proxy from https://github.com/zeppelinos/zos. Clone the zos, and install the dependencies:
git clone https://github.com/zeppelinos/zos
cd zos/packages/lib
npm install
rm contracts/mocks/WithConstructorImplementation.sol
Note: contracts/mocks/WithConstructorImplementation.sol must be removed as it contains a name clash collision with contracts/mocks/Invalid.sol
Then from your project directory:
slither-check-upgradeability . ContractName --proxy-filename /path/to/zos/packages/lib/ --proxy-name UpgradeabilityProxy
According to your setup, you might choose another proxy name than UpgradeabilityProxy.
Checks Description
Variables that should not be constant
Configuration
- Check:
became-constant - Severity:
High
Description
Detect state variables that should not be constant̀.
Exploit Scenario:
contract Contract{
uint variable1;
uint variable2;
uint variable3;
}
contract ContractV2{
uint variable1;
uint constant variable2;
uint variable3;
}
Because variable2 is now a constant, the storage location of variable3 will be different.
As a result, ContractV2 will have a corrupted storage layout.
Recommendation
Do not make an existing state variable constant.
Functions IDs collisions
Configuration
- Check:
function-id-collision - Severity:
High
Description
Detect function ID collision between the contract and the proxy.
Exploit Scenario:
contract Contract{
function gsf() public {
// ...
}
}
contract Proxy{
function tgeo() public {
// ...
}
}
Proxy.tgeo() and Contract.gsf() have the same function ID (0x67e43e43).
As a result, Proxy.tgeo() will shadow Contract.gsf()`.
Recommendation
Rename the function. Avoid public functions in the proxy.
Functions shadowing
Configuration
- Check:
function-shadowing - Severity:
High
Description
Detect function shadowing between the contract and the proxy.
Exploit Scenario:
contract Contract{
function get() public {
// ...
}
}
contract Proxy{
function get() public {
// ...
}
}
Proxy.get will shadow any call to get(). As a result get() is never executed in the logic contract and cannot be updated.
Recommendation
Rename the function. Avoid public functions in the proxy.
Initialize functions are not called
Configuration
- Check:
missing-calls - Severity:
High
Description
Detect missing calls to initialize functions.
Exploit Scenario:
contract Base{
function initialize() public{
///
}
}
contract Derived is Base{
function initialize() public{
///
}
}
Derived.initialize does not call Base.initialize leading the contract to not be correctly initialized.
Recommendation
Ensure all the initialize functions are reached by the most derived initialize function.
initializer() is not called
Configuration
- Check:
missing-init-modifier - Severity:
High
Description
Detect if Initializable.initializer() is called.
Exploit Scenario:
contract Contract{
function initialize() public{
///
}
}
initialize should have the initializer modifier to prevent someone from initializing the contract multiple times.
Recommendation
Use Initializable.initializer().
Initialize functions are called multiple times
Configuration
- Check:
multiple-calls - Severity:
High
Description
Detect multiple calls to a initialize function.
Exploit Scenario:
contract Base{
function initialize(uint) public{
///
}
}
contract Derived is Base{
function initialize(uint a, uint b) public{
initialize(a);
}
}
contract DerivedDerived is Derived{
function initialize() public{
initialize(0);
initialize(0, 1 );
}
}
Base.initialize(uint) is called two times in DerivedDerived.initiliaze execution, leading to a potential corruption.
Recommendation
Call only one time every initialize function.
Incorrect variables with the v2
Configuration
- Check:
order-vars-contracts - Severity:
High
Description
Detect variables that are different between the original contract and the updated one.
Exploit Scenario:
contract Contract{
uint variable1;
}
contract ContractV2{
address variable1;
}
Contract and ContractV2 do not have the same storage layout. As a result the storage of both contracts can be corrupted.
Recommendation
Respect the variable order of the original contract in the updated contract.
Incorrect variables with the proxy
Configuration
- Check:
order-vars-proxy - Severity:
High
Description
Detect variables that are different between the contract and the proxy.
Exploit Scenario:
contract Contract{
uint variable1;
}
contract Proxy{
address variable1;
}
Contract and Proxy do not have the same storage layout. As a result the storage of both contracts can be corrupted.
Recommendation
Avoid variables in the proxy. If a variable is in the proxy, ensure it has the same layout than in the contract.
State variable initialized
Configuration
- Check:
variables-initialized - Severity:
High
Description
Detect state variables that are initialized.
Exploit Scenario:
contract Contract{
uint variable = 10;
}
Using Contract will the delegatecall proxy pattern will lead variable to be 0 when called through the proxy.
Recommendation
Using initialize functions to write initial values in state variables.
Variables that should be constant
Configuration
- Check:
were-constant - Severity:
High
Description
Detect state variables that should be constant̀.
Exploit Scenario:
contract Contract{
uint variable1;
uint constant variable2;
uint variable3;
}
contract ContractV2{
uint variable1;
uint variable2;
uint variable3;
}
Because variable2 is not anymore a constant, the storage location of variable3 will be different.
As a result, ContractV2 will have a corrupted storage layout.
Recommendation
Do not remove constant from a state variables during an update.
Extra variables in the proxy
Configuration
- Check:
extra-vars-proxy - Severity:
Medium
Description
Detect variables that are in the proxy and not in the contract.
Exploit Scenario:
contract Contract{
uint variable1;
}
contract Proxy{
uint variable1;
uint variable2;
}
Proxy contains additional variables. A future update of Contract is likely to corrupt the proxy.
Recommendation
Avoid variables in the proxy. If a variable is in the proxy, ensure it has the same layout than in the contract.
Missing variables
Configuration
- Check:
missing-variables - Severity:
Medium
Description
Detect variables that were present in the original contracts but are not in the updated one.
Exploit Scenario:
contract V1{
uint variable1;
uint variable2;
}
contract V2{
uint variable1;
}
The new version, V2 does not contain variable1.
If a new variable is added in an update of V2, this variable will hold the latest value of variable2 and
will be corrupted.
Recommendation
Do not change the order of the state variables in the updated contract.
Extra variables in the v2
Configuration
- Check:
extra-vars-v2 - Severity:
Informational
Description
Show new variables in the updated contract.
This finding does not have an immediate security impact and is informative.
Exploit Scenario:
contract Contract{
uint variable1;
}
contract Proxy{
uint variable1;
uint variable2;
}
Proxy contains additional variables. A future update of Contract is likely to corrupt the proxy.
Recommendation
Ensure that all the new variables are expected.
Initializable is not inherited
Configuration
- Check:
init-inherited - Severity:
Informational
Description
Detect if Initializable is inherited.
Recommendation
Review manually the contract's initialization. Consider inheriting Initializable.
Initializable is missing
Configuration
- Check:
init-missing - Severity:
Informational
Description
Detect if a contract Initializable is present.
Recommendation
Review manually the contract's initialization..
Consider using a Initializable contract to follow standard practice.
Initialize function
Configuration
- Check:
initialize-target - Severity:
Informational
Description
Show the function that must be called at deployment.
This finding does not have an immediate security impact and is informative.
Recommendation
Ensure that the function is called at deployment.
initializer() is missing
Configuration
- Check:
initializer-missing - Severity:
Informational
Description
Detect the lack of Initializable.initializer() modifier.
Recommendation
Review manually the contract's initialization. Consider inheriting a Initializable.initializer() modifier.
Slither
The objective of this tutorial is to demonstrate how to use Slither to automatically find bugs in smart contracts.
- Installation
- Command-line usage
- Introduction to static analysis: A concise introduction to static analysis
- API: Python API description
Once you feel confident with the material in this README, proceed to the exercises:
- Exercise 1: Function override protection
- Exercise 2: Check for access controls
- Exercise 3: Find variable used in conditional statements
Watch Slither's code walkthrough, or API walkthrough to learn about its code structure.
Installation
Slither requires Python >= 3.8. You can install it through pip or by using Docker.
Installing Slither through pip:
pip3 install --user slither-analyzer
Docker
Installing Slither through Docker:
docker pull trailofbits/eth-security-toolbox
docker run -it -v "$PWD":/home/trufflecon trailofbits/eth-security-toolbox
The last command runs the eth-security-toolbox in a Docker container that has access to your current directory. You can modify the files from your host, and run the tools on the files from the Docker container.
Inside the Docker container, run:
solc-select 0.5.11
cd /home/trufflecon/
Command-line
Command-line vs. user-defined scripts. Slither comes with a set of predefined detectors that can identify many common bugs. Running Slither from the command-line will execute all the detectors without requiring detailed knowledge of static analysis:
slither project_paths
Besides detectors, Slither also offers code review capabilities through its printers and tools.
Exercise 1: Function Overridden Protection
The goal is to create a script that performs a feature that was not present in previous version of Solidity: function overriding protection.
exercises/exercise1/coin.sol contains a function that must never be overridden:
_mint(address dst, uint256 val)
Use Slither to ensure that no contract inheriting Coin overrides this function.
Use solc-select install 0.5.0 && solc-select use 0.5.0 to switch to solc 0.5.0
Proposed Algorithm
Get the Coin contract
For each contract in the project:
If Coin is in the list of inherited contracts:
Get the _mint function
If the contract declaring the _mint function is not Coin:
A bug is found.
Tips
- To get a specific contract, use
slither.get_contract_from_name(note: it returns a list) - To get a specific function, use
contract.get_function_from_signature
Solution
See exercises/exercise1/solution.py.
Exercise 2: Access Control
The exercises/exercise2/coin.sol file contains an access control implementation with the onlyOwner modifier. A common mistake is forgetting to add the modifier to a crucial function. In this exercise, we will use Slither to implement a conservative access control approach.
Our goal is to create a script that ensures all public and external functions call onlyOwner, except for the functions on the whitelist.
Proposed Algorithm
Create a whitelist of signatures
Explore all the functions
If the function is in the whitelist of signatures:
Skip
If the function is public or external:
If onlyOwner is not in the modifiers:
A bug is found
Solution
Refer to exercises/exercise2/solution.py for the solution.
Exercise 3: Find function that use a given variable in a condition
The exercises/exercise3/find.sol file contains a contract that use my_variable variable in multiple locations.
Our goal is to create a script that list all the functions that use my_variable in a conditional or require statement.
Proposed Approach
Explore all the helpers provided by Function object to find an easy way to reach the goal
Solution
Refer to exercises/exercise3/solution.py for the solution.
Trail of Bits Blog Posts
The following contains blockchain-related blog posts made by Trail of Bits.
Consensus Algorithms
Research in the distributed systems area
| Date | Title | Description |
|---|---|---|
| 2021/11/11 | Motivating global stabilization | Review of Fischer, Lynch, and Paterson’s classic impossibility result and global stabilization time assumption |
| 2019/10/25 | Formal Analysis of the CBC Casper Consensus Algorithm with TLA+ | Verification of finality of the Correct By Construction (CBC) PoS consensus protocol |
| 2019/07/12 | On LibraBFT’s use of broadcasts | Liveness of LibraBFT and HotStuff algorithms |
| 2019/07/02 | State of the Art Proof-of-Work: RandomX | Summary of our audit of ASIC and GPU-resistant PoW algorithm |
| 2018/10/12 | Introduction to Verifiable Delay Functions (VDFs) | Basics of VDFs - a class of hard to compute, not parallelizable, but easily verifiable functions |
Fuzzing Compilers
Our work on the topic of fuzzing the solc compiler
| Date | Title | Description |
|---|---|---|
| 2021/03/23 | A Year in the Life of a Compiler Fuzzing Campaign | Results and features of fuzzing solc |
| 2020/06/05 | Breaking the Solidity Compiler with a Fuzzer | Our approach to fuzzing solc |
General
Security research, analyses, announcements, and write-ups
| Date | Title | Description |
|---|---|---|
| 2022/10/12 | Porting the Solana eBPF JIT compiler to ARM64 | Low-level write-up of the work done to make the Solana compiler work on ARM64 |
| 2022/06/24 | Managing risk in blockchain deployments | A summary of "Do You Really Need a Blockchain? An Operational Risk Assessment" report |
| 2022/06/21 | Are blockchains decentralized? | A summary of "Are Blockchains Decentralized? Unintended Centralities in Distributed Ledgers" report |
| 2020/08/05 | Accidentally stepping on a DeFi lego | Write-up of a vulnerability in yVault project |
| 2020/05/15 | Bug Hunting with Crytic | Description of 9 bugs found by Trail of Bits tools in public projects |
| 2019/11/13 | Announcing the Crytic $10k Research Prize | Academic research prize promoting open source work |
| 2019/10/24 | Watch Your Language: Our First Vyper Audit | Pros and cons of Vyper language and disclosure of vulnerability in the Vyper's compiler |
| 2019/08/08 | 246 Findings From our Smart Contract Audits: An Executive Summary | Publication of data aggregated from our audits. Discussion about possibility of automatic and manual detection of vulnerabilities, and usefulness of unit tests |
| 2018/11/19 | Return of the Blockchain Security Empire Hacking | |
| 2018/02/09 | Parity Technologies engages Trail of Bits | |
| 2017/11/06 | Hands on the Ethernaut CTF | First write-up on Ethernaut |
Guidance
General guidance
| Date | Title | Description |
|---|---|---|
| 2021/02/05 | Confessions of a smart contract paper reviewer | Six requirements for a good research paper |
| 2018/11/27 | 10 Rules for the Secure Use of Cryptocurrency Hardware Wallets | Recommendations for the secure use of hardware wallets. |
| 2018/10/04 | Ethereum security guidance for all | Announcement of office hours, Blockchain Security Contacts, and Awesome Ethereum Security |
| 2018/04/06 | How to prepare for a security review | Checklist for before having a security audit |
Presentations
Talks, videos, and slides
| Date | Title | Description |
|---|---|---|
| 2019/01/18 | Empire Hacking: Ethereum Edition 2 | Talks include: Anatomy of an unsafe smart contract programming language, Evaluating digital asset security fundamentals, Contract upgrade risks and recommendations, How to buidl an enterprise-grade mainnet Ethereum client, Failures in on-chain privacy, Secure micropayment protocols, Designing the Gemini dollar: a regulated, upgradeable, transparent stablecoin, Property testing with Echidna and Manticore for secure smart contracts, Simple is hard: Making your awesome security thing usable |
| 2018/11/16 | Trail of Bits @ Devcon IV Recap | Talks include: Using Manticore and Symbolic Execution to Find Smart Contract Bugs, Blockchain Autopsies, Current State of Security |
| 2017/12/22 | Videos from Ethereum-focused Empire Hacking | Talks include: A brief history of smart contract security, A CTF Field Guide for smart contracts, Automatic bug finding for the blockchain, Addressing infosec needs with blockchain technology |
Tooling
Description of our tools and their use cases
| Date | Tool | Title | Description |
|---|---|---|---|
| 2022/08/17 | Using mutants to improve Slither | Inserting random bugs into smart contracts and detecting them with various static analysis tools - to improve Slither's detectors | |
| 2022/07/28 | Shedding smart contract storage with Slither | Announcement of the slither-read-storage tool | |
| 2022/04/20 | Amarna: Static analysis for Cairo programs | Overview of Cairo footguns and announcement of the new static analysis tool | |
| 2022/03/02 |  | Optimizing a smart contract fuzzer | Measuring and improving performance of Echidna (Haskell code) |
| 2021/12/16 | Detecting MISO and Opyn’s msg.value reuse vulnerability with Slither | Description of Slither's new detectors: delegatecall-loop and msg-value-loop | |
| 2021/04/02 | Solar: Context-free, interactive analysis for Solidity | Proof-of-concept static analysis framework | |
| 2020/10/23 | Efficient audits with machine learning and Slither-simil | Detect similar Solidity functions with Slither and ML | |
| 2020/08/17 | | Using Echidna to test a smart contract library | Designing and testing properties with differential fuzzing |
| 2020/07/12 |  | Contract verification made easier | Re-use Echidna properties with Manticore with manticore-verifier |
| 2020/06/12 | Upgradeable contracts made safer with Crytic | 17 new Slither detectors for upgradeable contracts | |
| 2020/03/30 | | An Echidna for all Seasons | Announcement of new features in Echidna |
| 2020/03/03 | | Manticore discovers the ENS bug | Using symbolic analysis to find vulnerability in Ethereum Name Service contract |
| 2020/01/31 | | Symbolically Executing WebAssembly in Manticore | Using symbolic analysis on an artificial WASM binary |
| 2019/08/02 | Crytic: Continuous Assurance for Smart Contracts | New product that integrates static analysis with GitHub pipeline | |
| 2019/07/03 | Avoiding Smart Contract "Gridlock" with Slither | Description of a DoS vulnerability resulting from a strict equality check, and Slither's dangerous-strict-equality detector | |
| 2019/05/27 | Slither: The Leading Static Analyzer for Smart Contracts | Slither design and comparison with other static analysis tools | |
| 2018/10/19 | Slither – a Solidity static analysis framework | Introduction to Slither's API and printers | |
| 2018/09/06 | Rattle – an Ethereum EVM binary analysis framework | Turn EVM bytecode to infinite-register SSA form | |
| 2018/05/03 | | State Machine Testing with Echidna | Example use case of Echidna's Haskell API |
| 2018/03/23 | Use our suite of Ethereum security tools | Overview of our tools and documents: Not So Smart Contracts, Slither, Echidna, Manticore, EVM Opcode Database, Ethersplay, IDA-EVM, Rattle | |
| 2018/03/09 | | Echidna, a smart fuzzer for Ethereum | First release and introduction to Echidna |
| 2017/04/27 | | Manticore: Symbolic execution for humans | First release and introduction to Manticore (not adopted for EVM yet) |
Upgradeability
Our work related to contracts upgradeability
| Date | Title | Description |
|---|---|---|
| 2020/12/16 | Breaking Aave Upgradeability | Description of Delegatecall Proxy vulnerability in formally-verified Aave contracts |
| 2020/10/30 | Good idea, bad design: How the Diamond standard falls short | Audit of Diamond standard's implementation |
| 2018/10/29 | How contract migration works | Alternative to upgradability mechanism - moving data to a new contract |
| 2018/09/05 | Contract upgrade anti-patterns | Discussion of risks and recommendations for Data Separation and Delegatecall Proxy patterns. Disclosure of vulnerability in Zeppelin Proxy contract. |
Zero-Knowledge
Our work in Zero-Knowledge Proofs space
| Date | Title | Description |
|---|---|---|
| 2022/04/18 | The Frozen Heart vulnerability in PlonK | |
| 2022/04/15 | The Frozen Heart vulnerability in Bulletproofs | |
| 2022/04/14 | The Frozen Heart vulnerability in Girault’s proof of knowledge | |
| 2022/04/13 | Coordinated disclosure of vulnerabilities affecting Girault, Bulletproofs, and PlonK | Introducing new "Frozen Heart" class of vulnerabilities |
| 2021/12/21 | Disclosing Shamir’s Secret Sharing vulnerabilities and announcing ZKDocs | |
| 2021/02/19 | Serving up zero-knowledge proofs | Fiat-Shamir transformation explained |
| 2020/12/14 | Reverie: An optimized zero-knowledge proof system | Rust implementation of the MPC-in-the-head proof system |
| 2020/05/21 | Reinventing Vulnerability Disclosure using Zero-knowledge Proofs | Announcement of DARPA sponsored work on ZK proofs of exploitability |
| 2019/10/04 | Multi-Party Computation on Machine Learning | Implementation of 3-party computation protocol for perceptron and support vector machine (SVM) algorithms |
Blockchain Security Contacts
This page is a community-curated resource for contacting security teams. It identifies the best way to contact an organization's security team so that hackers can report vulnerabilities directly to the organizations that can resolve them.
This document is a work in progress. We're happy to accept feedback, questions, or ideas for improvements. File an issue or join us on Slack to talk further.
Recommendations
- Refer to disclose.io for vulnerability disclosure program best practices
- Don't make researchers agree to terms to report security issues to you
- Create a security@ email address that delivers directly to your engineering team
Blockchains
| Name | Contact | More info |
|---|---|---|
| Aptos | security@aptoslabs.com | |
| Arweave | team@arweave.org | |
| Auroracoin | m.hannes@auroracoin.is | |
| Bitcoin | security@bitcoincore.org | Security page Bitcoin Cash |
| Bitcoin Gold | admin@bitcoingold.org | Disclosure policy |
| Bitshares | contactbitshares@bitshares.org | |
| Bytecoin | contact@bytecoin.org | |
| Cloakcoin | anorak@cloakcoin.com | |
| Decred | contact@decred.org | |
| Edgeware | security@commonwealth.im | |
| Ethereum | bounty@ethereum.org | Bug bounty |
| Ethereum Classic | security@etcdevteam.com | |
| Horizen | security@horizen.global | Bug bounty |
| Hush | hushteam@protonmail.com | Security Page |
| ICON | hello@icon.foundation | |
| IOV | security@iov.one | |
| Komodo | security@komodoplatform.com | |
| Litecoin | contact@litecoin.org | |
| Nem | contact@nem.io | |
| Neo | contact@neo.org | |
| Monero | Multiple | Bug bounty |
| Ontology | contact@ont.io | |
| POA Core | security@poanetwork.com | Security page |
| Ripple | bugs@ripple.com | Bug bounty |
| RSK | security@rsk.co | Bug bounty |
| Sia | hello@sia.tech | |
| Tezos | security@tezos.com | Bug bounty |
| Quorum | quorum_info@jpmorgan.com | |
| xDai Chain | security@poanetwork.com | Security page |
| ZCash | security@z.cash | Security page |
Decentralized Applications
| Name | Deployed Addresses | Contact | More info |
|---|---|---|---|
| 0x | team@0xproject.com | Bug bounty | |
| 1Hive | Bug bounty | ||
| AAVE | security@aave.com | ||
| Ampleforth | External Reference | dev-support@ampleforth.org | |
| Aragon | External Reference | security@aragon.org | Bug bounty |
| Bamboo Relay | dex@bamboorelay.com | ||
| Bancor Network | security@bancor.network | ||
| BarterDEX Network | security@komodoplatform.com | ||
| Bloom | team@bloom.co | ||
| bZx | security@bzx.network | ||
| C-Layer | External Reference | security@c-layer.org | |
| Commonwealth.im | security@commonwealth.im | ||
| Compound Finance | security@compound.finance | ||
| Connext | support@connext.network | ||
| Cozy Finance | security@cozy.finance | ||
| Decentraland | Bug bounty | ||
| Decentralized Vulnerability Platform | service@dvpnet.io | ||
| Democracy Earth | hello@democracy.earth | ||
| Dharma | security@dharma.io | ||
| Erasure / Numerai | External Reference | security@numer.ai | |
| Ethfinex | bounty@ethfinex.com | ||
| Idle Finance | External Reference | security@idle.finance | |
| InstaDApp | External Reference | info@instadapp.io | |
| Kleros | External Reference | contact@kleros.io | Bug bounty |
| Kyber Network | hello@kyber.network | ||
| LivePeer | External Reference | security@livepeer.org | |
| Melon | security@melonport.com | ||
| Nahmii | security@hubii.com | ||
| Nexus Mutual | security@nexusmutual.io | ||
| Raiden Network | bounty@raiden.network | ||
| Reimagined Finance | security@reimagined.fi | ||
| RenEx | security@republicprotocol.com | ||
| Sablier | External Reference | hello@sablier.finance | |
| Sandclock | security@sandclock.org | ||
| Set Protocol | security@setprotocol.com | Bug bounty | |
| Solidified | info@solidified.io | ||
| Sovryn | External Reference | Bug bounty | |
| Status.im | security@status.im | Bug bounty |
Decentralized Exchanges (DEXs)
| Name | Deployed Addresses | Contact | More info |
|---|---|---|---|
| AirSwap | Etherscan | bounty@airswap.io | |
| DDEX | Etherscan | security@ddex.io | |
| Enclaves | contact@enclaves.io | ||
| Leverj | Custodian | info@leverj.io | leverj.io |
| Orderbook | Etherscan | security@orderbook.io | Instruction |
| Synthetix | security@synthetix.io | ||
| UniSwap | contact@uniswap.io |
ERC20 Tokens
| Name | Ticker | Mainnet Address | Contact | More info |
|---|---|---|---|---|
| Aelf | ELF | Etherscan | contact@aelf.io | |
| Aeternity | AE | Etherscan | info@aeternity.com | |
| Aion | AION | Etherscan | hello@aion.network | |
| AirSwap | AST | Etherscan | bounty@airswap.io | Bug bounty |
| Ampleforth | AMPL | Etherscan | dev-support@ampleforth.org | |
| Aragon | ANT | Etherscan | security@aragon.org | Bug bounty |
| Augur | REP | Etherscan | bounty@augur.net | |
| Aurora | AOA | Etherscan | info@aurorachain.io | |
| Bancor | BNT | Etherscan | contact@bancor.network | |
| Banker Token | BNK | Etherscan | technical@bankera.com | |
| Basic Attention Token | BAT | security@brave.com | Bug bounty | |
| Bibox Token | BIX | Etherscan | ||
| Binance Coin | BNB | Etherscan | security@binance.com | Bug Bounty |
| Bloom | BLT | Etherscan | team@bloom.co | |
| Brickblock | BBK | Etherscan | security@brickblock.io | |
| Bytom | BTM | Etherscan | contact@bytom.io | |
| ChainLink | LINK | Etherscan | security@chain.link | |
| CyberMiles | CMT | Etherscan | contact@cybermiles.io | |
| Dai | DAI | Etherscan | infosec@makerdao.com | |
| Decentraland | MANA | Etherscan | hello@decentraland.org | |
| DentaCoin | DCN | Etherscan | founder@dentacoin.com | |
| DigixDAO | DGD | |||
| Dropil | DROP | Etherscan | support@dropil.com | |
| EToken Assets | security@ambisafe.com | Many tokens are issued with EToken | ||
| Dynamic Trading Rights | DTR | Etherscan | security@tokens.net | |
| FEE Token | FEE | Etherscan | info@leverj.io | |
| FunFair | FUN | Etherscan | info@funfair.io | |
| Gnosis | GNO | Etherscan | info@gnosis.pm | |
| Golem | GNT | Etherscan | contact@golem.network | |
| Holo | HOT | Etherscan | info@holo.host | |
| Hubiits | HBT | Etherscan | security@hubii.com | |
| Immutable X | IMX | Etherscan | security@immutable.com | |
| IOST | IOST | Etherscan | team@iost.io | |
| Jigstack | STAK | Etherscan | hello@jigstack.org | |
| Kin | KIN | Etherscan | ||
| KuCoin Shares | KCS | Etherscan | support@kucoin.com | |
| Kyber Network | KNC | Etherscan | hello@kyber.network | |
| Ledgerium | LGUM | Etherscan | security@ledgerium.net | |
| Leverj | LEV | Etherscan | info@leverj.io | |
| Loopring | LRC | Etherscan | bounty@loopring.org | |
| Loom Network | LOOM | Etherscan | security@loomx.io | |
| Mainframe | MFT | Etherscan | security@mainframe.com | |
| Maker | MKR | Etherscan | ||
| Melon Token | MLN | security@melonport.com | ||
| Monaco | MCO | Etherscan | contact@mco.crypto.com | |
| Mithril | MITH | Etherscan | ||
| Mixin | XIN | Etherscan | contact@mixin.one | |
| MUI Token | MUI | Etherscan | wallet@sovereignwallet.network | |
| Nahmii | NII | Etherscan | security@hubii.com | |
| Nectar | NEC | Etherscan | bounty@ethfinex.com | |
| NuCypher | NU | security@nucypher.com | ||
| Nuls | NULS | Etherscan | hi@nuls.io | |
| Numeraire | NMR | Etherscan | security@numer.ai | |
| ODEM | ODEM | Etherscan | info@odem.io | |
| OmiseGO | OMG | Etherscan | ||
| Orderbook BTC | OBTC | Etherscan | security@orderbook.io | Instructions |
| Orderbook USD | OUSD | Etherscan | security@orderbook.io | Instructions |
| Paypex | PAYX | Etherscan | contact@paypex.org | |
| POA20 Bridge | POA20 | Etherscan | security@poanetwork.com | Security page |
| PolySwarm | NCT | Etherscan | security@polyswarm.io | Security page |
| Polymath | POLY | Etherscan | support@polymath.zendesk.com | Bug bounty |
| Populous | PPT | Etherscan | info@populous.co | |
| Power Ledger | POWR | Etherscan | support@powerledger.io | |
| Pundi X | NPXS | Etherscan | contact@pundix.com | |
| QASH | QASH | Etherscan | ||
| Quantstamp | QSP | Etherscan | security@quantstamp.com | |
| RChain | RHOC | Etherscan | ||
| Ren | REN | Etherscan | ||
| Sai | SAI | Etherscan | ||
| Salt | SALT | Etherscan | salt_security@saltlending.com | |
| SelfKey | KEY | Etherscan | help@selfkey.org | |
| SpankChain | SPANK | Etherscan | security@spankchain.com | |
| Synthetix | SNX | Proxy Underlying | security@synthetix.io | |
| Synths (all flavors) | sUSD, sETH, etc | Proxy sUSD | security@synthetix.io | |
| Status | SNT | Etherscan | security@status.im | |
| Storj | STORJ | Etherscan | hello@storj.io | |
| Tellor | TRB | Etherscan | info@tellor.io | |
| TenX | PAY | Etherscan | team@tenx.tech | |
| Tether | USDT | Etherscan | security@tether.to , security@bitfinex.com | |
| TrueUSD | TUSD | Etherscan | hello@trusttoken.com | |
| USDCoin | USDC | Etherscan | usdc-security@circle.com | |
| Veritaseum | VERI | Etherscan | ||
| Waltonchain | WTC | Etherscan | info@waltonchain.org | |
| WAX | WAX | Etherscan | support@wax.io | |
| Zilliqa | ZIL | Etherscan | security@zilliqa.com |
ERC721 Tokens
| Name | Mainnet Address | Contact | More Info |
|---|---|---|---|
| CryptoKitties (CK) | Etherscan | ||
| Gods Unchained (GODS) | Etherscan | security@immutable.com |
Exchanges
| Name | Contact | More Info |
|---|---|---|
| A1 Exchange | contact@a1.exchange | |
| BCEX | business@bcex.top, service@bcex.top | |
| Bankera Exchange | technical@bankera.com | |
| Bibox | support@bibox.zendesk.com | |
| Binance | security@binance.com | Bug Bounty |
| Bitaccess | security@bitaccess.ca | Bug bounty |
| Bittrex | security-reports@bittrex.com | |
| Bit-Z | safe@bit-z.pro | |
| Bitfinex | security@bitfinex.com | |
| bitFlyer | security@bitflyer.com | |
| Bitforex | support@bitforex.com, report@bitforex.com | |
| Bitso | security@bitso.com | |
| Bitstamp | security@bitstamp.net | |
| BitMEX | support@bitmex.com | Security page |
| Blockchain | security@blockchain.com | Bug bounty |
| Coinbase | Bug bounty | |
| Coinbene | support@coinbene.com | |
| Coinbit | cs@coinbit.co.kr | |
| CoinExchange | support@coinexchange.io | |
| Coinfinity | security@coinfinity.co | Security page |
| Coinify | security@coinify.com | |
| Coinsquare | security@coinsquare.com | |
| Coinsuper | customer.support@coinsuper.com | |
| CoinSwitch | security@coinswitch.co | |
| CryptoFacilities | contact@cryptofacilities.com | |
| Digifinex | support@digifinex.com | |
| DOBI | service@dobitrade.com | |
| Ethfinex | security@ethfinex.com | |
| Exmo | admin@exmo.com | |
| EXX | support@exx.com | |
| Faa.st | security@faa.st | Bug bounty |
| Gemini Trust | security@gemini.com | |
| HitBTC | relations@hitbtc.com, legal@hitbtc.com | |
| Huobi Global | sec@huobi.com | |
| ICONOMI | security@iconomi.com | |
| IDAX | service@idax.mn | |
| Kraken | bugbounty@kraken.com | |
| Leverj | info@leverj.io | leverj.io |
| Lopeer | support@lopeer.com | lopeer.com |
| OKEx | support@okex.com, lawenforcement@okex.com | |
| Orderbook | security@orderbook.io | Instructions |
| Poloniex | poloniex-security@circle.com | |
| qTrade.io | security@qtrade.io | |
| QuadrigaCX | security@quadrigacx.com | |
| SFOX | security@sfox.com | Bug Bounty |
| ShapeShift | security@shapeshift.io | |
| SpectroCoin | technical@spectrocoin.com | Bug bounty |
| Trade.io | security@trade.io | |
| Tokens | security@tokens.net | |
| ZBG | sp@zbg.com |
Infrastructure
| Name | Contact | More Info |
|---|---|---|
| Ambisafe SaaS | security@ambisafe.com | |
| Etherscan | ||
| GasTracker | splix@gastracker.io | |
| Infura | security@infura.io | |
| PegaSys | security@pegasys.tech | For Pantheon, Orion, and Artemis: Ethereum 1.0/2.0/EEA clients |
| SafeBlocks Firewall | support@safeblocks.io | |
| Upvest | security@upvest.co | |
| QuikNode | info@quiknode.io | |
| Vyper | security@vyperlang.org | Security Policy |
Wallets
| Name | Contact | More info |
|---|---|---|
| Ambisafe CryptoWallet | security@ambisafe.com | |
| Arkane | info@arkane.network | |
| Blockchain | security@blockchain.com | Bug bounty |
| BitGo | InfoSec@bitgo.com | |
| Emerald Wallet | security@etcdevteam.com | |
| Groundhog | security@groundhog.network | |
| KeepKey | security@shapeshift.io | |
| Ledger | security@ledger.fr | Bug bounty |
| MetaMask | security@metamask.io | Bug bounty |
| MyCrypto | security@mycrypto.com | Disclosure Program |
| MyEtherWallet | security@myetherwallet.com | Bug bounty |
| Parity | bugbounty@parity.io | Bug bounty |
| SelfKey | help@selfkey.org | |
| SovereignWallet | wallet@sovereignwallet.network | |
| Trustwallet | support@trustwalletapp.com | |
| Unchained Capital | secure@unchained-capital.com | |
| Upvest | security@upvest.co |
Trail of Bits Blog Posts
The following contains blockchain-related blog posts made by Trail of Bits.
Consensus Algorithms
Research in the distributed systems area
| Date | Title | Description |
|---|---|---|
| 2021/11/11 | Motivating global stabilization | Review of Fischer, Lynch, and Paterson’s classic impossibility result and global stabilization time assumption |
| 2019/10/25 | Formal Analysis of the CBC Casper Consensus Algorithm with TLA+ | Verification of finality of the Correct By Construction (CBC) PoS consensus protocol |
| 2019/07/12 | On LibraBFT’s use of broadcasts | Liveness of LibraBFT and HotStuff algorithms |
| 2019/07/02 | State of the Art Proof-of-Work: RandomX | Summary of our audit of ASIC and GPU-resistant PoW algorithm |
| 2018/10/12 | Introduction to Verifiable Delay Functions (VDFs) | Basics of VDFs - a class of hard to compute, not parallelizable, but easily verifiable functions |
Fuzzing Compilers
Our work on the topic of fuzzing the solc compiler
| Date | Title | Description |
|---|---|---|
| 2021/03/23 | A Year in the Life of a Compiler Fuzzing Campaign | Results and features of fuzzing solc |
| 2020/06/05 | Breaking the Solidity Compiler with a Fuzzer | Our approach to fuzzing solc |
General
Security research, analyses, announcements, and write-ups
| Date | Title | Description |
|---|---|---|
| 2022/10/12 | Porting the Solana eBPF JIT compiler to ARM64 | Low-level write-up of the work done to make the Solana compiler work on ARM64 |
| 2022/06/24 | Managing risk in blockchain deployments | A summary of "Do You Really Need a Blockchain? An Operational Risk Assessment" report |
| 2022/06/21 | Are blockchains decentralized? | A summary of "Are Blockchains Decentralized? Unintended Centralities in Distributed Ledgers" report |
| 2020/08/05 | Accidentally stepping on a DeFi lego | Write-up of a vulnerability in yVault project |
| 2020/05/15 | Bug Hunting with Crytic | Description of 9 bugs found by Trail of Bits tools in public projects |
| 2019/11/13 | Announcing the Crytic $10k Research Prize | Academic research prize promoting open source work |
| 2019/10/24 | Watch Your Language: Our First Vyper Audit | Pros and cons of Vyper language and disclosure of vulnerability in the Vyper's compiler |
| 2019/08/08 | 246 Findings From our Smart Contract Audits: An Executive Summary | Publication of data aggregated from our audits. Discussion about possibility of automatic and manual detection of vulnerabilities, and usefulness of unit tests |
| 2018/11/19 | Return of the Blockchain Security Empire Hacking | |
| 2018/02/09 | Parity Technologies engages Trail of Bits | |
| 2017/11/06 | Hands on the Ethernaut CTF | First write-up on Ethernaut |
Guidance
General guidance
| Date | Title | Description |
|---|---|---|
| 2021/02/05 | Confessions of a smart contract paper reviewer | Six requirements for a good research paper |
| 2018/11/27 | 10 Rules for the Secure Use of Cryptocurrency Hardware Wallets | Recommendations for the secure use of hardware wallets. |
| 2018/10/04 | Ethereum security guidance for all | Announcement of office hours, Blockchain Security Contacts, and Awesome Ethereum Security |
| 2018/04/06 | How to prepare for a security review | Checklist for before having a security audit |
Presentations
Talks, videos, and slides
| Date | Title | Description |
|---|---|---|
| 2019/01/18 | Empire Hacking: Ethereum Edition 2 | Talks include: Anatomy of an unsafe smart contract programming language, Evaluating digital asset security fundamentals, Contract upgrade risks and recommendations, How to buidl an enterprise-grade mainnet Ethereum client, Failures in on-chain privacy, Secure micropayment protocols, Designing the Gemini dollar: a regulated, upgradeable, transparent stablecoin, Property testing with Echidna and Manticore for secure smart contracts, Simple is hard: Making your awesome security thing usable |
| 2018/11/16 | Trail of Bits @ Devcon IV Recap | Talks include: Using Manticore and Symbolic Execution to Find Smart Contract Bugs, Blockchain Autopsies, Current State of Security |
| 2017/12/22 | Videos from Ethereum-focused Empire Hacking | Talks include: A brief history of smart contract security, A CTF Field Guide for smart contracts, Automatic bug finding for the blockchain, Addressing infosec needs with blockchain technology |
Tooling
Description of our tools and their use cases
| Date | Tool | Title | Description |
|---|---|---|---|
| 2022/08/17 | Using mutants to improve Slither | Inserting random bugs into smart contracts and detecting them with various static analysis tools - to improve Slither's detectors | |
| 2022/07/28 | Shedding smart contract storage with Slither | Announcement of the slither-read-storage tool | |
| 2022/04/20 | Amarna: Static analysis for Cairo programs | Overview of Cairo footguns and announcement of the new static analysis tool | |
| 2022/03/02 | | Optimizing a smart contract fuzzer | Measuring and improving performance of Echidna (Haskell code) |
| 2021/12/16 | Detecting MISO and Opyn’s msg.value reuse vulnerability with Slither | Description of Slither's new detectors: delegatecall-loop and msg-value-loop | |
| 2021/04/02 | Solar: Context-free, interactive analysis for Solidity | Proof-of-concept static analysis framework | |
| 2020/10/23 | Efficient audits with machine learning and Slither-simil | Detect similar Solidity functions with Slither and ML | |
| 2020/08/17 | | Using Echidna to test a smart contract library | Designing and testing properties with differential fuzzing |
| 2020/07/12 | | Contract verification made easier | Re-use Echidna properties with Manticore with manticore-verifier |
| 2020/06/12 | Upgradeable contracts made safer with Crytic | 17 new Slither detectors for upgradeable contracts | |
| 2020/03/30 | | An Echidna for all Seasons | Announcement of new features in Echidna |
| 2020/03/03 | | Manticore discovers the ENS bug | Using symbolic analysis to find vulnerability in Ethereum Name Service contract |
| 2020/01/31 | | Symbolically Executing WebAssembly in Manticore | Using symbolic analysis on an artificial WASM binary |
| 2019/08/02 | Crytic: Continuous Assurance for Smart Contracts | New product that integrates static analysis with GitHub pipeline | |
| 2019/07/03 | Avoiding Smart Contract "Gridlock" with Slither | Description of a DoS vulnerability resulting from a strict equality check, and Slither's dangerous-strict-equality detector | |
| 2019/05/27 | Slither: The Leading Static Analyzer for Smart Contracts | Slither design and comparison with other static analysis tools | |
| 2018/10/19 | Slither – a Solidity static analysis framework | Introduction to Slither's API and printers | |
| 2018/09/06 | Rattle – an Ethereum EVM binary analysis framework | Turn EVM bytecode to infinite-register SSA form | |
| 2018/05/03 | | State Machine Testing with Echidna | Example use case of Echidna's Haskell API |
| 2018/03/23 | Use our suite of Ethereum security tools | Overview of our tools and documents: Not So Smart Contracts, Slither, Echidna, Manticore, EVM Opcode Database, Ethersplay, IDA-EVM, Rattle | |
| 2018/03/09 | | Echidna, a smart fuzzer for Ethereum | First release and introduction to Echidna |
| 2017/04/27 | | Manticore: Symbolic execution for humans | First release and introduction to Manticore (not adopted for EVM yet) |
Upgradeability
Our work related to contracts upgradeability
| Date | Title | Description |
|---|---|---|
| 2020/12/16 | Breaking Aave Upgradeability | Description of Delegatecall Proxy vulnerability in formally-verified Aave contracts |
| 2020/10/30 | Good idea, bad design: How the Diamond standard falls short | Audit of Diamond standard's implementation |
| 2018/10/29 | How contract migration works | Alternative to upgradability mechanism - moving data to a new contract |
| 2018/09/05 | Contract upgrade anti-patterns | Discussion of risks and recommendations for Data Separation and Delegatecall Proxy patterns. Disclosure of vulnerability in Zeppelin Proxy contract. |
Zero-Knowledge
Our work in Zero-Knowledge Proofs space
| Date | Title | Description |
|---|---|---|
| 2022/04/18 | The Frozen Heart vulnerability in PlonK | |
| 2022/04/15 | The Frozen Heart vulnerability in Bulletproofs | |
| 2022/04/14 | The Frozen Heart vulnerability in Girault’s proof of knowledge | |
| 2022/04/13 | Coordinated disclosure of vulnerabilities affecting Girault, Bulletproofs, and PlonK | Introducing new "Frozen Heart" class of vulnerabilities |
| 2021/12/21 | Disclosing Shamir’s Secret Sharing vulnerabilities and announcing ZKDocs | |
| 2021/02/19 | Serving up zero-knowledge proofs | Fiat-Shamir transformation explained |
| 2020/12/14 | Reverie: An optimized zero-knowledge proof system | Rust implementation of the MPC-in-the-head proof system |
| 2020/05/21 | Reinventing Vulnerability Disclosure using Zero-knowledge Proofs | Announcement of DARPA sponsored work on ZK proofs of exploitability |
| 2019/10/04 | Multi-Party Computation on Machine Learning | Implementation of 3-party computation protocol for perceptron and support vector machine (SVM) algorithms |